Christmas Tree Brownies
These rich and crazy but scrumptiously happy Christmas Tree Brownies are a deliciously chocolate deviation from traditionally decorated sugar cookies.
Servings 16 tree brownies
Calories 358kcal
Ingredients
Brownies
- 1 cup unsalted sweet cream butter, softened
- 2 cups sugar
- 3 large eggs, lightly beaten and at room temperature
- 2 teaspoons vanilla
- 2/3 cup unsweetened Hershey's cocoa powder
- 1 cup all-purpose flour
- 1/2 teaspoon salt
- 1/2 teaspoon baking soda
- 1 cup chopped walnuts, optional
Royal Icing
- 3 large egg whites at room temperature
- 2 cups powdered sugar
- 1 teaspoon vanilla
- 1/2 teaspoon cream of tartar
- black/green food coloring
Instructions
Brownies:
- Preheat oven to 350 degrees.
- Spray 9x13 with non-stick cooking spray and set aside.
- In a small mixing bowl whisk together cocoa, flour, salt, and baking soda. Set aside
- Using a medium saucepan, melt butter. Remove from heat and stir in the sugar, eggs, and vanilla.
- Gradually whisk in flour mixture into cocoa just until incorporated.
- Stir in chopped walnuts.
- Place the batter in the prepared baking pan and bake until a toothpick inserted in the center comes out with a few moist crumbs, about 30-35 minutes.
- Place pan on wire baking rack, and cool completely.
- When brownies are completely cool use a tree-shaped cookie cutter to cut brownies. Place cut brownies on a cookie sheet.
Make the Royal Icing:
- In the bowl of a stand-up mixture, combine egg whites, cream of tartar, powdered sugar, and vanilla, mix on medium speed until stiff peaks form.
- Divide the icing into two small mixing bowls.
- To one bowl, add a couple of drops of green food coloring and stir until the color is even. Continue to add food coloring until the desired color is achieved.
- On the second bowl, add a couple of drops of black food coloring and stir until the desired color is achieved.
- Pour a small amount of each icing into its own piping bag.
- Thin the remaining green icing with a little water (around 2 tablespoons) and mix until combined. It should be thin enough to spread easily but not runny.
- Into a squeeze bottle pour the icing that has been thinned.
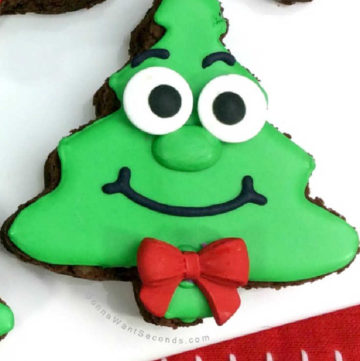
Decorations:
- Using the green icing in the piping bag, add a line around the edge of the trees.
- In the outlined area use the squeeze bottle to fill in.
- One-third of the way place two edible eyes.
- On the trunk of the tree add the red bow into the icing and allow it to dry.
- Using the icing from the piping bag, pipe an oval-shaped nose under the eyes and fil in.
- Using the black icing in the piping bag, pipe on a smile and eyebrows.
- Allow completed cookies to set, one hour.
Nutrition
Serving: 1brownie | Calories: 358kcal | Carbohydrates: 49g | Protein: 4g | Fat: 18g | Saturated Fat: 8g | Cholesterol: 61mg | Sodium: 131mg | Potassium: 135mg | Fiber: 2g | Sugar: 40g | Vitamin A: 399IU | Vitamin C: 1mg | Calcium: 21mg | Iron: 1mg