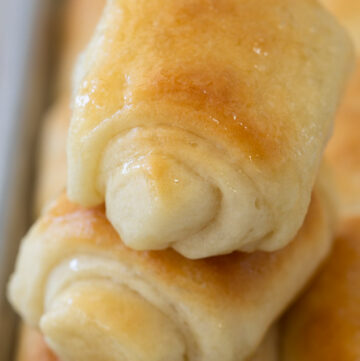
Lion House Rolls
These lion house rolls are tender, soft, and lusciously buttery. They just may be the BEST homemade dinner rolls and they're always a family favorite!
Servings 30 rolls
Calories 114kcal
Ingredients
- 2 cups warm water-between 105-110°F
- 2/3 cup instant nonfat dry milk
- 2 tablespoons dry yeast
- 1/4 cup sugar
- 3 1/2 teaspoons salt
- 1/3 cup butter plus more for brushing on the rolls butter, softened
- 1 large egg
- 5-6 cups all-purpose flour
Instructions
- In the bowl of a stand-up electric mixer, add the warm water (2 cups) and dry milk powder (2/3 cup) and whisk until the milk powder dissolves. Check the temp of the water, and wait until it's between 105-110°F (if it's less, microwave, and whisk. If it's more, wait until it drops to this temp). Stir in yeast (2 tablespoons) and 1 tablespoon of the sugar and mix. Allow the mixture to proof for about 7-8 minutes.
- Add the rest of the sugar, butter (1/3 cup), egg (1), salt (3 1/2 teaspoon), and 2 cups of flour. Turn the mixer on low and allow all the dry ingredients to moisten, then turn the mixer up to medium and mix for 2 minutes. Add 3 more cups of flour and turn the mixer on low and allow all the dry ingredients to moisten, then turn the mixer up to medium and mix for 2 minutes. The dough will begin to come together at this point and become stiff.
- Add more flour as needed, 1/4 cup at a time, until the dough climbs up the dough hook and separates from the side of the bowl. You know the dough has enough flour when the dough is soft, supple, elastic, and just slightly tacky to the touch. If it's sticky as opposed to tacky, it needs more flour.
- In a large clean mixing bowl, coat the inside with 1 tablespoon of vegetable oil and gather the dough into a ball, turn it in the oiled bowl to coat, and loosely cover it with plastic wrap. Set in a draft-free warm place and allow it to rise until it doubles in size. Mine took about 1 hour.
- Sprinkle a work surface with flour. Divide the dough in half. Roll out half the dough into an 11x14 inch rectangle, about a 1/4 inch thick. Brush the rolls generously with about 1/4 cup melted butter. Using a knife or pizza cutter, cut the dough in half down the length, I use my hand to measure (see video for visual!), the crease of my thumb to the tip of my index finger is roughly 3 1/2-4". Then cut the dough into smaller rectangles. Again, I use my hand to measure this as well, the length of my thumb is about 2". The rectangles should be about 2x4 inches.
- Working one rectangle at a time (again, watch the video for reference), gently tug the dough to slightly stretch it, then hold one edge of the dough and flip the rest of the dough over onto itself. If easier, you can just roll the dough into a cylinder.
- Place rolls on a parchment paper-lined baking sheet, with about 1 inch spacing around each side of the roll. Cover the baking sheet with a towel and allow it to rise again in a draft-free warm place until they have doubled in size. Mine took about 1 1/2 hours.
- Meanwhile, preheat an oven to 375°F. Brush the rolls generously with 1/4 cup melted butter, then bake in a preheated oven, 18-20 minutes or until they are baked through and nicely golden. Brush again with butter when they're hot from the oven. Serve
Notes
- Instant Nonfat Dry Milk: This is a great way to get milk's creaminess without the excess liquid! Baking with powdered milk will open your eyes to a whole new world of creamy flavors.
- Yeast: For this recipe, make sure you get regular active dry yeast, NOT instant yeast! We let this dough rise on its own, so no need for instant yeast.
- I used Fleischmann’s Active Dry Yeast from the jar. You can also use 2 of the little envelopes. If you measure out the quantity from the two envelopes, you’ll have slightly less than the 2 tablespoons, but it will work.
- If you only have Instant yeast on hand, you can use it, but cut down the amount to 1 1/2 tablespoons.
- Flour: You might think that since we're making bread, we should use bread flour, right? Wrong! All-purpose flour is what you want for this recipe -- bread flour has a higher protein content, which will throw off the final result of your rolls.
- Butter: In most baking recipes I use unsalted butter. I was told by a chef, a long time ago, that unsalted butter has a higher fat content than regular salted butter.
- The higher fat content generally serves me well in baking. In this recipe, however, I greatly prefer the flavor that the regular salted butter adds.
- The butter is added in many layers. First as a solid in the dough, then it’s melted and brushed on at different stages while making the rolls.
- Using salted butter flavors each of those layers with just the right amount of salt. When adding the butter to the dough, it’s very important to only use softened room temperature butter. The softened butter incorporates more smoothly and evenly into the dough
- Timing: Here’s your basic schedule:
- Mix your ingredients. (5 minutes plus 7–8 minute wait time to proof the yeast)
- Allow the dough to rise. (About 1–1 1/2 hours depending on warmth and humidity)
- Roll, cut, allow to rise a second time. (10 minutes plus 1–1 1/2 hours for the second rise)
- Bake. (15-20 minutes)
- How to Roll Lion House Rolls: The classic rolls made at the Lion House Pantry restaurant are rolled as big, generous rectangles. This is how I make mine at home and how I’ve written it up in my instructions. If you prefer, you can roll these out as crescents. Here are the modified instructions for the crescent rolls:
- After the dough has risen and doubled the first time, divide it into three equal size balls.
- Cover the balls with a clean kitchen towel until they are rolled.
- Roll each ball out into a 12-inch circle and cut into 12 wedges.
- Roll each slice, starting with the large end and finishing with the small end forming a crescent.
- Place on a well-greased baking sheet and continue with my instructions at #6.
- Spacing: The spacing and placement on the baking sheet are important if you want your rolls to look like the ones from the Lion House Pantry restaurant. They spaced theirs with 1 inch between rows. That way, when the dough rises and doubles, they bump into each other and raise a little more vertical.
- Mixer: I make them using my Kitchen Aide stand-up electric mixer. It does all of the “hard work,” so to say. While there’s no kneading required in this recipe, there is quite a lot of heavy-duty stirring. As more flour is incorporated into the dough, the dough gets pretty stiff.
- I use the Kitchen Aide flat blade to mix the dough through the first addition of the 2 cups of flour. Then I switch to my Kitchen Aide dough hook.
- I like to use the flat blade because it seems to be far more efficient at incorporating the butter into the dough.
- I like to use the dough hook because I think it works better with the dough as it gets stiff. I’m sure you can simplify this and use just one attachment!
- How much flour should I use? When making a yeast dough, the amount of flour actually used in a recipe is greatly affected by moisture content in the air, air temperature, and many other things.
- The amount used can vary greatly. Because of this, the recipe gives an average range of what you will use. I live on the coast where there is a lot of moisture in the air, so generally speaking, I use a greater amount of flour than most.
- Do not add all the flour at once! After I’ve added the initial 5 cups of flour, I add more flour, as needed, in 1/4 cup increments, then mix it until it’s incorporated.
- Then I decide if any more flour is needed. Remember, you can always add more flour, but you can’t take any out. Too much flour is the main reason homemade rolls can come out too dry.
- Right Texture: You know the dough has enough flour when the dough is soft, supple, elastic, and just slightly tacky to the touch. If it’s sticky as opposed to tacky, it needs more flour.
- When the dough is sticky, some of it comes off on your hands. Tacky feel more like how the adhesive on the back of a sticky note feels.
Nutrition
Serving: 1roll | Calories: 114kcal | Carbohydrates: 19g | Protein: 3g | Fat: 2g | Saturated Fat: 1g | Cholesterol: 6mg | Sodium: 236mg | Potassium: 78mg | Fiber: 1g | Sugar: 3g | Vitamin A: 160IU | Vitamin C: 1mg | Calcium: 41mg | Iron: 1mg