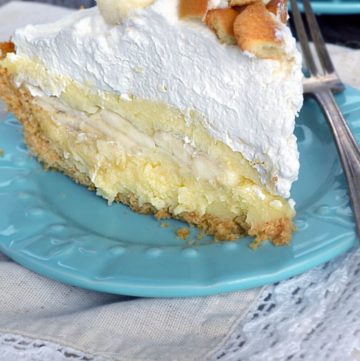
Banana Cream Pie
Banana Cream Pie made with a homemade custard, lots of fresh sliced bananas, a crunchy Nilla wafer cookie crust, topped off with fluffy whipped cream!
Servings 8 servings
Calories 786kcal
Ingredients
Crust:
- 2 1/2 cups coarsely crushed vanilla wafers
- 1/4 cup sugar
- 1/2 cup butter melted
Filling:
- 1/2 cup plus 2 tablespoons sugar
- 1/4 cup cornstarch
- 1/8 teaspoon salt
- 5 large egg yolks lightly beaten
- 1 1/2 cups whole milk
- 1 cup heavy cream
- 2 teaspoons vanilla
- 2 tablespoons unsalted butter
- 1 teaspoon (or more to taste) brandy
- 2 bananas firm, but ripe
Topping:
- 2 cups heavy cream
- 3 tablespoons powdered sugar
- 1/2 teaspoon vanilla
Instructions
Make the Crust:
- Preheat oven 350ºF (177ºC).
- In a medium mixing bowl, combine the vanilla wafer crumbs (2 1/2 cups) and sugar (1/4 cup). Add the butter (1/2 cup) and mix well. Press firmly onto the bottom and up the sides of a 9-inch pie plate. Bake for 10 to 12 minutes or until golden brown. Remove from oven, and cool completely before adding filling (about 1 hour).
Make the Filling:
- In a medium, heavy-bottomed saucepan, combine sugar (1/2 cup plus 2 tablespoons), cornstarch (1/4 cup), and salt (1/8 teaspoon). Whisk in egg yolks (5), Gradually add milk (1 1/2 cups) and cream (1 cup). Cook over medium heat, bringing to a gentle boil, whisking constantly until mixture thickens 8-10 minutes. Continue to gently simmer for 1 minute, lowering heat as necessary, and stirring constantly. Remove from heat. Whisk in vanilla (2 teaspoons), butter (2 tablespoons), and brandy (1 teaspoon).
- Pour the filling into a bowl. Place plastic wrap directly on the surface of the filling to prevent a skin from forming. Cool for about 30 minutes or until the filling is warm but no longer hot.
- Pour half of the warm filling into the cooled crust. Peel and slice the bananas into 1/2-inch slices and layer on top of the filling. Pour the remainder of the filling over sliced bananas. Place a clean sheet of plastic wrap directly on the top surface of the filling. Refrigerate pie until completely chilled, at least 3 hours.
Make the Topping:
- Whip the heavy cream (2 cups) in a chilled bowl until soft peaks form. Add powdered sugar (3 tablespoons) and vanilla (1/2 teaspoon); continue to whip until peaks are just stiff. Spread whipped cream over the topping and shape decoratively into a mound. Refrigerate until ready to serve.
Notes
- Crust: A lot of pies use homemade flaky pastry crust — but I love how easy crumb crust is to prepare! No rolling or floured counter mess. Plus, it tastes like cookies, so it’s a double win! I use vanilla wafers but is also absolutely delicious with either a rolled pastry crust or a graham cracker crumb crust as well. I use a measuring cup to help press the cookie crumb mixture into the pie plate.
- Another alternative for the crust, that I occasionally make, is a crumb crust made with half Nilla wafers and half graham crackers. I follow the recipe I’ve given you below and but instead of using all Nilla wafers, I use 1 1/4 cup crushed graham crackers with 1 1/4 cup crushed Nilla wafers.
- One thing that may go without saying for most people, but I, of course, had to find out the hard way, is all Nilla Wafers are not created equal. My favorite are the ones made by Nabisco (I’m not being paid or compensated to say this).
- If you’re short on time, or just want a quicker version of this recipe, you can simplify things by using a store-bought graham cracker crust or a boxed pastry crust.
- Pastry Crust: Because this is essentially a no bake pie, if you decide you’d prefer a flakey pastry crust, you’ll need to blind bake the pie dough. Fit the crust in the pie plate and pierce it all over with a fork. Brush interior with an egg yolk. Be sure to line the crust with parchment paper and use pie weights of dried beans to keep the crust in the pie plate and not puffing up too much.
- Custard: You must cook your custard to 212 degrees, which is just around the boiling stage. The egg yolks have a starch-digesting enzyme called alpha-amylase. In order for a successful gelling of starch, it has to be cooked at that temperature, or your custard will be nothing but liquid.
- Transferring: After the custard has been prepared on the stovetop, it needs to cool down a bit. So, the first thing you do is pour the filling into a shallow bowl. Cook’s Illustrated suggests using a second pie plate instead of a bowl. I love this idea. It’s obviously the perfect size. It’s shallow depth and fairly wide diameter help the filling cool more rapidly than a smaller standard mixing bowl would allow.
- Cover: It’s important that you press your plastic wrap directly to the surface of your custard so a skin doesn’t form while it cools. If a skin forms, you’ll either have to strain the filling or endure lumps in your finished pie. Yuck!
- Cooling: Don’t assemble the custard and bananas while the custard is hot or the pie can have a heavier, denser overall texture. You want every element to stay separate until you eat it!
- Bananas: This recipe is best made with firm, just-ripe bananas. They hold up in the pie better than very ripe bananas and they keep their nice bright color longer.
- Many recipes suggest refrigerating the pie overnight after the layers of custard and banana have been assembled in the crust. I like the idea of the custard setting up in the fridge overnight, but I don’t like how the bananas look after doing so. There’s just no way I know of to keep them looking fresh and just sliced.
- Brushing the sliced bananas with citrus juice. I think that’s a great idea for some recipes, but personally, I don’t like the taste it adds to this custard.
- Another suggestion is to make sure the sliced bananas are completely covered with the second layer of custard. This eliminates air coming into direct contact with the bananas. If you go this route, I suggest you also gently press on the top of the second layer of custard with a spatula to make sure the custard gets down into all the little crevices between the pieces of banana.
- Another trick to help fill any of those small voids and settle the filling into them is to place a dish towel on your countertop and gently tap the pie plate down a few times on the towel.
- Topping: I like a nice thick layer of whipped cream on this pie, so I start with 2 cups of heavy cream.
- To make the best whipped cream I can, I like to put my metal mixing bowl and the beaters from my mixer in the freezer 10-15 minutes before I make the whipped cream. I keep the heavy cream in the fridge until I’m ready to pour it in the mixing bowl. You can use a hand mixer or a stand mixer.
- I like a nice thick layer of whipped cream on this pie! I prefer using powdered sugar in my whipped cream so it dissolves easily.
- I generally make my whipped cream in my stand up mixer. I keep the speed on medium, not on high, so I don’t accidentally overbeat the cream. I shoot for peaks that are just stiff. If you go beyond that point, your whipped cream becomes stiff and grainy. If you go any further the milk solids will separate and bits of the fat in the heavy cream will solidify.
Nutrition
Serving: 1/8 of the recipe | Calories: 786kcal | Carbohydrates: 62g | Protein: 7g | Fat: 58g | Saturated Fat: 34g | Cholesterol: 281mg | Sodium: 336mg | Potassium: 273mg | Sugar: 39g | Vitamin A: 2000IU | Vitamin C: 3mg | Calcium: 128mg