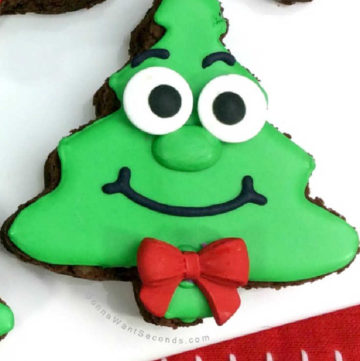
Christmas Tree Brownies
These rich and crazy but scrumptiously happy Christmas Tree Brownies are a deliciously chocolate deviation from traditionally decorated sugar cookies.
Servings 16 tree brownies
Calories 358kcal
Ingredients
Brownies
- 1 cup unsalted sweet cream butter, softened
- 2 cups sugar
- 3 large eggs, lightly beaten and at room temperature
- 2 teaspoons vanilla
- 2/3 cup unsweetened Hershey's cocoa powder
- 1 cup all-purpose flour
- 1/2 teaspoon salt
- 1/2 teaspoon baking soda
- 1 cup chopped walnuts, optional
Royal Icing
- 3 large egg whites at room temperature
- 2 cups powdered sugar
- 1 teaspoon vanilla
- 1/2 teaspoon cream of tartar
- black/green food coloring
Instructions
Brownies:
- Preheat oven to 350ºF (177ºC).
- Spray 9x13 with non-stick cooking spray and set aside.
- In a small mixing bowl whisk together cocoa (2/3 cup), flour (1 cup), salt (1/2 teaspoon), and baking soda (1/2 teaspoon). Set aside.
- Using a medium saucepan, melt butter (1 cup). Remove from heat and stir in the sugar (2 cups), eggs (3), and vanilla (2 teaspoons).
- Gradually whisk in flour mixture into cocoa just until incorporated.
- Stir in chopped walnuts (1 cup).
- Place the batter in the prepared baking pan and bake until a toothpick inserted in the center comes out with a few moist crumbs, about 30-35 minutes.
- Place pan on wire baking rack, and cool completely.
- When brownies are completely cool use a tree-shaped cookie cutter to cut brownies. Place cut brownies on a cookie sheet.
Make the Royal Icing:
- In the bowl of a stand-up mixture, combine egg whites (3), cream of tartar (1/2 teaspoon), powdered sugar (2 cups), and vanilla (1 teaspoon), and mix on medium speed until stiff peaks form.
- Divide the icing into two small mixing bowls.
- To one bowl, add a couple of drops of green food coloring and stir until the color is even. Continue to add food coloring until the desired color is achieved.
- In the second bowl, add a couple of drops of black food coloring and stir until the desired color is achieved.
- Pour a small amount of each icing into its own piping bag.
- Thin the remaining green icing with a little water (around 2 tablespoons) and mix until combined. It should be thin enough to spread easily but not runny.
- Into a squeeze bottle pour the icing that has been thinned.
Decorations:
- Using the green icing in the piping bag, add a line around the edge of the trees.
- In the outlined area use the squeeze bottle to fill in.
- One-third of the way place two edible eyes.
- On the trunk of the tree add the red bow into the icing and allow it to dry.
- Using the icing from the piping bag, pipe an oval-shaped nose under the eyes and fil in.
- Using the black icing in the piping bag, pipe on a smile and eyebrows.
- Allow completed cookies to set, one hour.
Notes
- Icing: If you want to simplify this recipe or if you want the preparation easier for kids to make, skip the royal icing and use a tub of pre-made vanilla frosting tinted green with gel food coloring or food coloring.
- I like vibrant green so I use gel food coloring for more intense color hues. Start with 3 to 4 drops and then keep adding until you get the color you want.
- If you need an extra set of hands to fill the piping bag, just set the empty bag in a tall slim glass. Fold the corners down over the edges and fill ‘er up! Best trick ever!
- Temperature: You’ll want your butter and eggs are at room temperature before you get started. Believe it or not, the temperature of your starting ingredients directly affects the texture of your baked goods.
- Butter: Melting the butter first will help give us the ideal consistency as long as the batter isn’t overmixed. Melting the butter first will produce a dense, sturdy chunk of chocolate since you’ll eliminate the extra air that’s usually incorporated from the butter/sugar creaming process.
- Batter: Since you’re mixing these by hand, you’ll want to make sure you lightly beat the eggs before incorporating them into the batter. This little extra step will help make sure the whites and yolks get incorporated more evenly.
- Once you start adding the dry ingredients, be sure to mix only until you can’t see the flour anymore. We want a dense but not tough brownie.
Nutrition
Serving: 1brownie | Calories: 358kcal | Carbohydrates: 49g | Protein: 4g | Fat: 18g | Saturated Fat: 8g | Cholesterol: 61mg | Sodium: 131mg | Potassium: 135mg | Fiber: 2g | Sugar: 40g | Vitamin A: 399IU | Vitamin C: 1mg | Calcium: 21mg | Iron: 1mg