This post may contain affiliate links. Please read our disclosure policy.

✨ Before You Start
✨ Use a true metal pan.
For the best texture and clean cuts, bake these in a light or medium-colored metal pan. Glass or ceramic can overbrown the edges before the center sets.
✨ Know your oven personality.
Every oven runs differently. This batter is thick and fudgy, so start checking around 22–25 minutes and use visual cues and a toothpick instead of relying only on the clock.
✨ Cool completely before cutting.
It’s tempting to rush, but cold brownies slice into neat triangles. Give them at least an hour (or chill briefly) before you grab the template and knife.
✨ Get the frosting consistency right.
You want frosting that’s soft enough to pipe in smooth zigzags, but firm enough to hold its “branch” shape. A teaspoon or two of extra cream or powdered sugar can make all the difference.
✨ Set up a decorating station.
Lay your brownie trees out on parchment, fill your piping bag, and set sprinkles in small bowls. It’s less messy, more fun, and makes these feel like a little holiday project instead of a chore.
Christmas Tree Brownies Ingredients + Key Notes
This is just a quick glance at what you’ll need. For exact measurements and the full ingredient list, head down to the recipe card below.
Brownies
-
Unsalted butter – Melting the butter instead of creaming it with sugar gives these brownies their fudgy, almost truffle-like texture. Butter carries cocoa flavor beautifully and helps create a shiny, crackly top when whisked with sugar.
-
Granulated sugar – There’s quite a bit here, and that’s intentional. Sugar sweetens, of course, but it also helps keep the crumb moist and tender and contributes to that glossy crust.
-
Unsweetened cocoa powder (Dutch-process recommended) – Dutch-process cocoa is smoother and less acidic, which gives these brownies a deep, mellow chocolate flavor and darker color. Natural cocoa will work in a pinch, but the flavor and color will be slightly different.
-
Eggs + extra egg yolk – The whole eggs provide structure and moisture; the extra yolk adds extra richness and fat, helping the brownies stay luscious and fudgy without turning cakey.
-
Vanilla extract – Adds warmth and rounds out the cocoa. You’ll miss it if it’s not there, especially in a cocoa-based brownie.
-
All-purpose flour – Just enough to hold the brownies together without making them tough. Too much flour would push them toward a cakier texture, which we don’t want here.
-
Cornstarch – A little baking trick borrowed from boxed brownie mixes. Cornstarch softens the crumb, tamps down gluten, and gives the brownies that slightly “velvety” bite.
-
Salt – Essential in chocolate desserts. It sharpens the cocoa flavor and keeps the sweetness from feeling flat or cloying.
-
Baking soda – Only ¼ teaspoon, but it gives a tiny lift so your brownies don’t bake up dense like fudge. That bit of structure is helpful when you’re cutting and stacking pieces.
-
Chocolate chips or chunks (optional) – Fold these in if you want pockets of melty chocolate in every bite. For ultra-clean tree shapes, mini chips or finely chopped chocolate are easier to slice through than big chunks.
Frosting
-
Unsalted butter, softened – The base of your buttercream. Softened (not melted) butter whips with air, giving you a fluffy frosting that still holds its shape for piping.
-
Powdered sugar, sifted – Sweetens and thickens the frosting. Sifting eliminates lumps so it pipes smoothly and doesn’t clog your decorating tip.
-
Vanilla extract – Adds that classic bakery frosting flavor and keeps the sweetness from tasting one-note.
-
Heavy cream or milk – Thins the frosting to a pipeable consistency. Cream gives a richer mouthfeel; milk works fine if that’s what you have.
-
Salt – Just a pinch balances the sweetness and makes the frosting taste more complex and “grown-up.”
-
Green gel food coloring – Gel coloring is concentrated, so you can get a vibrant tree green without watering down your frosting. Start with a drop or two and build from there.
-
White frosting (optional) – Either a bit of your buttercream left untinted or canned white frosting to create snowy tips when you pipe two colors together.
Decorations
-
Star sprinkles – Pop one at the top of each tree for that picture-perfect Christmas cookie moment.
-
Round or disc sprinkles – These look just like little Christmas lights when scattered over the frosted branches.
-
Pretzel sticks or candy canes (optional) – Pressed into the base of the triangle, they make adorable tree trunks. If you prefer a cleaner look, you can skip them altogether.

🔬 The Brownie Science
This recipe leans hard into sugar + cocoa + fat to give you that classic bakery brownie texture with a few simple tricks:
-
Warm sugar method: Whisking sugar and cocoa into warm melted butter helps dissolve some of the sugar crystals. That creates a smoother batter, promotes that shiny, papery top, and encourages a fudgy rather than cakey structure.
-
Eggs and yolks: Eggs are your structure builders—proteins in the whites set as they bake, holding everything together. The additional yolk adds fat and emulsifiers so the batter stays rich and unified instead of dry or crumbly.
-
Cornstarch + limited flour: A small amount of cornstarch “dilutes” the gluten in the flour. You get enough structure to slice neat triangles, but not so much that the brownies turn bready or cake-like.
-
Internal temp over timer: Sugar lowers the freezing/setting point of water, so sugary batters can still look soft when they’re actually done. That’s why an internal temp around 190–200°F and a toothpick with moist crumbs (not wet batter) are more reliable than the timer alone.
Knowing this makes it easier to relax—once you understand what the batter is doing in the oven, you’re not guessing, you’re just checking for confirmation.
How to Make Christmas Tree Brownies
Here’s a quick look at how to assemble these easy Christmas Tree Brownies (full instructions in the recipe card below).
You’ll start by lining a metal 8×8 or 9×9 pan with parchment and preheating your oven to 350°F (177ºC). Whisk together your dry ingredients in one bowl, then melt the butter in a saucepan and stir in the sugar and cocoa until smooth and glossy. Once that mixture has cooled a bit, whisk in the eggs, extra yolk, and vanilla, then gently fold in the dry ingredients (and chocolate chips if you’re using them) just until there are no streaks of flour.
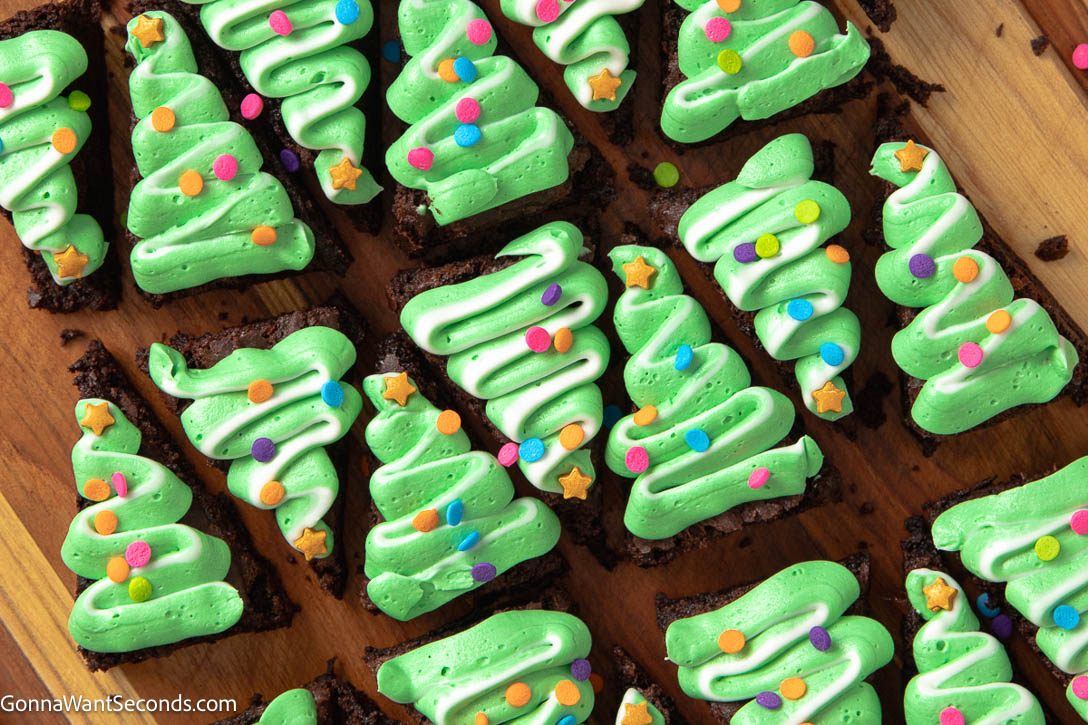
Spread the thick batter into your pan, tap it a few times to pop any big air bubbles, and bake until the top looks set and a toothpick in the center comes out with a few moist crumbs. Let the brownies cool completely, then lift the slab out of the pan, level if needed, and use your template to cut them into neat tree-shaped triangles. While they rest, whip up a small batch of buttercream, tint it a pretty tree green, and adjust the consistency until it pipes smoothly. Then pipe zigzags of frosting from the top to the base of each tree, sprinkle on “lights,” add a star at the top, and you’ve got the cutest little holiday brownies ready for your dessert tray.

⭐ Pro Tips for the Best Christmas Tree Brownies
⭐ Don’t overmix once the flour goes in.
That thick, shiny batter is tempting to fuss with, but the more you stir after adding flour, the more gluten develops—and that means tougher brownies. Fold gently just until the dry ingredients disappear and walk away.
⭐ Use the thermometer as your safety net.
If you’ve ever cut into underbaked brownies (especially in a thick 8×8 pan), you know the heartbreak. Aim for an internal temp around 190–200°F in the center. Once you hit that—and the toothpick shows moist crumbs—you’re golden.
⭐ Chill before cutting.
If you want razor-sharp tree shapes, pop the cooled brownies into the fridge for 30–45 minutes before slicing. A long, sharp knife and gentle sawing motion will give you bakery-worthy triangles with minimal crumbling.
⭐ Adjust frosting in tiny amounts.
It’s much easier to fix frosting by adding 1 teaspoon of cream or 1 tablespoon of powdered sugar at a time than to swing wildly between too runny and too stiff. Stop as soon as your frosting pipes smooth ribbons that hold their shape.
⭐ Set up a decorating “assembly line.”
Pipe a row of trees, then go back and add stars and lights while the frosting is still soft. This keeps everything moving, and it’s such a fun, low-stress way to get kids or guests involved in the decorating.
Storing + Reheating + Freezing + Make-Ahead Tips
Storing
- Once the frosting has had a chance to set, store the Christmas Tree Brownies in a single layer in an airtight container. If you need to stack them, slip a sheet of parchment or wax paper between layers so the decorations don’t smudge. They’ll keep at room temperature for 2–3 days, or in the fridge for up to 5 days (just know refrigeration will firm up the brownie and frosting slightly).
Reheating
- Brownies are delicious at room temperature, but if you like a slightly warm brownie, you can microwave individual pieces for 5–10 seconds—just enough to take the chill off without melting the frosting.
- For a larger platter that’s been refrigerated, let the brownies sit at room temperature for about 30 minutes before serving so the texture softens again. If you ever warm a larger portion in the oven, transfer to an oven-safe pan, cover loosely with foil, and warm at 300–325°F for just a few minutes; avoid putting a cold glass or ceramic dish straight into a hot oven to prevent thermal shock.
Freezing
- You have two options:
-
Freeze the brownie slab (undecorated):
Bake and cool completely, then wrap the whole slab tightly in plastic wrap and then foil. Freeze for up to 2 months. Thaw overnight in the fridge, bring to room temp, then cut and decorate. -
Freeze decorated brownies:
Arrange decorated trees on a baking sheet, freeze until solid, then transfer to an airtight container with parchment between layers. Freeze up to 1 month. Thaw in the fridge or at cool room temperature; the frosting may soften slightly but should still look pretty.
-
Make-Ahead
-
1–2 days ahead: Bake, cool, and cut the brownies into trees, then store them in an airtight container at room temperature. You can also make the frosting and refrigerate it; just bring it back to room temp and rewhip before piping.
-
Day of serving: Pipe the frosting and add decorations. This keeps the colors bright and the frosting fresh while taking most of the work off your plate on party day.
Food Safety
- If you’d like more info on food safety, check out this link.
What to Serve With Christmas Tree Brownies
These Christmas Tree Brownies are made for a festive dessert spread or a cozy holiday gathering. Here are some delicious ways to round out the menu:
Fresh + Crisp Sides
Balance all that chocolatey richness with something fresh and bright. A big bowl of Creamy Fruit Salad, Strawberry Spinach Salad, or 1905 Salad looks gorgeous on the table and gives everyone something lighter to enjoy alongside their sweets.
Cozy Holiday Mains
If you’re serving these as part of a larger holiday meal, pair them with crowd-pleasing comfort food. Think cozy favorites like Chicken Tetrazzini, Johnny Marzetti Casserole, or Pork Tenderloin in Pear Cream Sauce—they’re all hearty, make-ahead friendly, and perfect for feeding a group before dessert comes out.
Sweet Finishes & Sips
Make your dessert table extra special by pairing these brownies with a few more holiday treats. Try a plate of Italian Wedding Cookies, Haystacks, Chocolate Crinkle Cookies, or Chocolate Christmas Cookies, and don’t forget a Keoke Coffee or a big pot of homemade Crockpot Hot Chocolate for sipping while everyone decorates (and eats!) their trees.

✦ Frequently Asked Questions
✦ How do I know when the brownies are done?
Look for a set, matte top and a center that no longer looks glossy or jiggly. A toothpick inserted into the center should come out with a few moist, fudgy crumbs but not wet batter. If you like using an instant-read thermometer, the center should read about 188–195°F (87-90ºC). Every oven is different, so go by texture and crumbs instead of the clock—don’t wait for the brownies to pull dramatically from the sides of the pan, or they’ll likely be overbaked.
✦ Can I use a 9×9 pan instead of 8×8?
Yes, a 9×9 metal pan works fine—the brownies will be slightly thinner and may bake a bit faster. Start checking for doneness around 22–25 minutes, and rely on the visual cues and toothpick test rather than the full time range.
✦ Do I have to use Dutch-process cocoa?
Dutch-process cocoa is recommended because it gives a deeper color and smoother, less acidic chocolate flavor, which is lovely here. If you only have natural cocoa, you can still make the recipe; just know the flavor will be a touch sharper and the color a bit lighter. Keep all the other ingredients the same.
✦ Can I make these Christmas Tree Brownies ahead of time?
Absolutely. You can bake and cut the brownies 1–2 days in advance, then store them in an airtight container at room temp. Frost and decorate them the day you plan to serve for the freshest look, or decorate fully and refrigerate if needed. They also freeze well undecorated if you want to get even further ahead.
✦ What if my brownies sink a little in the middle?
A slight dip usually means the center was a bit underbaked or your oven runs cooler than you think—but it’s not a dealbreaker at all for this recipe. Once the brownies are cool, you can gently level the top with a serrated knife before cutting, and the frosting will cover any imperfections. No one will ever know.
Still have questions? Drop them in the comments — I love helping you cook with confidence! 💗
More Brownie Recipes
- Brookies
- Brownie Cookies
- Caramel Brownies
- Cookie Dough Brownies
- Lemon Brownies
- Red Velvet Oreo Brownies
- Blondies
- Triple Chocolate Brownies
- Bourbon Brownies with Double Frosting
- Easy Brownie Bark
- German Chocolate Brownies
Tried This Recipe?
💌 And while you’re here, don’t miss the next cozy recipe — subscribe to my totally FREE newsletter so you’ll always have comfort food favorites at your fingertips. 💌
If you enjoyed this recipe, please take a moment to leave ⭐️⭐️⭐️⭐️⭐️ star rating and a quick comment — I love hearing from you and it helps our community of bakers and cooks!
📸 And if you Gram…don’t forget to share your photo on Instagram — tag me @gonnawantseconds so I can cheer you on and share your creations!
Thanks for stopping by my kitchen today — happy cooking, friends! 💗 Kathleen
Christmas Tree Brownies
Ingredients
- 3/4 cup unsalted butter
- 1 1/2 cups granulated sugar
- 3/4 cup unsweetened cocoa powder Dutch-process recommended
- 2 large eggs room temperature
- 1 extra egg yolk room temperature
- 1 tablespoon vanilla extract
- 1 cup all-purpose flour
- 1 teaspoon cornstarch
- 1/2 teaspoon salt
- 1/4 teaspoon baking soda
- 3/4 cup semi-sweet chocolate chips or chunks optional
Frosting Ingredients
- 1/2 cup unsalted butter softened
- 1 1/2 cups powdered sugar sifted
- 1 teaspoon pure vanilla extract
- 1-2 tablespoons heavy cream or milk as needed
- pinch of salt
- green gel food coloring I used 3 drops of AmeriColor Leaf Green
- 1/4 cup pure white canned frosting for snowy accent
Instructions
- Prep the pan and oven: Preheat your oven to 350°F (175°C). Line an 8x8-inch metal pan (for thicker brownies) or a 9x9-inch metal pan (for slightly thinner brownies) with parchment paper, leaving an overhang on two sides to lift the brownies out easily. For the smoothest edges, cut the parchment slightly narrower than the pan so it doesn’t wrinkle in the corners, and use a tiny dab of water or oil under the parchment to help it stay put.
- Mix the dry ingredients: In a medium bowl, whisk together the flour (1 cup), cornstarch (1 teaspoon), salt (1/2 teaspoon), and baking soda (1/4 teaspoon) until everything is well combined and there are no streaks. Set this bowl aside while you make the chocolate base.
- Make the chocolate base: In a medium saucepan, melt the butter (3/4 cup) over medium-low heat. Remove the pan from the heat and immediately whisk in the sugar (1 1/2 cups) and cocoa powder (3/4 cup) until the mixture is smooth and glossy. Let it cool for about 5 minutes, until the pan feels warm but not hot to the touch, so the eggs don’t scramble when you add them.
- Finish the brownie batter: Whisk the eggs (2), extra egg yolk (1), and vanilla (1 tablespoon) into the cooled chocolate mixture, giving it a few vigorous strokes to create a shiny, smooth batter. Switch to a spatula and gently fold in the dry ingredients just until no dry flour streaks remain. If you’re using chocolate chips or chunks (3/4 cup), fold them in at the very end so you don’t overmix the batter.
- Bake the brownies: Spread the batter evenly into the prepared pan and tap the pan lightly on the counter a few times to release any large air bubbles. Bake for 25–35 minutes, starting to check around 22 minutes (especially if using a 9x9 pan), until the top looks set and a toothpick inserted into the center comes out with just a few moist crumbs (not wet batter). If you like using an instant-read thermometer, the center should register about 190–200°F (88–93°C) when the brownies are done.
- Cool, level (if needed), and cut into trees: Let the brownies cool completely in the pan on a wire rack, at least 1 hour. Use the parchment overhang to lift the slab carefully out of the pan. If the center sunk a bit, don’t worry—since you’re decorating these, you can gently level the top with a long serrated knife just like you would a cake. Use your Christmas tree triangle template to cut the brownies into tree shapes: lay the template over the brownies or mark the edges where the lines would fall, then slice into long strips and cut each strip into triangles. Save any scraps for brownie parfaits, ice cream sundaes, or hot chocolate toppings.
- Make the frosting: In a large bowl, beat the softened butter (1/2 cup) with a hand mixer or stand mixer on medium speed until creamy and pale, about 2–3 minutes. Gradually add the powdered sugar (1 1/2 cups), about 1/2 cup at a time, mixing on low until each addition is incorporated so you don’t get a sugar cloud. Once all the sugar is in, add the vanilla (1 teaspoon), a pinch of salt (if using), and 1/2 tablespoon of cream or milk. Beat on medium until the frosting is smooth and fluffy. Add the green gel food coloring a drop at a time until you reach your desired tree green.
- Adjust frosting consistency and (optional) two-tone effect: If the frosting feels too stiff to pipe, beat in additional cream or milk, a teaspoon at a time, just until it pipes smoothly and holds soft peaks. If it feels too soft and won’t hold its shape, beat in extra powdered sugar, 1 tablespoon at a time. For a snow-tipped effect, tint the main frosting green and leave a small portion white (or use canned white frosting), then spread each color in a long line on its own piece of plastic wrap, roll each into a log, twist the ends, and tuck both rolls side by side into a piping bag fitted with an elongated oval tip (like Wilton #44 or #104).
- Decorate the Christmas tree brownies: Arrange the brownie triangles on a parchment-lined baking sheet or serving board. Holding the piping bag at the “top” of each tree, pipe a zigzag pattern of frosting from the tip to the base so it looks like layered branches. While the frosting is still soft, press a star-shaped sprinkle at the top of each tree and add round or disc sprinkles to mimic Christmas lights. If you’d like trunks, gently press a pretzel stick or straight candy cane piece into the base of each tree. Let the frosting set slightly, then serve and enjoy.
Fans Also Made:


Notes
- Don’t overmix once the flour goes in.
That thick, shiny batter is tempting to fuss with, but the more you stir after adding flour, the more gluten develops—and that means tougher brownies. Fold gently just until the dry ingredients disappear and walk away. - Use the thermometer as your safety net.
If you’ve ever cut into underbaked brownies (especially in a thick 8×8 pan), you know the heartbreak. Aim for an internal temp around 190–200°F in the center. Once you hit that—and the toothpick shows moist crumbs—you’re golden. - Chill before cutting.
If you want razor-sharp tree shapes, pop the cooled brownies into the fridge for 30–45 minutes before slicing. A long, sharp knife and gentle sawing motion will give you bakery-worthy triangles with minimal crumbling. - Adjust frosting in tiny amounts.
It’s much easier to fix frosting by adding 1 teaspoon of cream or 1 tablespoon of powdered sugar at a time than to swing wildly between too runny and too stiff. Stop as soon as your frosting pipes smooth ribbons that hold their shape. - Set up a decorating “assembly line.”
Pipe a row of trees, then go back and add stars and lights while the frosting is still soft. This keeps everything moving, and it’s such a fun, low-stress way to get kids or guests involved in the decorating.

My kids will definitely love to help me decorate these brownies! Thank you for your recipe! 🙂
Thank you, Jackie! Enjoy this with your kids!!