This post may contain affiliate links. Please read our disclosure policy.
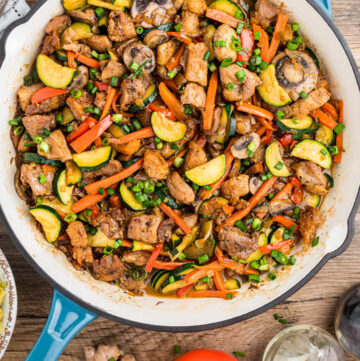
This Hibachi Chicken brings that sizzling steakhouse experience straight to your kitchen — no flat-top grill, no reservations, no special equipment. You get juicy, deeply seared chicken, tender-crisp vegetables, and a glossy garlic-ginger soy glaze that tastes exactly like hibachi night out… minus the bill.
What makes this version really work is the method. Cooking the vegetables first keeps them crisp instead of soggy, searing the chicken in batches builds real hibachi flavor (not steamed chicken), and finishing with butter and soy gives you that restaurant-style shine. If you love bold, takeout-style dinners like Mongolian Chicken, Easy Beef Chow Mein, or PF Chang’s Lettuce Wraps, this recipe fits right into that crave-worthy rotation. And if you’re looking for even more easy meal ideas for busy nights, be sure to browse my full Chicken Dinner Recipes for more family-friendly favorites
Hibachi night at home just got a whole lot easier — and better. This hibachi chicken is fast enough for weeknights, bold enough for company, and completely doable in a regular skillet — no hibachi grill required.

✨ Before You Begin
✨ Use a large 12-inch skillet or wide sauté pan so the chicken can sear properly.
✨ Cut the chicken into even 1-inch pieces for consistent cooking.
✨ Prep all sauces before heating the pan — hibachi cooking moves quickly.
✨ Plan to cook the chicken in batches. This is the key to real flavor.
Hibachi Chicken Ingredients + Key Notes
Chicken
-
Boneless, skinless chicken thighs – Juicier and more forgiving than breasts under high heat.
-
Kosher salt + black pepper – Simple seasoning lets the glaze shine.
-
Neutral oil – Canola or vegetable oil works best for high heat.
Hibachi Glaze
-
Low-sodium soy sauce – Prevents the sauce from getting overly salty once reduced.
-
Light brown sugar – Adds balance and helps create that glossy finish.
-
Garlic (2 Tbsp, yes really!) – Hibachi flavor is bold and garlicky by design.
-
Fresh ginger – Bright, aromatic heat that keeps the sauce lively.
-
Rice vinegar – Adds acidity to cut the richness.
-
Toasted sesame oil – Always added off heat to preserve its aroma.
Hibachi Finish
-
Butter + soy sauce – This is where the signature restaurant sheen comes from.
Hibachi Vegetables
-
Carrot, onion, bell pepper, mushrooms, zucchini – Classic steakhouse mix with varied textures.
-
Butter + soy sauce – Season and enrich the vegetables right at the end.
Benihana-Style Mustard Sauce
-
Light mayo – Creamy without feeling heavy.
-
Dijon, soy sauce, rice vinegar – Tangy, savory, and slightly sharp — exactly what you expect at hibachi.

⭐ Pro Tips
⭐ Don’t crowd the pan
If the chicken overlaps, it will steam instead of sear. Cooking in smaller batches creates that signature hibachi flavor.
⭐ Sesame oil is a finisher
Adding sesame oil off heat keeps it fragrant and nutty instead of bitter.
⭐ Keep the glaze silky
If the sauce tightens too much, a splash of water brings it right back to glossy.
⭐ Tested for batch cooking
This method has been tested to keep the chicken juicy even when cooking multiple batches.
🥣 How to Make (Skillet Hibachi Method)

Here’s a quick look at how to make this Benihana copycat hibachi chicken — full instructions are in the recipe card below.
Make the sauces first.
Stir together all hibachi glaze ingredients except the sesame oil and set aside. Mix the mustard sauce and refrigerate until ready to serve — it improves as it chills.
Cook the vegetables first.
Heat a large skillet over medium-high until very hot. Add oil and cook the vegetables in stages so everything stays tender-crisp: carrots first, then onion, bell pepper, mushrooms, and finally zucchini. During the last minute, season with soy sauce, salt, and pepper, then finish with butter. Transfer vegetables to a plate.
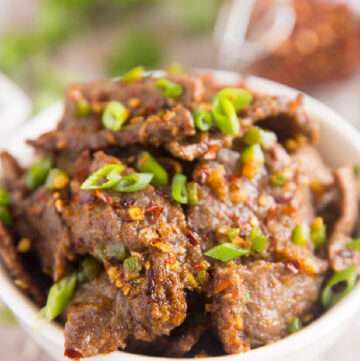
Sear the chicken in batches.
Add oil to the hot skillet and spread the chicken in a single layer. Let it sit undisturbed to brown before stirring. Cook until mostly done, then remove to a plate and repeat as needed. Golden chicken beats rushed chicken every time.
Glaze the chicken.
Return all chicken to the skillet and pour in the hibachi glaze. Let it bubble until glossy and coating the chicken. If it thickens too fast, add a tablespoon or two of water to keep it saucy, not sticky.
Hibachi finish.
Lower the heat, add butter and soy sauce, and toss until melted and shiny. Turn off the heat and stir in the toasted sesame oil.
Bring it together.
Add the vegetables back just to warm through. Serve over rice with mustard sauce (and Yum Yum Sauce if you like) and a sprinkle of green onions.

🍚 What to Serve With Hibachi Chicken
Classic Bases
-
Steamed white rice or garlic butter rice
-
Fried rice for a full hibachi spread
Fresh + Crisp Sides
-
Asian Coleslaw
-
Cucumber Tomato Salad
Extra Sauces
-
Yum Yum Sauce
-
Extra mustard sauce (always a good idea)

✦ Frequently Asked Questions
✦ Can I make hibachi chicken at home without a grill?
Yes — a wide skillet over high heat gives you the same seared flavor and glossy sauce without special equipment.
✦ Can I use chicken breasts instead of thighs?
Yes, but slice them evenly and watch closely. Breasts cook faster and can dry out more easily.
✦ How do I store leftovers?
Store in an airtight container in the fridge for up to 3 days.
✦ Can I make this gluten-free?
Absolutely. Use gluten-free soy sauce or tamari.
✦ Why didn’t my chicken brown well?
The pan likely wasn’t hot enough, or it was overcrowded. High heat and space are essential for hibachi-style searing.
Still have questions? Drop them in the comments — I love helping you bake + cook with confidence! 💗
More Restaurant-Style Dinners You’ll Love
-
Honey Walnut Shrimp — Crispy, sweet, and restaurant-fancy (but totally doable at home).
-
Slow Cooker Mongolian Beef — Same takeout flavor profile, hands-off and weeknight-easy.
-
Shrimp Lo Mein — Slurpable noodles + saucy shrimp for an easy “better than takeout” dinner.
-
Dragon Noodles — Spicy, glossy noodles that hit the same craveable Asian comfort note.
-
Sheet Pan Cashew Chicken — Big takeout flavor with the easiest cleanup (one pan!).
-
Asian Green Beans — That steakhouse-style side you’ll want with everything (and it pairs perfectly here).
-
Empress Chicken — Sweet, sticky, crispy-edged chicken that feels like a true takeout treat.
Tried This Recipe?
💌 And while you’re here, don’t miss the next cozy recipe — subscribe to my totally FREE newsletter so you’ll always have comfort food favorites at your fingertips. 💌
If you enjoyed this recipe, please take a moment to leave ⭐️⭐️⭐️⭐️⭐️ star rating and a quick comment — I love hearing from you and it helps our community of bakers and cooks!
📸 And if you Gram… don’t forget to share your photo on Instagram — tag me @gonnawantseconds so I can cheer you on and share your creations!
Thanks for stopping by my kitchen today — happy cooking, friends! 💗 Kathleen
Hibachi Chicken
Ingredients
Chicken
- 2 pounds boneless skinless chicken thighs, cut into 1-inch pieces
- 1 teaspoon kosher salt
- 1/2 teaspoon black pepper
- 2 tablespoons neutral oil plus more if needed (canola/vegetable), divided +
Hibachi Glaze
- 6 tablespoons low-sodium soy sauce
- 2 1/2 tablespoons light brown sugar
- 1/4 cup water
- 2 tablespoons finely minced garlic yes—amount is correct
- 1 tablespoon freshly peeled + grated ginger
- 2 teaspoons rice vinegar
- 1/2 teaspoon toasted sesame oil added at the end only
Hibachi Finish
- 4 tablespoons unsalted butter
- 2 tablespoons soy sauce
Hibachi Vegetables (tender-crisp timing)
- 1 tablespoon neutral oil
- 1 tablespoon butter
- 1 carrot thinly sliced
- 1 medium yellow onion chopped
- 1 red bell pepper cut into 1-inch pieces
- 8 ounces mushrooms halved/sliced
- 2 zucchini sliced into half-moons
- 1 tablespoon soy sauce
- salt + pepper to taste
Benihana-Style Mustard Sauce
- 1/2 cup light mayo
- 1 tablespoon soy sauce
- 1 tablespoon rice vinegar
- 1 tablespoon Dijon mustard
- For serving: Rice or fried rice, sliced green onions
Instructions
- Make sauces first. Stir together all Hibachi Glaze ingredients except the sesame oil. Mix the mustard sauce and refrigerate until serving.
- Cook veggies first (they stay in the skillet). Heat a large skillet over medium-high until very hot. Add 1 Tbsp oil. Cook in this order for crisp-tender: Heat a large skillet over medium-high until very hot. Add 1 tablespoon oil. Add the vegetables in this order, stir-frying and keeping everything in the pan as you go: add carrots and cook 2 minutes, add onion and cook 2 minutes, add bell pepper and cook 2 minutes, add mushrooms and cook 2 minutes, then add zucchini and cook 2–3 minutes more. During the last minute, stir in soy sauce and season with salt and pepper; finish with butter, then transfer to a plate.
- Sear the chicken (Cook in 2-3 batches, as needed don’t crowd).NOTE: {The number of batches you need to cook will depend on the amount of flat surface in your pan. For good hibachi chicken, it's very important to sear, and not steam the chicken} Add 1 tablespoon oil to the hot skillet. Add chicken in a single layer (cook in 2 batches). Let it sit 2–3 minutes undisturbed to brown, then stir and cook until mostly done. Removed cooked chicken to a separate plate while searing the next batch
- Glaze. Reduce heat to medium-high. Add all the seared chicken back to the skillet. Pour in the hibachi glaze and toss. Let it bubble 1–3 minutes until glossy and coating the chicken. Pro safety move: if it starts looking too thick, add 1–2 Tbsp water and toss—this keeps it saucy, not sticky.
- Hibachi finish (butter + soy gloss). Lower heat to medium. Add butter + soy sauce and toss until it melts into a shiny glaze. Turn off heat and stir in ½ tsp toasted sesame oil.
- Add veggies back + serve. Add vegetables back to the skillet just to warm through. Serve over rice with mustard sauce on the side and green onions.


Notes
- Don’t crowd the pan. If the chicken overlaps, it will steam instead of sear. Cooking in smaller batches creates that signature hibachi flavor.
- Sesame oil is a finisher. Adding sesame oil off heat keeps it fragrant and nutty instead of bitter.
- Keep the glaze silky. If the sauce tightens too much, a splash of water brings it right back to glossy.
- Tested for batch cooking. This method has been tested to keep the chicken juicy even when cooking multiple batches.
Nutrition

Leave a Reply