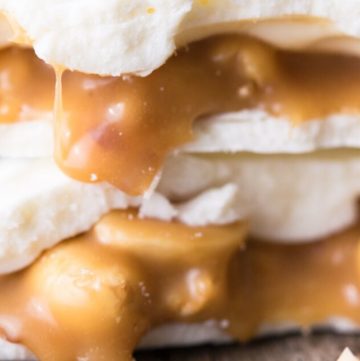
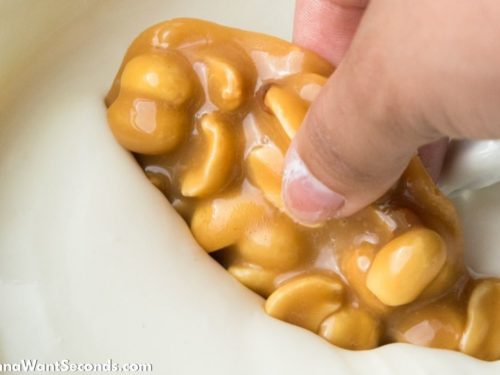
Every Christmas cookie tray needs a candy to balance out the crunch and crumble — like my polar bear paws recipe! These delicious candies are just like the ones you can buy from See’s candy. They combine a fabulous combination of sweet and salty and ooey-gooey! The caramel center is absolutely to die for!!
Though it seems impossible, not everyone goes for cookies during the holidays, so I love having a mix of candies to pick from too- fudge, peanut butter fudge, microwave fudge, you name it. And these turtle-like treats are such a crowd-pleaser that they are always on my yearly Christmas cookies rotation!
Easy on the budget, easy on the chef, and downright decadent to eat, this polar bear paw recipe brings peanuts and caramel into a smooth white chocolate CandiQuick shell.
Let’s make some candy!

What I Love About This Polar Bear Paws Recipe
Aside from getting to have homemade candy at the ready? I love everything about this polar bear paw recipe!
- Sweet + salty perfection
- Ooey gooey caramel center
- Crunchy peanut YUM
- Easy to make
- No-bake!

Polar Bear Paws Recipe Notes
Also known as polar bear feet or polar bear paw print, these treats are most famous in the version you find at the well known See’s Candies. I always love getting to peek behind the curtain of famous goodies and I promise, this recipe nails that iconic crisp shell and gooey center!
- White Chocolate: This recipe uses CandiQuick, not white chocolate — and for good reason! White chocolate needs extra attention when being melted to prevent scalding. Using CandiQuick adds to the ease of making these decadent candies.
- Nuts: Don’t feel limited by peanuts! This recipe is also delicious with pecans, cashews, almonds — you could even go crazy and try Brazil nuts! Though you might want to chop those big boys first.
- Chocolate: The white chocolate coating is just as versatile as the nuts — go for milk CandiQuick or dark to shake up your polar bear prints in tasty ways! If you go for CandiQuick, you’ll have a much more forgiving coating to work with, and not have to worry about consistent temperature or tempering as you would with full chocolate.

Storing + Freezing + Make-Ahead
- How To Store: Like many candies, this recipe will be just fine hanging out at your holiday party at room temperature. You should not, however, store your candy out in the open indefinitely.
- The key to storing caramel-type candies is moisture is the enemy. Too much, too little; caramel requires a delicate balance. I recommend individually wrapping your truffles in wax or parchment paper and storing them in a Ziploc bag. At room temperature, your candies will last for up to three weeks.
- Can You Freeze This? Yes! If you want to get the most life out of your polar bear paws candy, pop them in the freezer! Polar bear paws candy will last up to six months frozen. But do be sure to thaw your candies before you eat them! Your teeth will thank you.
- Make Ahead Tips Christmas cooking can be utter madness — so anything that can be done to save time, I’ll do it! For this recipe, I’ve often made the filling ahead of time and frozen it, then waited to do the coating until my baking schedule opens up. Follow the recipe through Step 4, and you’ll be ahead of the game!

How To Make Polar Bear Paws
- Line a baking cookie sheet with waxed paper. Set aside.
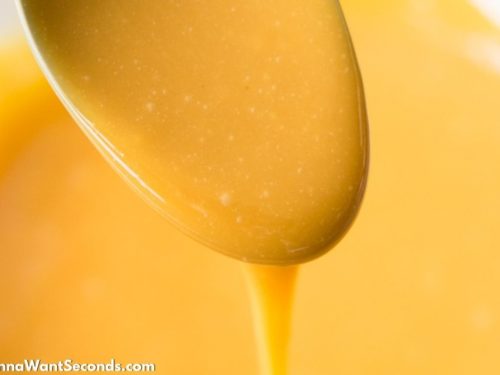
- In a microwave-safe bowl, melt caramels, butter, and cream, using 30-second intervals and stirring vigorously after each interval, until the mixture is smooth.
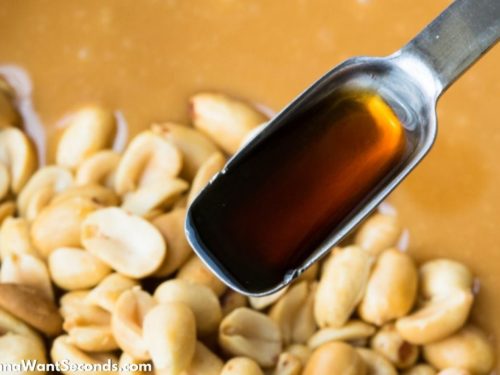
- Add vanilla and peanuts and allow the mixture to cool, stirring occasionally, for about 15 minutes.
- Spoon a generous Tablespoon sized drop of caramel and peanut mixture unto prepared baking sheet, about 2 inches apart. Place in freezer for 5-10 minutes or until the caramel cluster are firm.
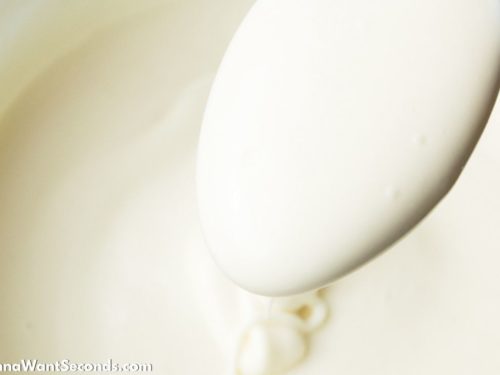
- In a microwave-safe bowl, melt the candy coating per the package instructions.
- Using a fork, dip the caramel clusters in the melted candy coating, covering the cluster completely. Allow excess chocolate to drip off into the bowl, then return the cluster to the baking sheet and continue with the rest of the clusters.
- Place in the fridge to allow the coating to set. They’re ready to package up or star on your holiday cookie tray!
More Christmas Goodies Recipes
- Italian Christmas Cookies
- Spritz Cookies
- Vanillekipferl
- Christmas Sugar Cookies
- Christmas Butter Cookies
- Christmas Crack
- Almond Crescent Cookies
- Cream Cheese Spritz Cookies
- Butter Pecan Cookies
- Christmas Sugar Cookies
- Chewy Double Ginger Cookies
- Brown Sugar Shortbread
- Whipped Shortbread Cookies
- Danish Wedding Cookies
- Christmas Chex Mix
- Pfeffernusse (German Spice Cookies!)
TRIED THIS RECIPE?
Leave a review, I love hearing your feedback! ⭐⭐⭐⭐⭐
Polar Bear Paws
Ingredients
- 1 (11-ounce) bag Kraft caramel squares, unwrapped
- 3 tablespoons heavy cream
- 1 tablespoon unsalted butter
- 1 teaspoon vanilla
- 1 cup unsalted peanuts
- 1 (16-ounce) package white chocolate CandiQuik
Instructions
- Line a baking cookie sheet with waxed paper. Set aside.
- In a microwave-safe bowl, melt caramels, butter, and cream, using 30-second intervals and stirring vigorously after each interval, until the mixture is smooth.

- Add vanilla and peanuts and allow the mixture to cool, stirring occasionally, for about 15 minutes.
- Spoon a generous Tablespoon sized drop of caramel and peanut mixture unto prepared baking sheet, about 2 inches apart. Place in freezer for 5-10 minutes or until the caramel cluster are firm.
- In a microwave-safe bowl, melt the candy coating per the package instructions.
- Using a fork, dip the caramel clusters in the melted candy coating, covering the cluster completely. Allow excess chocolate to drip off into the bowl, then return the cluster to the baking sheet and continue with the rest of the clusters.
- Place in the fridge to allow the coating to set. They're ready to package up or star on your holiday cookie tray!


Nutrition

Made these with my daughter and they are awesome!! She had the best time dipping and of course she had to put sprinkles on them:) they were delicious too!!
Hey Andrianne! So glad you made these with your daughter and you guys enjoyed them <3