
This post may contain affiliate links. Please read our disclosure policy.
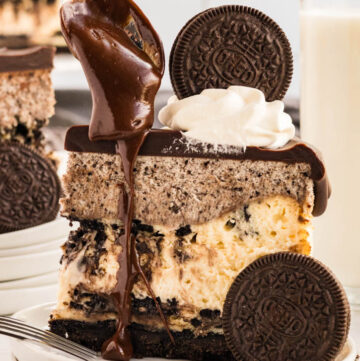
If you love Oreo desserts, this Cookies and Cream Cheesecake is pure dessert perfection — a buttery Oreo cookie crust, ultra-creamy cheesecake packed with sandwich cookies, a light cookies-and-cream mousse, and a glossy dark chocolate ganache on top. It’s layered with flavor and texture — buttery cookie crust, silky cheesecake, mousse as light as a cloud, and that shiny dark chocolate finish. Every forkful is balanced, rich, and just the right amount of sweet.
I’ve tested this recipe carefully so it’s reader-friendly and foolproof — from a high-heat start that gives your cheesecake lift (without cracks) to a mousse layer that sets beautifully in the fridge. And don’t worry: I’ve included a few extra notes to help you succeed even if your oven runs hot or you only have a 9-inch pan.
💗 Craving more showstopping desserts? Try my berry chantilly cake, banana pudding cake, and Lawry’s banana coconut cream pie!
Now, let’s make this dreamy cheesecake step-by-step — you’ll be surprised how easy it comes together!

✨ Before You Begin
✨ Springform size: This recipe is written for an 8-inch springform pan, which makes a tall cheesecake. A 9-inch pan works too — the cake will just be a bit shorter, and you may want to reduce the low-temperature bake by about 5 minutes.
✨ Oven temp caution: The recipe starts at 450°F for 5 minutes. If your oven runs hot, drop it to 425°F so the edges don’t overbrown.
✨ Patience is key: This cake has multiple chill times. For the best mousse texture, let it set overnight if you can.
✨ Ganache pour: Make sure the ganache is pourable but not hot (about body temperature) before spreading on top — this prevents melting the mousse layer.
✨ Cookies: Regular chocolate sandwich cookies work great here, but don’t skimp — you’ll need the cream filling intact for the crust!
✨ Room-temperature dairy: Always start with soft cream cheese for a lump-free batter.
✨ Line the pan for easy release: Lightly spray your springform pan, line the bottom with parchment, then spray again — this guarantees clean slices.
✨ Chill between layers: Cool the cheesecake fully before adding the mousse, and again after decorating — those chill steps create clean, bakery-style layers.
✨ Use good-quality chocolate: Guittard white chocolate melts beautifully and adds depth to the mousse, while real semi-sweet chips make a rich, glossy ganache.
✨ Plan ahead: This dessert needs at least 8 hours of total chill time, so it’s ideal to make the day before serving.

Cookies and Cream Cheesecake Ingredients + Key Notes
This isn’t the full list — you’ll find all measurements in the recipe card below. These are just the key ingredients that need a little extra explanation so your cheesecake turns out perfect
- Chocolate sandwich cookies: You’ll use these three ways — for the crust, baked into the cheesecake, and folded into the mousse. Regular Oreos give the best flavor balance; Double Stuf makes it sweeter and heavier.
- Cream cheese: Always bring it to room temperature so your batter blends smooth and lump-free.
- White chocolate chips: I recommend Guittard for the mousse because they melt silky-smooth, but a finely chopped bar works too.
- Gelatin: A small amount stabilizes the mousse so it sets firmly under ganache without weeping.
- Heavy cream: Divided between mousse, ganache, and topping. Use heavy whipping cream (36–40% fat) for structure and richness.
How Do You Know The Cheesecake is Done?
You’ll know your cheesecake is baked just right when the edges are set and the center still has a gentle wobble about 2–3 inches wide. Give the pan a light shake — the center should jiggle softly like Jell-O, not ripple or slosh.
Don’t overbake waiting for the middle to firm up; it will finish setting as it cools. That little bit of jiggle is the secret to a silky, creamy texture every single time. Once it passes the jiggle test, it’s time to cool it slowly for that smooth, crack-free finish.
Cheesecake Science
Cheesecake behaves more like a custard than a cake — which means temperature control is everything.
Low and slow mixing prevents air bubbles, so your cheesecake stays dense, creamy, and velvety.
High-then-low baking (450°F → 250°F) helps the edges set quickly while the center cooks gently.
Slow cooling prevents rapid contraction, which is the #1 reason cheesecakes crack.
Flour in the batter gives structure, reducing the risk of curdling or graininess.
Room-temperature dairy blends smoothly and prevents lumps.
Cookie layering inside creates distinct strata without interrupting the custard set.
Master these principles, and every cheesecake becomes foolproof.

⭐ Pro Tips for Perfect Cookies and Cream Cheesecake
⭐ Let dairy come to room temperature. Bring cream cheese and eggs to cool-room temp (about 68–72°F) before mixing. Cold cream cheese traps lumps and air, which leads to uneven texture.
⭐ Mix low and slow. Beat on low speed and stop as soon as each egg disappears. Overmixing whips in air and can cause cracks.
⭐ Tap out air bubbles. After filling your pan, tap it firmly on the counter 4–5 times to pop any hidden air pockets.
⭐ Bake on the middle rack. This ensures even heat so the top doesn’t brown before the center sets.
⭐ Start with high heat. Bake at 450°F for 5 minutes (or 425°F if your oven runs hot), then drop to 250°F without opening the door for that velvety, even texture.
⭐ Cool gradually. Follow the cool-down stages: 15 minutes in a cracked oven → 1 hour on the counter → chill completely. This slow cool prevents cracking.
⭐ Fold mousse gently. Make sure the white chocolate base is cool to the touch before folding in whipped cream — warm chocolate will deflate your mousse.
⭐ Use the right butter ratio. The higher butter amount (4 Tbsp) ensures your no-bake crust slices clean and firm, without crumbling.
⭐ Pour ganache at the right temperature. It should be pourable but not hot — about body temperature. If it feels warm on your finger, wait 5 minutes and stir again.
⭐ Cut clean slices. Use a long knife warmed under hot water, wiping between cuts. Chill the cheesecake 15 minutes before slicing for bakery-style edges.
⭐ Adjust for pan size. Using a 9-inch springform? It works perfectly — just expect a slightly shorter cake and reduce the 250°F bake by about 5 minutes.
⭐ Plan for make-ahead magic. Cheesecake tastes even better the next day! An overnight chill gives the mousse time to stabilize and makes every slice picture-perfect.
🥣 How to Make Cookies and Cream Cheesecake

This cheesecake comes together in three simple parts — the crust, the filling, and the toppings — but each step is easy once you know the rhythm.
Start with the crust: crush chocolate sandwich cookies (filling and all!) into fine crumbs, stir in melted butter, and press the mixture firmly into your springform pan. Chill it while you make the batter.
For the cheesecake layer, beat room-temperature cream cheese with sugar, flour, and vanilla until smooth. Add eggs one at a time, mixing slowly — gentle mixing keeps it creamy, not airy. Pour some of the batter over the crust, layer in whole cookies, then cover with the rest of the batter.
Bake briefly at high heat, then finish low and slow until the edges are set and the center still has that little jiggle. Cool it completely before adding the mousse — that’s what keeps your layers distinct.
The cookies-and-cream mousse and glossy ganache come next: whip, fold, pour, and chill. Once the ganache is set, add a ring of whipped cream swirls and a few cookies for garnish.
That’s it — rich, creamy, bakery-beautiful perfection made right in your own kitchen.
Frequently Asked Questions
Can I Use White Chocolate Bars Instead of Chips?
Yes—finely chop high-quality bars. They melt smoother than some chips (which can have stabilizers).
Can I Use a 9-Inch Springform Pan?
Yes. The cheesecake will be a bit shorter; reduce the 250°F portion of the bake by ~5 minutes and begin checking the jiggle early.
Do I Need a Water Bath?
Nope! The lower baking temperature and gradual cooling give you that creamy texture without cracks.
Can I Use Reduced-Fat Cream Cheese?
It’s best to stick with full-fat — the mousse and cheesecake need that richness and structure to hold their shape.
Can I Skip the Gelatin in the Mousse?
I don’t recommend it. The gelatin is what gives the mousse its light, sliceable structure and helps it hold up beautifully under the ganache. Without it, the layer will be much softer, and the ganache may press down or cause the mousse to ooze slightly when sliced. For best results — and that bakery-perfect finish — include the gelatin and allow the cheesecake to chill fully before assembling.
What if I Don’t Have a Food Processor?
Place cookies in a heavy zip-top bag and crush them with a rolling pin until fine crumbs form.
How Far Ahead Should I Remove Cheesecake from the Fridge?
For the best texture, slice the cheesecake while it’s cold, then let slices rest at room temperature for 5–10 minutes before serving. The flavors and creaminess develop beautifully as it warms just slightly.
Can I Decorate it the Day Before?
Yes! Add the mousse, ganache, and whipped cream swirls up to a day ahead. Let the ganache firm up uncovered for about 30 minutes, then cover loosely with plastic wrap or a cake dome overnight. It’ll look picture-perfect the next day.

What to Serve With Cookies and Cream Cheesecake
Something Warm to Sip
A rich dessert like this cheesecake pairs beautifully with a cozy beverage. Serve each slice alongside a steaming mug of tea or a cup of freshly brewed coffee. Earl Grey, vanilla black tea, or a smooth medium roast coffee all balance the sweetness perfectly and make every bite taste even more indulgent.
Sweet Finishes
Round out your dessert table with Brownie Bites, Possum Pie, or Sugar Cream Pie — all GWS reader favorites!
Make-Ahead Plan + Strategy
Planning ahead makes this dessert effortless for holidays and special occasions — here’s exactly how to break it into manageable steps.
Day 1:
-
Make the crust and cheesecake layer.
-
Bake, cool, and refrigerate overnight until fully chilled. This allows the texture to set and the flavors to deepen.
Day 2:
-
Prepare and add the Cookies and Cream Mousse. Chill for at least 2 hours (or overnight) until the mousse is firm and airy.
-
Add the ganache and decorations once the mousse is completely set.
Serving Day:
-
Chill the finished cheesecake for at least 1 hour after decorating so the ganache firms up and the layers stabilize.
-
Slice cold for clean edges, then let the slices rest 5–10 minutes before serving for the creamiest texture.
💡 Pro Tip: If you’re entertaining, assemble the cheesecake completely the day before and refrigerate overnight. It holds perfectly and slices beautifully when served cold.
Storing + Freezing Cookies and Cream Cheesecake
Storing
- Cheesecake will stay fresh and creamy for up to 4 days refrigerated or 1 month frozen if wrapped well.
Freezing
- Freeze slices: chill until firm, wrap in plastic + foil, and freeze up to 1 month. Thaw overnight in the fridge. For whole cakes, freeze uncovered to set, then wrap.
Food Safety
- If you’d like more info on food safety, check out this link.
More Showstopping Cakes
- Orange Cake
- Hummingbird Cake
- Strawberry Cake
- Strawberry Shortcake Cake
- Berry Chantilly Cake
- Coconut Cake
- Kit Kat Cake
Tried This Recipe?
💌 And while you’re here, don’t miss the next cozy recipe — subscribe to my totally FREE newsletter so you’ll always have comfort food favorites at your fingertips. 💌
If you made this cheesecake, I’d love to hear how it turned out! Please leave a ⭐️⭐️⭐️⭐️⭐️ rating and a quick review below — it helps our community of cooks and bakers find the recipe, and it absolutely makes my day. 💕
📸 And if you Gram…don’t forget to share your cheesecake on Instagram — tag me @gonnawantseconds so I can cheer you on and share your creations!
Thanks for stopping by my kitchen today — happy baking + cooking, friends! ❤️ Kathleen
Cookies And Cream Cheesecake
Ingredients
Chocolate Cookie Crust
- 24 pieces chocolate sandwich cookies include creamy centers
- 4 tablespoons unsalted butter melted
Cookies and Cream Cheesecake Batter
- 4 (32 ounces / 908 grams) packages cream cheese room temperature
- 1 cup granulated sugar
- 3 tablespoons all-purpose flour (22 g)
- 1 tablespoon vanilla extract
- 4 large eggs
- 14-18 pieces whole chocolate sandwich cookies
- 8 pieces chocolate sandwich cookies roughly chopped
Cookies and Cream Mousse
- 1 1/2 tablespoons water
- 1 1/8 teaspoons unflavored powdered gelatin
- 1 cup (226 g) white chocolate chips Guittard recommended
- 1 1/4 cups heavy cream divided
- 1/4 cup powdered sugar
- 10 chocolate sandwich cookies finely chopped
Dark Chocolate Ganache
- 1 cup dark or semi-sweet chocolate chips
- 1/2 cup heavy cream
Stabilized Whipped Cream Topping
- 1 cup heavy cream
- 1/2 cup powdered sugar
- 8 –12 pieces whole chocolate sandwich cookies for garnish
Instructions
Chocolate Cookie Crust
- Prep the pan: Lightly coat the bottom of an 8-inch springform pan with nonstick spray. Line with an 8-inch parchment circle, then spray the parchment and sides again.
- Make the crumbs: Add cookies (with filling) (24 pieces) to a food processor and pulse until fine crumbs form.
- Add butter: Pour in melted butter (4 tablespoons) and pulse until crumbs are evenly moistened.
- Form the crust: Transfer crumb mixture to the prepared pan and press firmly into an even layer across the bottom (and slightly up the sides, if desired) using the bottom of a measuring cup.
- Chill: Refrigerate for 20–30 minutes while preparing the cheesecake batter. This helps the crust firm up and hold together beautifully when sliced.
Make the Cookies and Cream Cheesecake
- Mix the base: In a large mixing bowl, beat the cream cheese (4 packages), sugar (1 cup), flour (3 tablespoons), and vanilla (1 tablespoon) on low speed until smooth and fully blended, about 2 minutes. Scrape down the bowl as needed.
- Add eggs: Beat in eggs one at a time (4) on low speed, mixing just until each is incorporated. Avoid overmixing to prevent excess air. Finish by folding gently with a spatula until smooth.
- Layer with cookies: Pour 1 cup of batter over the prepared crust and smooth the surface gently to avoid disturbing the base. Arrange whole cookies (14-18 pieces) horizontally in a single layer over the batter, pressing them slightly so they touch the edges of the pan.
- Add remaining batter: Pour remaining batter evenly over the cookie layer and smooth the top. Sprinkle the chopped cookies (8 pieces) evenly over the surface, pressing them in lightly so they’re mostly submerged but still visible.
- Bake: Place the pan on the middle oven rack and bake at 450°F (232ºC) for 5 minutes, then reduce the temperature to 250°F (121°C) without opening the oven door and continue baking for 45–50 minutes, or until edges are set and the center still jiggles slightly.
- Cool gradually: Turn off the oven and prop the door open with a wooden spoon. Let the cheesecake rest inside for 15 minutes to prevent cracking.
- Cool completely: Remove from oven, run a thin knife around the edge to loosen, and cool at room temperature for 1 hour. Then refrigerate for at least 4–6 hours, or overnight, until fully chilled before adding the mousse layer.
Cookies and Cream Mousse
- Bloom the gelatin: In a small bowl, add 1 1/2 tablespoons of cold water and sprinkle gelatin (1 1/8 teaspoons) evenly over the surface. Lightly press any dry spots down. Let it stand for 5 minutes.
- Dissolve gelatin: In a microwave-safe cup, heat 1/2 cup heavy cream until steaming (about 45–60 seconds). Add bloomed gelatin and stir until fully dissolved. If needed, microwave another 5–10 seconds and stir again.
- Melt the chocolate: Place white chocolate chips (1 cup) in a medium bowl. Pour hot cream/gelatin mixture over the chocolate, let sit 1 minute, then stir until smooth. Microwave briefly (10–15 seconds) if needed. Cool completely to room temperature before the next step.
- Whip the cream: In a separate bowl, beat 3/4 cup heavy cream with 1/4 cup powdered sugar to stiff peaks.
- Lighten and fold: Stir one large spoonful of whipped cream into the cooled chocolate to loosen it. Gently fold in the remaining whipped cream in 2–3 additions until no streaks remain.
- Add cookies: Fold in finely chopped cookies (10 pieces) until evenly distributed.
- Top and set: (Optional: Line inside of pan with acetate for clean edges.) Pour mousse over fully chilled cheesecake, smoothing the top evenly. Refrigerate until set — at least 2 hours, preferably overnight.
Make the Stabilized Whipped Cream
- Whip Cream: In a cold mixing bowl, whip heavy cream (1 cup) and powdered sugar (1/2 cup) on low speed to incorporate, then on high until stiff peaks form, about 3–4 minutes. Keep refrigerated until ready to pipe.
Dark Chocolate Ganache
- Heat the cream: Warm 1/2 cup heavy cream in the microwave until steaming but not boiling (about 30–40 seconds).
- Add chocolate: Place chocolate chips (1 cup) in a heatproof bowl and pour hot cream over top. Let sit for 1–2 minutes, then stir until smooth. Microwave another 10–15 seconds if needed to fully melt.Cool to room temperature before using: After stirring in the salt, let the ganache cool at room temperature for about 10–15 minutes, until it’s thickened but still pourable and no longer warm to the touch. This ensures the mousse stays perfectly intact and gives you a smooth, glossy finish.
- Add salt + cool: Stir in a small pinch of salt. Let the ganache cool at room temperature for about 10–15 minutes, until it’s thickened but still pourable and no longer warm to the touch. This ensures the mousse stays perfectly intact and gives you a smooth, glossy finish.
Assemble the Cheesecake
- Release: Once the mousse is fully set, run a thin knife around the inside of the pan and gently remove the springform ring. Peel away the acetate if used.
- Smooth (optional): For a professional finish, use an offset spatula or bench scraper to smooth the sides.
- Add ganache: Pour the cooled ganache over the center of the mousse and spread evenly to the edges, letting a few elegant drips fall down the sides. Chill 5–10 minutes to lightly set.
- Decorate: Pipe stabilized whipped cream swirls around the edge using a 1M star tip. Press whole cookies upright into the whipped cream for garnish.
- Final Chill: Refrigerate the fully decorated cheesecake for at least 1 hour (or up to 24 hours) before slicing. This allows the ganache to set, the whipped cream to stabilize, and the layers to firm up for clean, picture-perfect slices
- Serve: Slice with a hot, clean knife, wiping between cuts. Serve very cold for clean slices, or let stand 5–10 minutes at room temperature for a creamier texture.
Fans Also Made:


Notes
- Let dairy come to room temperature. Bring cream cheese and eggs to cool-room temp (about 68–72°F) before mixing. Cold cream cheese traps lumps and air, which leads to uneven texture.
- Mix low and slow. Beat on low speed and stop as soon as each egg disappears. Overmixing whips in air and can cause cracks.
- Tap out air bubbles. After filling your pan, tap it firmly on the counter 4–5 times to pop any hidden air pockets.
- Bake on the middle rack. This ensures even heat so the top doesn’t brown before the center sets.
- Start with high heat. Bake at 450°F for 5 minutes (or 425°F if your oven runs hot), then drop to 250°F without opening the door for that velvety, even texture.
- Cool gradually. Follow the cool-down stages: 15 minutes in a cracked oven → 1 hour on the counter → chill completely. This slow cool prevents cracking.
- Fold mousse gently. Make sure the white chocolate base is cool to the touch before folding in whipped cream — warm chocolate will deflate your mousse.
- Use the right butter ratio. The higher butter amount (4 Tbsp) ensures your no-bake crust slices clean and firm, without crumbling.
- Pour ganache at the right temperature. It should be pourable but not hot — about body temperature. If it feels warm on your finger, wait 5 minutes and stir again.
- Cut clean slices. Use a long knife warmed under hot water, wiping between cuts. Chill the cheesecake 15 minutes before slicing for bakery-style edges.
- Adjust for pan size. Using a 9-inch springform? It works perfectly — just expect a slightly shorter cake and reduce the 250°F bake by about 5 minutes.
- Plan for make-ahead magic. Cheesecake tastes even better the next day! An overnight chill gives the mousse time to stabilize and makes every slice picture-perfect.

Leave a Reply