This post may contain affiliate links. Please read our disclosure policy.
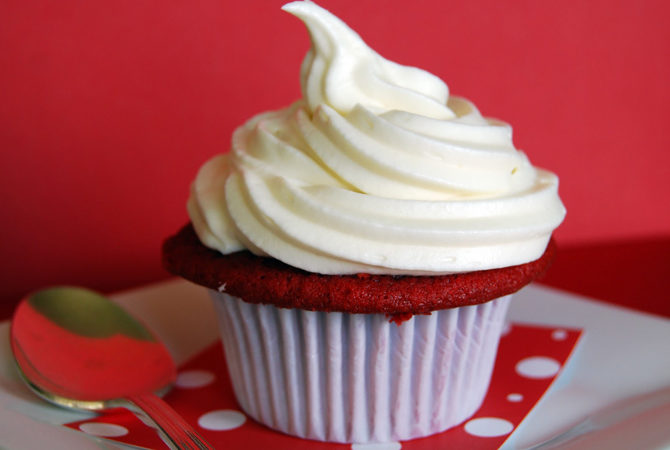
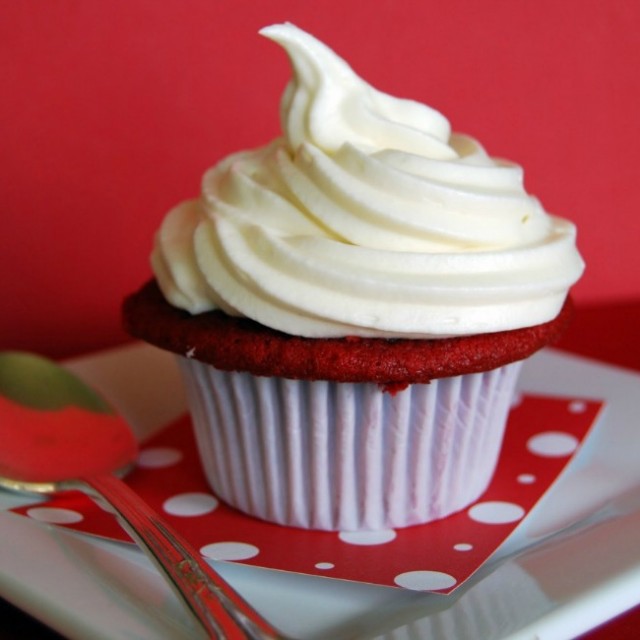
My Red Velvet Cupcakes are a glorious handful of joy — all that classic red velvet flavor in a perfectly portable little package, topped with a rich, tangy cream cheese frosting. They’re soft, tender, beautifully red, and guaranteed to disappear fast at any party, shower, or Sunday supper.
In the mood for even more red velvet treats? Try my Red Velvet Brownies, Red Velvet Bundt Cake, Red Velvet Crinkle Cookies, or fun little Red Velvet Cake Balls next — you can build a whole red velvet dessert table around this recipe!
Serve them with a generous swirl of frosting and a few extra crumbs on the plate, and watch everyone fall in love at first bite.

✨ Before You Begin
✨ Use room temperature ingredients.
Soft butter, room temperature eggs, and cream cheese help the batter and frosting mix smoothly so you get a tender crumb and a silky, lump-free frosting.
✨ Stick with full-fat brick cream cheese.
Avoid tubs or whipped cream cheese — they’re softer and can make your frosting runny. Brick-style, full-fat cream cheese gives you the structure you want for piping.
✨ Don’t overfill the cupcake liners.
Aim for about 2/3 full. Overfilled liners can cause domed, overflowing cupcakes instead of neat, pretty tops.
✨ Check doneness with a toothpick, not just the clock.
Every oven runs a little differently. Start checking around 20 minutes — you’re looking for cupcakes that spring back lightly and a toothpick with a few moist crumbs.
✨ Let cupcakes cool completely before frosting.
If they’re even a little warm, the cream cheese frosting can melt and slide right off. Cool on a wire rack or chill briefly before you decorate.
Red Velvet Cupcakes Ingredients + Key Notes
Cupcake Ingredients
- All-purpose flour (2 1/4 cups)
This is the structural backbone of your cupcakes. All-purpose flour has just enough protein to give the cupcakes shape while still staying tender. For the most consistent results, fluff, scoop, and level — or weigh if you like baking by grams. - Baking soda (1 1/2 teaspoons)
Baking soda reacts with the buttermilk and vinegar to give your cupcakes lift and a soft, even crumb. It’s strong stuff, so measure carefully and level off the spoon. - Fine sea salt (1/4 teaspoon)
A small amount of salt keeps the cupcakes from tasting flat or overly sweet. It doesn’t make them “salty” — it just brightens the cocoa, vanilla, and tangy notes. - Buttermilk (1 cup, well shaken)
Classic red velvet gets its flavor and texture from buttermilk. The acidity tenderizes the crumb and works with the baking soda, while the fat adds moisture and richness. - White vinegar (1 tablespoon)
This boosts the acidity just enough for a nice reaction with the baking soda and gives that subtle, old-fashioned red velvet tang. You won’t taste “vinegar” in the final cupcake — just balanced flavor. - Vanilla extract (1 teaspoon)
Vanilla rounds out the cocoa and tang so the cupcakes taste like a cohesive, luxurious dessert instead of just “red cocoa cake.” - Large eggs (2)
Eggs add structure, richness, and moisture. Whisking them into the buttermilk mixture helps everything blend smoothly into the batter. - Unsweetened cocoa powder (2 tablespoons)
Red velvet is lightly chocolatey — not a full-on chocolate cupcake. This small amount of cocoa gives depth of flavor and that familiar red velvet “whisper” of chocolate. - Red food coloring (1 (1-ounce) bottle)
Traditional liquid red food coloring gives you that bold, classic red color readers expect. If you ever swap to gel, you’ll need less — and may want to adjust liquid elsewhere. - Unsalted butter (12 tablespoons / 1 1/2 sticks, at room temperature)
Butter adds richness and flavor and helps create a tender crumb when creamed properly with sugar. Room temperature butter is key so it creams light and fluffy. - Granulated sugar (1 1/2 cups)
Sugar sweetens, of course, but it also helps create a soft, moist texture and a fine crumb by tenderizing the batter and trapping air during creaming.
Cream Cheese Frosting Ingredients
- Unsalted butter (16 tablespoons / 2 sticks, at room temperature)
Butter gives the frosting body and a silky mouthfeel. Beating it with the powdered sugar first helps create a fluffy base that supports the cream cheese. - Powdered sugar (4 cups)
Powdered sugar sweetens the frosting and thickens it. It dissolves easily into the butter and cream cheese to give you a smooth, pipeable consistency. - Cream cheese (16 ounces, full-fat, brick-style, at room temperature)
Cream cheese adds that luscious tang and creamy texture everyone expects with red velvet. Full-fat brick cream cheese is important here — tubs are too soft and can make the frosting runny. - Vanilla extract (1 1/2 teaspoons)
Vanilla softens the tang of the cream cheese and rounds out the sweetness, giving you a frosting that tastes layered and balanced, not just sugary. - Fine sea salt (1/8–1/4 teaspoon, to taste)
Just a pinch or two keeps the frosting from feeling cloying. Start with 1/8 teaspoon, taste, and add a bit more if needed. You shouldn’t taste “salt” — just better flavor.
How to Make Red Velvet Cupcakes
Here’s a quick look at how to assemble these easy Red Velvet Cupcakes (full instructions in the recipe card below).
You’ll start by lining your cupcake pans and preheating the oven to 350°F (177ºC), then whisk your dry ingredients (flour, baking soda, salt) in one bowl and your wet ingredients (buttermilk, vinegar, vanilla, eggs) in another. Next, stir the cocoa powder and red food coloring together into a smooth paste so the color blends beautifully. Cream the butter and sugar in your mixer until light and fluffy, then alternate adding the dry and wet ingredients, beginning and ending with the flour mixture, mixing just until everything is smooth.
Beat in the cocoa–red paste until the batter is evenly red, divide it into cupcake liners about 2/3 full, and bake until the tops spring back and a toothpick comes out with a few moist crumbs. Let them cool completely, then whip together the butter and powdered sugar for the frosting, mix in the cream cheese, vanilla, and salt until smooth, and swirl that tangy frosting generously on top of each cupcake.
⭐ Pro Tips for the Best Red Velvet Cupcakes
⭐ Cream the butter and sugar properly.
Take the full 2–3 minutes to cream the butter and sugar on medium speed until they’re pale and fluffy. That little bit of extra time builds air into the batter, which translates into lighter, more tender cupcakes.
⭐ Don’t skip the cocoa paste step.
Mixing your cocoa powder with the red food coloring into a paste might feel fussy, but it keeps the cocoa from clumping and helps the color distribute evenly. It’s one of those tiny steps that makes the finished cupcakes look bakery-perfect.
⭐ Mix just until combined.
Once the flour goes in, be gentle. Overmixing can develop too much gluten and make your cupcakes dense or tough. As soon as the batter looks smooth and streak-free, stop the mixer and finish with a few folds by hand.
⭐ Use the right cream cheese.
Full-fat, brick-style cream cheese is non-negotiable here. Low-fat, whipped, or tub-style cream cheese can make your frosting loose, grainy, or hard to set up — especially if your kitchen is warm.
⭐ Chill the frosting, not the cupcakes, if it’s too soft.
If your frosting feels a bit loose for piping, pop the bowl in the fridge for 10–15 minutes and give it a stir. It’s easier to control the frosting temperature than to frost chilled cupcakes and risk condensation.

🔬 The Baking Science Behind Red Velvet Cupcakes
Red velvet cupcakes are all about acid and alkali working together. The buttermilk and vinegar are acidic, while the baking soda is alkaline. When they meet in the batter, they react and produce tiny bubbles of carbon dioxide, which help the cupcakes rise and create that soft, velvety crumb.
The small amount of cocoa powder does double duty: it brings a whisper of chocolate flavor and also contributes mild acidity. Historically, that interaction between natural cocoa and baking soda gave red velvet its subtle reddish hue. These days, the 1-ounce bottle of red food coloring does most of the color work, but the cocoa still helps prevent the red from looking flat or artificial.
In the frosting, cream cheese and butter form an emulsion with powdered sugar. The sugar absorbs moisture and thickens the mixture, while the fat coats your taste buds and carries flavor. That tiny bit of salt doesn’t make the frosting salty — it simply balances sweetness by slightly suppressing bitter notes and sharpening the perception of vanilla and tang. The result is a frosting that tastes full and rich instead of one-note sweet.
Storing + Freezing + Reheating + Make-Ahead Tips
Storing
- Store frosted red velvet cupcakes in an airtight container in the refrigerator for up to 3 days. Because of the cream cheese frosting, they shouldn’t sit out at room temperature for long periods. For the best texture and flavor, let them sit at room temperature for about 20–30 minutes before serving so the cake softens and the frosting isn’t too firm.
Freezing
- To freeze, place unfrosted cupcakes on a baking sheet and freeze until solid, then transfer them to a freezer bag or airtight container for up to 2 months. Thaw at room temperature in the closed container so they don’t dry out. Cream cheese frosting can also be frozen in an airtight container; thaw in the fridge and rebeat briefly before using if it looks slightly separated.
Reheating
- You don’t really “reheat” cupcakes, but you can take the chill off refrigerated or thawed cupcakes by letting them sit at room temperature for 20–30 minutes before serving. Avoid microwaving frosted cupcakes — it can melt the frosting and dry out the cake.
Make-Ahead
- You can absolutely make components ahead:
- Bake the cupcakes a day in advance, cool completely, and store them covered in the fridge or at cool room temperature if they’re unfrosted.
- Make the frosting up to 2 days ahead and refrigerate in an airtight container; let it soften slightly at room temperature, then beat it briefly before piping.
- For parties, I like to bake the cupcakes the day before and frost them the morning of, then chill until about 30 minutes before guests arrive.
Food Safety
- If you’d like more info on food safety, check out this link.
✦ Red Velvet Cupcakes FAQs
✦ Why do you put vinegar in red velvet cupcakes?
Vinegar adds a little extra acidity, which reacts with the baking soda to help the cupcakes rise and stay tender. It also contributes to that classic red velvet tang. You won’t taste vinegar in the finished cupcake — just a balanced, slightly tangy flavor.
✦ Can I use gel food coloring instead of liquid?
Yes, you can use gel coloring, but you’ll need much less since gel is more concentrated. Start with a small amount and add more as needed until the batter is a rich red. Because this recipe was tested with 1 ounce of liquid color, you may want to slightly reduce another liquid ingredient (like buttermilk) if you’re adding a lot of gel.
✦ Can I bake this recipe as a cake instead of cupcakes?
You sure can. This batter will bake up nicely in two 9-inch round cake pans. Grease and flour the pans well, divide the batter evenly, and bake at 350°F for about 25 minutes, or until a toothpick inserted in the center comes out clean or with a few moist crumbs.
✦ How do I keep my cream cheese frosting from getting runny?
Start with brick-style, full-fat cream cheese, and make sure it’s just softened, not overly warm. Beat the butter and powdered sugar first, then add the cream cheese and mix just until smooth. If your kitchen is warm or the frosting seems soft, chill it for 10–15 minutes, then stir and frost.
✦ Do these cupcakes need to be refrigerated?
Because of the cream cheese frosting, it’s best to refrigerate them if they’ll be sitting longer than 2 hours. Store them in an airtight container in the fridge, then let them sit at room temperature for a bit before serving so the texture is soft and creamy again.
Still have questions? Drop them in the comments — I love helping you bake + cook with confidence! 💗
More Red Velvet Recipes
- Red Velvet White Chocolate Chip Cookies
- Red Velvet Oreo Brownies
- Red Velvet Whoopie Pies
- Grinch Cupcakes
Tried This Recipe?
💌 And while you’re here, don’t miss the next cozy recipe — subscribe to my totally FREE newsletter so you’ll always have comfort food favorites at your fingertips. 💌
If you enjoyed this recipe, please take a moment to leave ⭐️⭐️⭐️⭐️⭐️ star rating and a quick comment — I love hearing from you and it helps our community of bakers and cooks!
📸 And if you Gram… don’t forget to share your photo in Instagram — tag me @gonnawantseconds so I can cheer you on and share your creations!
Thanks for stopping by my kitchen today — happy cooking, friends! 💗 Kathleen
Red Velvet Cupcakes
Ingredients
Cake:
- 2 1/4 cups all purpose flour
- 1 1/2 teaspoons baking soda
- 1/4 teaspoon salt
- 1 cup buttermilk well shaken
- 1 tablespoon white vinegar
- 1 teaspoon vanilla extract
- 2 large eggs at room temperature
- 2 tablespoons unsweetened cocoa powder
- 1 (1-ounce) bottle red food coloring
- 12 tablespoons unsalted butter softened
- 1 1/2 cups sugar
Frosting:
- 16 tablespoons unsalted butter
- 4 cups powdered sugar
- 16 ounces cream cheese softened
- 1 1/2 teaspoons vanilla extract
- 1/8 teaspoon salt
Instructions
FOR THE CUPCAKE
- Prep the pans + oven. Preheat the oven to 350°F (177ºC). Line cupcake pans with paper liners.
- Mix the dry ingredients. In a medium bowl, whisk together the flour (2 1/4 cups), baking soda (1 1/2 teaspoons), and salt (1/4 teaspoon). Set aside.
- Mix the wet ingredients. In another bowl, whisk together the buttermilk (1 cup), vinegar (1 tablespoon), vanilla (1 teaspoon), and eggs (2) until well combined.
- Make the cocoa paste. In a small bowl, sift in the cocoa powder (2 tablespoons). Add the red food coloring (1 ounce) and stir until a smooth paste forms. Set aside.
- Cream the butter and sugar. In a stand mixer fitted with the paddle attachment, beat the butter (12 tablespoons) and sugar (1 1/2 cups) together on medium speed for about 2 minutes, until light and fluffy. Scrape down the bowl.
- Combine the batter.Add 1/3 of the flour mixture and beat on medium speed just until incorporated.Add 1/2 of the buttermilk mixture and beat on low until combined. Scrape down the bowl.Add another 1/3 of the flour mixture and mix on medium until incorporated.Add the remaining buttermilk mixture and mix on low until combined.Add the final 1/3 of the flour mixture and beat on medium just until the batter is smooth. Scrape down the bowl again.
- Add the cocoa mixture. Add the cocoa–food coloring paste to the batter and beat on medium until fully incorporated. Scrape down the sides and bottom of the bowl, then give the batter a final stir with a rubber spatula to make sure everything is evenly mixed.
- Bake. Divide the batter evenly among the cupcake liners, filling each about 2/3 full. Bake for about 20–24 minutes, or until a toothpick inserted in the center comes out clean or with just a few moist crumbs.
- Cool. Let cupcakes cool in the pan for about 10 minutes, then transfer to a wire rack to cool completely before frosting. (You can also leave them in the pan, cover, and refrigerate overnight, then frost the next day.)
FOR THE FROSTING
- Cream the butter and sugar. In a stand mixer, beat the butter (16 tablespoons) and powdered sugar (4 cups) together on medium speed until light and fluffy, about 2 minutes.
- Add cream cheese. Add the cream cheese (16 ounces), a few pieces at a time (or all at once if it’s very soft), and beat just until smooth and fully incorporated.
- Flavor and season. Beat in the vanilla (1 1/2 teaspoons) and salt (1/8 teaspoon).
- Frost the cupcakes. If the frosting seems a bit soft for piping, chill it in the refrigerator for a few minutes to firm up slightly. Spread or pipe onto completely cooled cupcakes.


Notes
- Cream the butter and sugar properly.
Take the full 2–3 minutes to cream the butter and sugar on medium speed until they’re pale and fluffy. That little bit of extra time builds air into the batter, which translates into lighter, more tender cupcakes. - Don’t skip the cocoa paste step.
Mixing your cocoa powder with the red food coloring into a paste might feel fussy, but it keeps the cocoa from clumping and helps the color distribute evenly. It’s one of those tiny steps that makes the finished cupcakes look bakery-perfect. -
Mix just until combined.
- Once the flour goes in, be gentle. Overmixing can develop too much gluten and make your cupcakes dense or tough. As soon as the batter looks smooth and streak-free, stop the mixer and finish with a few folds by hand.
- Use the right cream cheese.
Full-fat, brick-style cream cheese is non-negotiable here. Low-fat, whipped, or tub-style cream cheese can make your frosting loose, grainy, or hard to set up — especially if your kitchen is warm. - Chill the frosting, not the cupcakes, if it’s too soft.
If your frosting feels a bit loose for piping, pop the bowl in the fridge for 10–15 minutes and give it a stir. It’s easier to control the frosting temperature than to frost chilled cupcakes and risk condensation.
Nutrition
Reader Interactions
Comments
Trackbacks
-
[…] Find Recipe Here : http://www.gonnawantseconds.com […]

The Best Recipe I have used for red velvet by far. In addition, I have made GREAT amazing chocolate cake (subtract the red food coloring) using this recipe.
Recently, I had cupcakes that were catered and these were better by far! Highly recommend!!!
So happy to hear that Dr. Katy! I adore these too!! <3
Since REAL Red Velvet cake does not have cream cheese frosting, this is not for me! The cake is the right recipe, but cream cheese frosting on red velvet cake is a BIG no no! Who ever started that never had the real thing, I guess.
The sauce and also icing could be prepared while you are waiting for the
cupcakes to cook.
Absolutely!
Woow, great cupcakes! They are awesome. Your website is wonderful!
From Russia with love:)
Hi Kathleen,
How the heck are you? It’s lovely here in Roseville–the cherry trees are all in bloom!
I just made these as mini-cupcakes. They were nice and moist, and I liked that this recipe calls for less food coloring than others I’ve made. I doubled the cocoa, but still wanted more chocolate flavor, so will probably triplenthe cocoa next try. Thanks for the recipe!
Hi Kathleen! I saw many Red Velvet Cupcakes , but your look so gorgeous,I’m delighted with them so I featured these on my blog hopping that you will agree with that. If you don’t, please contact me and I’ll remove it.
Best regards
It doesn't get better than a good red velvet cupcake and this one, my dear, looks perfect 🙂
I think I will make these for Christmas for the gkids. They look delicious. I have to take a bake break, I did so much for our party last Sunday, I need to step away from the oven! 🙂
Kathleen
That is one gorgeous looking cupcake! I am digging Cooks “best ever” special publication and now I think my wife would like this one.
I'm embarrassed to say that I have never made these…nor have I tasted them before! Isn't that just a crime? I've been meaning to..just haven't ever gotten around to it. When I decide to finally whip up a batch, I will use this recipe!
Perfectly beautiful about sums these up. They sound delicious as well. I hope you've had a great weekend. Blessings…Mary
I saw that cover at the bookstore last night, and I was drooling. I need to try this recipe ASAP. Red Velvet has a special place in my heart too. It is by far my favorite cupcake! Thank you so much for sharing! Have a good Sunday afternoon.
I have GOT to make these! I love that deep red and the cream cheese frosting is perfect!