This post may contain affiliate links. Please read our disclosure policy.
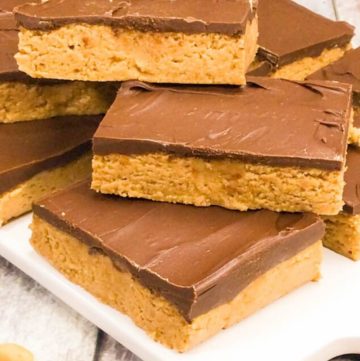
These no bake peanut butter bars are an easy, no-oven dessert with a creamy peanut butter base and a smooth chocolate topping — very similar to a homemade Reese’s.
They come together quickly with simple ingredients and chill in the refrigerator until firm, making them perfect for potlucks, holidays, and anytime you need a quick, crowd-pleasing treat.
The texture is soft but sliceable, rich without being overly sweet, and loaded with that classic chocolate and peanut butter flavor everyone loves.
If you love simple, no-bake desserts like this, be sure to browse my No-Bake Desserts collection for more easy, crowd-pleasing favorites.
Grab a spoon and a foil-lined pan… we’re making the easiest peanut butter bars ever.

Peanut Butter Bars at a Glance
- No oven required
- Pantry-friendly ingredients
- Make-ahead dessert
- Tastes just like peanut butter cups
- Perfect for parties and dessert trays
✨ Before You Begin
✨ Line your pan with foil and leave an overhang — it makes lifting and slicing the bars effortless.
✨ Use creamy, no-stir peanut butter for the best texture; natural peanut butter can separate and prevent the bars from setting.
✨ Do not skip the chill times. They’re essential for clean layers and neat slices.
✨ Melt chocolate low and slow — chocolate should never get too hot to touch or it can seize or lose its shine.
Peanut Butter Bars Ingredients + Key Notes
This is just a quick glance at what you’ll need. For exact measurements and the full ingredient list, head down to the recipe card below.
Peanut Butter Base
-
Butter (melted) — Helps the bars firm up as they chill
-
Graham cracker crumbs — Boxed crumbs are finer than homemade, giving the base a smoother, sturdier texture
-
Confectioners’ sugar — Sweetens and binds the mixture without grit
-
Peanut butter — Creamy, shelf-stable peanut butter works best
Chocolate Topping
-
Semi-sweet chocolate chips — Classic peanut butter cup flavor
-
Peanut butter — Keeps the topping softer and easier to slice
Chocolate swaps:
-
Milk chocolate → sweeter, softer bars
-
Dark chocolate → richer, less sweet bars
-
White chocolate → very sweet and dessert-forward

🥣 How to Make Peanut Butter Bars
Line a 9×13-inch baking dish with foil, leaving a few inches hanging over the long sides, then spray generously with nonstick spray. In a large bowl, mix together the melted butter, graham cracker crumbs, confectioners’ sugar, and peanut butter until fully combined and smooth. Press the mixture firmly and evenly into the prepared pan, packing it down well, then refrigerate for about 20 minutes to help it set.
While the base chills, melt the chocolate chips and peanut butter together using a double boiler or short bursts in the microwave, stirring often until smooth and glossy. Spread the chocolate evenly over the chilled peanut butter layer, then return the pan to the refrigerator for 2–4 hours, or until fully firm. Lift out using the foil overhang, slice into bars, and enjoy.
⭐ Pro Tips
⭐ Low-and-slow chocolate melting matters. Gentle heat keeps the chocolate glossy and prevents seizing.
⭐ Chill time = structure. Rushing the fridge step leads to smeared layers and messy cuts.
⭐ For clean slices: Let the bars sit at room temperature for 5–10 minutes, then cut with a sharp knife wiped clean between slices.
⭐ Press the base firmly. A tightly packed base holds together and slices cleanly.
Pan Size + Thickness Options
-
9×13 pan: Thinner bars, more servings (great for parties)
-
8×8 pan: Thicker, richer bars with a more fudge-like bite
-
Smaller bars set faster and are ideal for dessert trays or gifting

Peanut Butter Bar Variations
-
Sea Salt Finish: Sprinkle flaky sea salt over the chocolate layer before chilling for a sweet-salty contrast.
-
Crunchy Twist: Add chopped peanuts or crushed pretzels to the base for texture.
-
Extra Chocolate: Drizzle melted chocolate over the top after slicing for a bakery-style look.
🔬 Peanut Butter Bar Science: Why They Set
The graham cracker crumbs and powdered sugar create a stable, no-bake structure, while the melted butter firms up as it chills. Adding peanut butter to the chocolate topping softens it slightly, preventing cracks and making the bars easy to slice cleanly.
Storing + Freezing + Make-Ahead Tips
Storing
- Store bars in an airtight container in the refrigerator for up to 5 days.
Freezing
- Wrap tightly and freeze for up to 3 months. Thaw overnight in the fridge before serving.
Make-Ahead
- These bars are ideal for making 1–2 days in advance — the flavor and texture only improve.
Food Safety
- If you’d like more info on food safety, check out this link.
More Dessert Tray Favorites
If you’re building a dessert tray, add these peanut butter bars alongside Oreo Delight, Espresso Brownies, Million Dollar Pie, or Hershey’s Chocolate Chip Cookies for a spread that disappears fast.
✦ Frequently Asked Questions
✦ Can I use natural peanut butter?
It’s not recommended. Natural peanut butter can separate and keep the bars from setting properly.
✦ Can I use crunchy peanut butter?
You can, but the texture will be chunkier and slightly less cohesive.
✦ Can I make these gluten-free?
Yes. Use gluten-free graham cracker crumbs or crushed gluten-free cookies.
✦ Can I double this recipe for a crowd?
Absolutely. Use two 9×13 pans or one large sheet pan and increase chill time slightly.
✦ Why is my chocolate cracking when I cut it?
The bars are too cold. Let them sit at room temperature for a few minutes before slicing.
Still have questions? Drop them in the comments — I love helping you bake + cook with confidence! 💗
More Dessert Bars You’ll Love
7 Layer Bars — Sweet, gooey, and packed with chocolate + coconut + graham cracker goodness… basically the ultimate “one pan does it all” bar.
Carmelitas — Buttery oat crumble bars with melty chocolate and a caramel center that’s downright messy in the best way possible.
Almond Joy Bars — If you love chocolate + coconut + almond vibes, these are candy-bar energy in dessert-bar form (and they disappear fast).
S’more Bars — Chocolate, graham crackers, and gooey marshmallow in every bite — like a campfire treat you can make right in your kitchen.
Pecan Pie Bars — All the sticky, caramel-pecan goodness of pecan pie, but in an easy bar form that’s perfect for slicing and sharing..
Tried This Recipe?
💌 Hey, while you’re here, don’t miss the next cozy recipe — subscribe to my totally FREE newsletter. That way, you’ll always have comfort food favorites at your fingertips! 💌
If you enjoyed this recipe, please take a moment to leave a ⭐️⭐️⭐️⭐️⭐️ star rating and a quick comment — I love hearing from you and it helps our community of bakers and cooks!
📸 And if you Gram… don’t forget to share your photo on Instagram — tag me @gonnawantseconds so I can cheer you on and share your creations!
Thanks for stopping by my kitchen today — happy cooking, friends! 💗 Kathleen
Peanut Butter Bars
Ingredients
Peanut Butter Base:
- 1 cup butter Melted
- 2 cups graham cracker crumbs
- 2 cups confectioner's sugar
- 1 cup peanut butter
Topping:
- 1 1/2 cups semi-sweet chocolate chips
- 4 tablespoons peanut butter
Instructions
- Line a 9 X 13-inch baking dish with aluminum foil, allowing 2-3 inches to extend over long sides. Spray generously with non-stick cooking spray.
- Mix together the butter (1 cup), graham cracker crumbs (2 cups), confectioner's sugar (2 cups), and 1 cup peanut butter until evenly combined. Cool in the fridge for 20 minutes to firm.
- Meanwhile, melt the semi-sweet chocolate chips (1 1/2 cups) and 4 tablespoons of peanut butter in a double boiler or in the microwave. Spread over cooled peanut butter base. Refrigerate until firm. 2-4 hours. Cut into bars and enjoy.
Fans Also Made:
Notes
- Low-and-slow chocolate melting matters. Gentle heat keeps the chocolate glossy and prevents seizing.
- Chill time = structure. Rushing the fridge step leads to smeared layers and messy cuts.
- For clean slices: Let the bars sit at room temperature for 5–10 minutes, then cut with a sharp knife wiped clean between slices.
- Press the base firmly. A tightly packed base holds together and slices cleanly.
- Pan Size + Thickness Options
-
- 9×13 pan: Thinner bars, more servings (great for parties)
- 8×8 pan: Thicker, richer bars with a more fudge-like bite
- Smaller bars set faster and are ideal for dessert trays or gifting
Nutrition

Hi kathleen, I wondered upon your site while looking for some good fresh corn recipes. Then, the Peanut Butter Bars picture grabbed my attention. I haven’t tried any of the recipes yet, but I think these bars will be the first. I have only one question. Can you use crunchy peanut butter? And, your’e so right about Blowing Rock! My family just loves that beautiful, little town. We used to rent a house up on Misty Mountain during the holidays and fell in love with the area. My youngest daughter learned to ice skate, and land a trout, and my son at seventeen drank water from a local beaver pond, and has had a parasitic infection ever since. That was 12 years ago. Great times!! ??
CORRECTION: WANDERED! LOL SORRY, THAT’S WHY I HAVE AN EDITOR! ??
Hi Johanna! So glad the peanut butter bars caught your eye! Crunchy peanut butter will work great. Oh gosh, I sure hope you son gets better!!!
OMG, everything I love melted together?! Sign me UP!