
This post may contain affiliate links. Please read our disclosure policy.
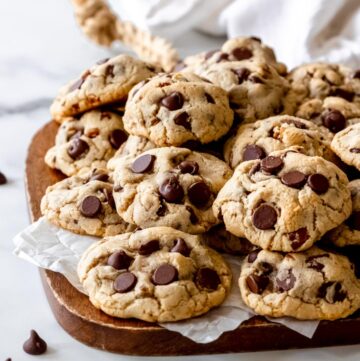
This classic Toll House Cookie Recipe is the one that started it all — the famous Nestlé chocolate chip cookie recipe created by Ruth Wakefield at the Toll House Inn. Buttery, chocolatey, and downright irresistible, they bake up with golden edges and soft, chewy centers that practically beg for a cold glass of milk. These follow the classic original Toll House style — a little thinner with that signature spread (not the thick bakery-style chocolate chip cookies).
Why this recipe is so delicious: It’s based on the tried-and-true formula Ruth Wakefield created at the Toll House Inn back in the 1930s — the original chocolate chip cookie. Over the years, the story goes that Nestlé secured the rights to share her recipe widely (often repeated as “for a dollar”), and it’s been a cookie-world staple ever since.
If you love homemade chocolate chip cookies, be sure to try my Best Chocolate Chip Cookies next, or browse my full Chocolate Chip Cookies collection for even more classic, chewy, bakery-style, and delicious flavor variations. For a few reader-favorite twists, try my Soft Chocolate Chip Cookies and Hershey’s Chocolate Chip Cookies, too.
Let’s bake these sweet little legends! 💗

What Makes Toll House Cookies Unique
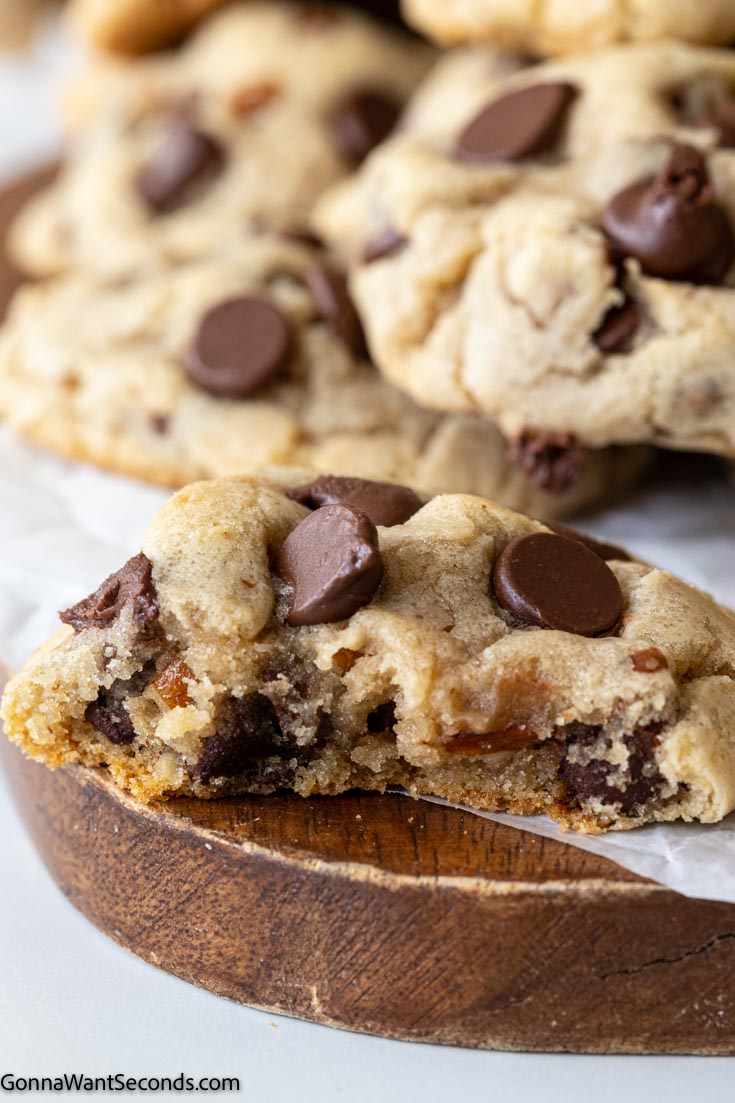
Toll House cookies are meant to spread a little and bake up with lightly crisp edges, soft centers, and that classic homemade chocolate chip cookie texture. A mix of white and brown sugar gives Toll House cookies their classic texture: lightly crisp edges, soft and chewy centers, and a subtle caramel note from the brown sugar.
They’re also baked at 375°F, which helps set the edges before the centers dry out. Chilling isn’t required for the original Toll House style, but it does make the cookies thicker and gives the dough a deeper, richer flavor. Pull them from the oven when the centers still look slightly underbaked, but not wet — they’ll finish setting as they cool.
✨ Before You Begin
✨ Measure flour the right way. Spoon flour into your measuring cup and level it off. Scooping from the bag packs in extra flour and can make your cookies dense or dry.
✨ Use butter that’s soft but still cool. You want it pliable, not shiny or greasy. If your butter is too warm, the dough will spread faster and bake up thinner.
✨ Pan choice matters. Dark baking sheets brown the bottoms more quickly, while light-colored pans bake more gently. If your cookies brown too fast underneath, use a light-colored sheet pan with parchment.
✨ Chilling is optional. No chill gives you the classic Toll House spread. Chilling the dough for 1–24 hours makes thicker cookies with deeper flavor.
✨ Keep dough cold between batches. Bake one tray at a time and keep the remaining dough in the fridge until the oven is ready. This helps the cookies stay thick and chewy.
✨ Always bake on a cool baking sheet. A warm pan starts melting the dough before it reaches the oven, which can make cookies spread too much.
✨ Pull them while the centers look soft. The edges should be lightly golden, but the centers should still look pale and slightly underbaked. They’ll finish setting as they cool, which keeps them chewy instead of dry.
How To Make Toll House Cookies Thicker
Classic Toll House cookies are meant to spread more than bakery-style chocolate chip cookies, but there are a few easy ways to make them thicker if you prefer.
Chill the dough for at least 1 hour before baking, use slightly larger dough balls, and always bake on a cool baking sheet. Keeping the dough refrigerated between batches also helps prevent excess spreading.
For an even thicker cookie, add 2–3 tablespoons of flour to the dough. Just keep in mind that thicker cookies won’t have quite the same texture as the original Toll House recipe, which is known for its thinner profile, crisp edges, and soft chewy centers.
Toll House Cookies Ingredients + Key Notes
Butter Science (in plain English!)
When butter is creamed with sugar, the sugar crystals cut tiny air pockets into the butter. Those pockets expand in the oven, giving the cookies lift and tenderness. If the butter is too warm, it can’t hold those air bubbles as well, so the cookies spread too quickly instead of baking up soft and chewy.
How to Tell When They’re Done
Look for lightly golden edges and soft centers. The tops should look slightly underbaked, but not wet — they’ll firm up as they cool.
-
Unchilled dough: Bake 9–11 minutes.
-
Chilled dough: Bake 11–13 minutes.
-
Large cookies: Bake up to 14 minutes.
⚠️ Common Mistakes to Avoid
- Using butter that’s too warm. Soft butter is ideal, but greasy or partially melted butter can make the cookies spread too much.
- Adding too much flour. Scooping directly from the bag can pack in extra flour and lead to dry, dense cookies. Spoon flour into the measuring cup and level it off.
- Baking on a warm cookie sheet. A hot pan starts melting the dough before it reaches the oven, which can cause excessive spreading.
- Overbaking the cookies. Toll House cookies should still look slightly underbaked in the center when they come out of the oven. They’ll continue setting as they cool.
- Skipping parchment paper. Parchment promotes more even baking and helps prevent overly browned bottoms.
Pro Tips
⭐ Cream properly. Mix until fluffy — under-creamed butter = dense cookies.
⭐ Chill for flavor. Even 30 minutes enhances caramel notes and improves shape.
⭐ Use parchment. Prevents overbrowning and ensures even spread.
⭐ Play with chocolate. Try mixing dark and milk chips for bakery-style depth.
⭐ Don’t overbake! Cookies should look slightly underdone in the center.
🔍 Troubleshooting & Adjustments
| Dough Size / Type | Temperature | Time | Texture |
|---|---|---|---|
| Medium (1 1/2 Tbsp), unchilled | 375°F | 9–11 min | Soft, classic spread |
| Medium (1 1/2 Tbsp), chilled | 375°F | 11–13 min | Thick, chewy center |
| Large scoop (2 Tbsp+) | 375°F | 13–14 min | Golden edges, gooey middle |
| Small scoop (1–2 tsp) | 375°F | 7–9 min | Crisp edges, tender center |
Tip: Bake until the edges are golden and the centers still look slightly underbaked — they’ll finish setting as they cool.
Cookies turned out hard
They baked too long. Pull them when the centers still look slightly underbaked — they finish setting on the hot pan.
Cookies spread too much
Butter was too warm or dough sat out too long. Chill the dough 20–30 minutes and bake on a cool baking sheet.
Cookies didn’t spread
Too much flour was added. Spoon and level flour instead of scooping.
Bottoms browned too quickly
Use a light-colored baking sheet or add parchment.
Cookies seem dry or cakey
Usually from overbaking or excess flour — next batch pull earlier.
How To Make Nestle Toll House Cookies Recipe

- Whisk together flour, baking soda, and salt.
- Combine butter, sugar, and vanilla extract.
- Mix using a handheld electric mixer.
- Add eggs one at a time.
- Gradually mix in the flour mixture.
- Mix until just combined.
- Add in morsels and nuts.
- Mix. Scoop.
- Optionally-Refrigerate the dough.
- Bake.
***See full instructions below.
✦ Frequently Asked Questions
✦ Why did my Toll House cookies spread?
Toll House cookies are actually meant to spread a bit — that’s what gives them their classic thin edges and chewy centers. But if they spread too much, the butter was likely too warm, the dough sat out too long, or too little flour was measured. Chilling the dough for 20–30 minutes and baking on a cool baking sheet usually fixes it right away.
✦ Should you refrigerate Toll House cookie dough before baking?
The original recipe doesn’t call for chilling, but it’s my favorite trick for a chewier, thicker cookie with deeper flavor. Try chilling for at least 1 hour or up to 24 hours for bakery-style results.
✦ Can I use different kinds of chocolate?
Absolutely! Semi-sweet is traditional, but dark chocolate adds intensity, milk chocolate gives creaminess, and chopped bars create melty pools.
✦ Why do Toll House cookies look underbaked when they’re done?
That’s exactly how they should look. The edges should be golden while the centers remain pale and slightly underbaked. They continue setting on the hot baking sheet after removal, which is what creates their classic chewy texture.
Storing + Reheating + Freezing + Make-Ahead
Storing: Store cookies in an airtight container at room temperature once they’re completely cool. They’re at their very best in the first 1–2 days (that classic chewy center!), but they’ll keep well for up to 5–7 days. Don’t worry if they feel a little firmer the next day — that’s totally normal. A quick 8–10 seconds in the microwave brings back that fresh-from-the-oven chew.
Reheating (Revive Tip!) If your cookies firm up after a day, warm one in the microwave for 8–10 seconds to bring back that fresh-baked chew. For a whole batch, pop them on a baking sheet in a 300°F oven for 2–3 minutes.
Freezing: Yes — you can freeze baked cookies or cookie dough.
-
Baked cookies: Freeze in a freezer bag or airtight container for up to 3 months for best flavor and texture.
-
Cookie dough balls: Freeze for up to 3 months (you can push longer, but 3 months keeps them tasting bakery-fresh).
Make-Ahead: This dough is perfect for making ahead (and honestly, the hardest part is not “sampling”). I love doubling the batch and freezing dough balls so I can bake a few whenever the craving hits.
How to Freeze Dough: Scoop the dough into balls and place them on a baking sheet (not touching). Freeze until firm, then transfer to a freezer bag.
- Bake from frozen: Add 1–2 extra minutes to the bake time and pull them when the centers still look slightly underbaked.

More Chocolate Chip Cookie Recipes to Try
Chocolate chip cookies come in all kinds of delicious forms. If you love classic Toll House cookies, here are a few more chocolate chip cookie recipes worth baking next.
Chocolate Chip Pudding Cookies — Extra soft and chewy cookies with a bakery-style texture thanks to pudding mix in the dough.
Crisco Chocolate Chip Cookies — A nostalgic favorite with tender centers and classic homemade chocolate chip cookie flavor.
Chocolate Chunk Cookies — Bakery-style cookies loaded with chopped chocolate for rich, melty pockets throughout.
Coconut Chocolate Chip Cookies — Sweet coconut adds extra chew and a fun twist to a classic cookie.
Alton Brown Chocolate Chip Cookies — A famous chocolate chip cookie variation known for its chewy texture and chocolate-forward flavor.
Tried This Recipe?
💌 And while you’re here, don’t miss the next cozy recipe — subscribe to my totally FREE newsletter so you’ll always have comfort food favorites at your fingertips. 💌
If you enjoyed this recipe, please take a moment to leave ⭐️⭐️⭐️⭐️⭐️ star rating and a quick comment — I love hearing from you and it helps our community of bakers and cooks!
📸 And if you Gram…don’t forget to share your cookies on Instagram — tag me @gonnawantseconds so I can cheer you on and share your creations!
Thanks for stopping by my kitchen today — happy cooking, friends! 💗 Kathleen
Toll House Cookies
Ingredients
- 2 1/4 cups all-purpose flour
- 1 teaspoon baking soda
- 1 teaspoon salt
- 1 cup butter softened
- 3/4 cup granulated sugar
- 3/4 cup brown sugar packed
- 1 teaspoon vanilla extract
- 2 eggs large
- 2 cups semi-sweet chocolate morsels
- 1 cup pecans (optional) chopped
Instructions
- Preheat the oven to 375°F. Line baking sheets with parchment paper or silicone baking mats.
- Mix the dry ingredients: In a medium bowl, whisk together the flour, baking soda, and salt. Set aside
- Cream the butter and sugars: Beat butter and both sugars for 2–3 minutes, until lighter in color and fluffy.(This step helps the cookies rise slightly before settling into chewy centers.)Add vanilla and mix briefly.
- Add the eggs: Beat in eggs one at a time, mixing just until blended after each addition. The mixture should look smooth and glossy — not curdled.
- Combine: Gradually add dry ingredients on low speed, mixing just until no dry streaks remain. Do not overmix.
- Fold in the chocolate and nuts: Stir in the chocolate morsels and pecans (if using).
- Optional Chill (for thicker, chewier cookies): Cover and refrigerate the dough for at least 1 hour or up to 24 hours. Chilling allows the flour to fully hydrate and the butter to firm up, resulting in thicker cookies with richer flavor.
- Scoop and bake: Drop dough by rounded tablespoons or use a medium cookie scoop onto prepared baking sheets, spacing cookies about 2 inches apart.Room temperature dough: Bake 1o–11 minutes. Bake until the edges are golden brown and the centers still look slightly soft.Chilled dough: Bake 11–13 minutes.Large cookies (about ¼ cup dough each): 13–15 minutes at 375°F.** Cold-dough tip: Bake one tray at a time. Keep the next tray in the fridge, and only pull it out when you’re literally ready to open the oven door and slide it in — that way the dough stays cold and your cookies stay thick and chewy.
Visual Doneness Cue (Trust This Over Time)
Remove cookies when:1. edges are light golden1. centers look pale and slightly underbaked3. tops look set but softThey will continue cooking on the hot pan for about 1 minute after removal.👉 If the centers look fully browned in the oven, the cookies will be crunchy after cooling.- Cool: Let cookies rest on the baking sheet for 2 minutes, then transfer to wire racks to cool completely.
Fans Also Made:
None found
Notes
- For crispy, larger, and spread out cookies, cook on upper rack for 9 minutes.
- For smaller soft cookies, cook on middle rack for 9 minutes.
- After cookies are taken out of the oven, remove after 2 minutes from cookies sheets or cookies will stick.
- As the batter warms, cookies will become thinner.
Nutrition

Leave a Reply