This post may contain affiliate links. Please read our disclosure policy.
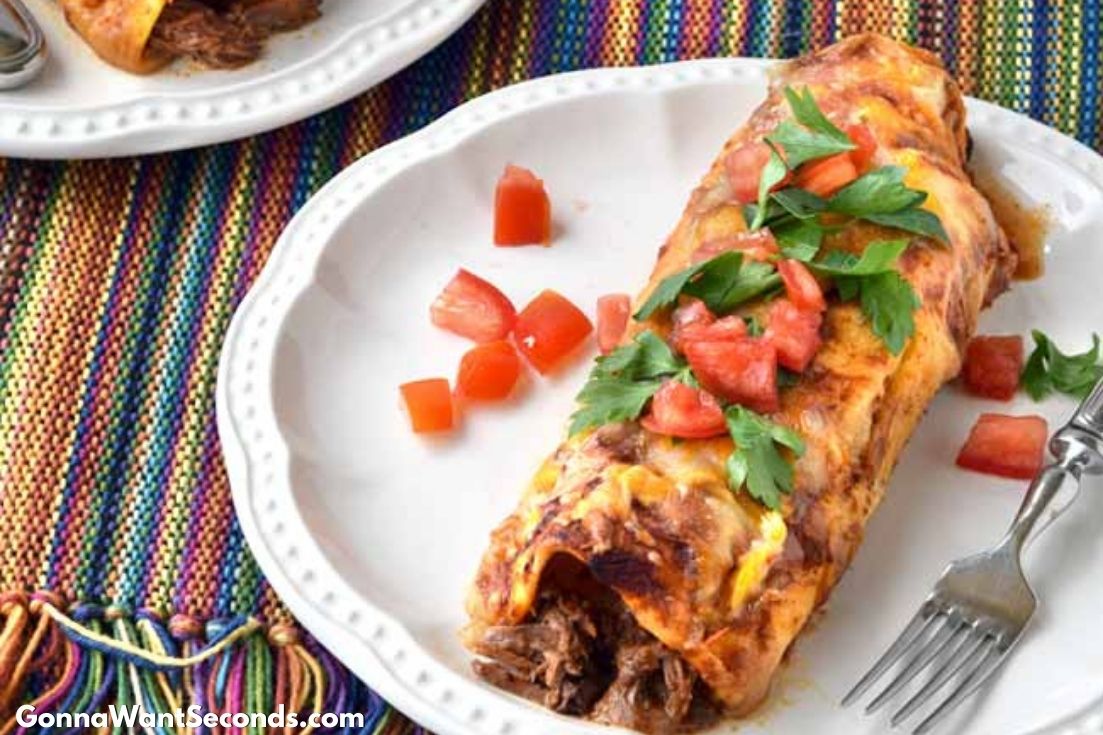
These shredded beef enchiladas are slow-braised until fall-apart tender, then rolled into tortillas and baked in the rich, savory sauce created right in the pot. This is the kind of cozy, comforting meal that fills the house with incredible smells and brings everyone to the table — a true Sunday Supper classic.
This is one of those recipes my family requests again and again — especially when we want something cozy and special without a lot of fuss.
If you love hearty enchilada dinners, be sure to check out my White Chicken Enchiladas, Cheesy Chicken Enchiladas, and Shrimp Enchiladas — all family favorites that bring big flavor in their own way.
This version stands out because the beef cooks low and slow, developing deep flavor and creating its own incredible enchilada sauce as it braises. No shortcuts, no canned sauce — just comfort food done right.

✨ Before You Begin
This recipe is straightforward, but a few key details make all the difference.
✨ Plan ahead — this is a slow-braised dish that shines as a relaxed weekend or Sunday Supper meal
✨ Use the right cut of beef so it becomes tender and shreddable
✨ Don’t rush the braise — the sauce develops naturally as the beef cooks
✨ Warm the tortillas before filling so they roll easily without cracking
✨ Assemble gently so the enchiladas stay saucy and cohesive in the oven
Shredded Beef Enchiladas Ingredients + Key Notes
This is just a quick glance at what you’ll need. For exact measurements and the full ingredient list, head down to the recipe card below.
- Beef chuck roast – the best cut for shredding after slow cooking
- Onion and garlic – form the flavor base for the braising liquid
- Chili powder and spices – give the sauce depth without overwhelming heat
- Beef broth – combines with the beef drippings to create the enchilada sauce
- Flour tortillas – soft, sturdy, and perfect for this style of enchilada
- Cheese – melts into the sauce and ties everything together
🥣 How to Make Shredded Beef Enchiladas

You’ll start by seasoning and browning the beef until it develops deep color, which builds the foundation of flavor for both the meat and the sauce. Once the onions, garlic, spices, and broth are added, the beef slowly braises until it’s fall-apart tender, releasing rich, beefy flavor into the liquid and naturally creating an incredible enchilada sauce.
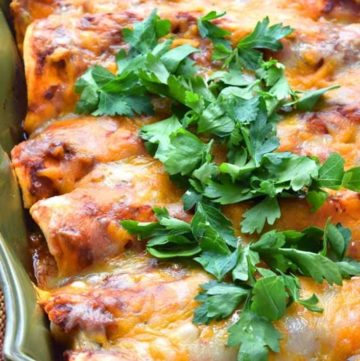
When the beef shreds easily, return it to the sauce so it can soak up every bit of flavor before assembling. Warm the tortillas, fill them generously with the shredded beef, roll, and arrange them seam-side down in the baking dish. Spoon additional sauce over the top, finish with cheese, and bake until everything is bubbly, melty, and irresistibly saucy.
Don’t worry if the sauce looks a little loose at this stage — it thickens beautifully as the enchiladas bake.
***See Full Instructions On the Recipe Card Below
⭐ Pro Tips
⭐ Let the beef tell you when it’s done (not the clock)
Because this recipe uses a slow braise, the cooking time is only a guideline — not a rule. Oven temperatures vary, roasts vary, and Dutch ovens seal differently. The beef is ready when it shreds easily with a fork. If it resists at all, it simply needs more time. Nothing is wrong.
⭐ Pat the beef dry before browning
Before browning the chuck roast, pat it dry with paper towels. Removing surface moisture helps create a deep, flavorful crust, which is key to building layers of rich flavor in both the beef and the sauce as it braises.
⭐ Toss the shredded beef in the sauce — don’t skip this
Once the beef is shredded, stir it back into about a cup of the braising liquid before assembling the enchiladas. This step ensures every bite of beef is juicy, seasoned, and deeply flavorful instead of dry or one-note.
⭐ Sauce on the bottom matters
Before adding the rolled enchiladas to the baking dish, spread a thin layer of sauce across the bottom. This prevents sticking and keeps the enchiladas from getting tough on the underside as they bake.
⭐ Flour tortillas work beautifully here
This recipe is written for flour tortillas because they’re tender, easy to roll, and hold up well to the saucy filling without tearing. I don’t fry them and have never had an issue with sogginess in this dish.
⭐ Divide the cheese for the best texture
Half of the cheese goes inside the enchiladas, where it melts into the shredded beef. The rest is sprinkled over the top so you get that bubbly, golden finish. This layering gives you the best texture and flavor throughout the dish.
⭐ Mild by default — easy to make spicy
These enchiladas are rich and savory rather than spicy. If you like heat, add a pinch of cayenne to the sauce or a splash of hot sauce during cooking. It’s easy to adjust without overpowering the dish.
⭐ Even better the next day
Like most slow-braised meals, these shredded beef enchiladas taste even better after resting. The flavors deepen overnight, making this a great make-ahead option for Sunday supper or entertaining.
Storing, Reheating, Freezing, and Make-Ahead Tips
Storing
- Store leftover enchiladas tightly covered in the refrigerator for up to 4 days.
Reheating
- For best results, cover and reheat in a 350°F oven until warmed through. For smaller portions, the microwave works well.
Freezing
- These enchiladas freeze beautifully. Wrap tightly and freeze for up to 3 months. Thaw overnight in the refrigerator before reheating.
Make-Ahead
- The beef can be braised and shredded up to 2 days in advance. Assemble and bake when ready to serve.
What to Serve With Shredded Beef Enchiladas
Fresh + Crisp Sides
- Southwest Salad
- Mexican Corn Salad
- Pineapple Coleslaw
- Cucumber Tomato Salad
Comforting Sides
Sweet Finishes
✦ Frequently Asked Questions
✦ What cut of beef is best for shredded beef enchiladas?
Beef chuck roast is the best choice for this recipe. It’s well-marbled, economical, and made for low-and-slow cooking — which means it turns meltingly tender and easy to shred. As it braises, all that beefy richness also helps create an incredibly flavorful enchilada sauce right in the pot.
✦ Why are my enchiladas dry?
Dry enchiladas usually come down to not enough sauce or too much uncovered baking time. Enchiladas should be generously sauced — a thin layer on the bottom of the pan, sauce mixed into the shredded beef, and more sauce spooned over the top before baking. If they bake uncovered too long, moisture can evaporate and dry them out. To fix this, make sure the enchiladas are well-coated in sauce and cover the dish loosely with foil if you notice them browning before they’re heated through.
✦ How do I know when the beef is tender enough to shred?
The beef is ready when it shreds easily with a fork. Cooking times are always an estimate because roast size, oven accuracy, and how well your Dutch oven seals can all vary. If the beef resists shredding, it simply needs more time — keep braising until it pulls apart effortlessly.
✦ Can I use corn tortillas instead of flour tortillas?
Yes. Corn tortillas are the more traditional choice, but they can tear more easily and tend to need a little extra help to roll. If you use corn tortillas, a quick, light fry (just a few seconds per side) makes them more pliable and helps prevent cracking. Flour tortillas are softer, easier to roll, and hold up beautifully in this saucy enchilada style.
✦ Do I need to fry the tortillas to prevent soggy enchiladas?
Not for this recipe. Because the beef is tossed with sauce and the enchiladas bake in sauce, you want tortillas that stay tender — not crisp. I don’t fry flour tortillas and haven’t had sogginess issues with this dish. If you’re using corn tortillas, a quick fry can help with pliability and structure, but don’t overdo it since they’ll finish cooking in the oven.
✦ Can I make shredded beef enchiladas ahead of time?
Absolutely. You can braise and shred the beef up to 2 days ahead, then store it in the sauce in the fridge. When you’re ready, assemble and bake. You can also assemble the enchiladas (unbaked), cover tightly, and refrigerate overnight, then bake the next day.
✦ Do these shredded beef enchiladas freeze well?
Yes — they freeze very well. For best results, let them cool completely, wrap tightly, and freeze for up to 3 months. Thaw overnight in the refrigerator before reheating. (They’ll stay saucier and reheat more evenly this way.)
✦ How do I reheat enchiladas without drying them out?
Reheat them covered so the moisture stays trapped. For larger portions, cover with foil and warm in a 350°F oven for 15–20 minutes, or until heated through. If the enchiladas were stored in a glass or ceramic baking dish, let the dish come closer to room temperature before placing it in a hot oven to prevent shattering. Alternatively, transfer leftovers to an oven-safe pan.
✦ Can I change the cheese?
Definitely. Cheddar and Monterey Jack are a classic combo here, but Pepper Jack is great if you want a little kick. If you love a saltier, more traditional finish, you can sprinkle a little Cotija on top after baking. Just keep a good melty cheese in the mix so you still get that gooey enchilada texture.
✦ How spicy are these enchiladas?
They’re mild to medium, depending on your chili powder and any optional heat you add. If you like spicy enchiladas, add a pinch of cayenne to the sauce or a splash of hot sauce during cooking. It’s an easy way to dial up the heat without changing the overall flavor.
✦ What can I use instead of sour cream for serving?
Plain yogurt is my favorite swap — it’s creamy, mild, and works especially well if you’re serving picky eaters who don’t love a strong sour cream tang.
Still have questions? Drop them in the comments — I love helping you bake + cook with confidence! 💗
More Mexican Dinner Favorites
- Taco Lasagna — All the cozy, cheesy taco flavors layered up like lasagna (total family-night winner).
- Carne Picada — Tender, saucy beef that’s perfect for tacos, burritos, bowls, or stuffing into tortillas.
- Carne Guisada — Rich, slow-simmered Texas-style beef stew that’s incredible with warm tortillas.
- Chicken Tortilla Casserole — A crowd-pleasing baked Mexican casserole that’s cheesy, saucy, and weeknight-friendly.
- Enchilada Sauce — Your quick, from-scratch sauce for when you want enchiladas on a faster weeknight.
- Taco Rice — An easy one-pan dinner with big taco flavor that’s perfect for busy weeknights.
- Fresas con Crema — Sweet, creamy strawberries that make the perfect light finish after a saucy enchilada dinner.
Tried This Recipe?
💌 And while you’re here, don’t miss the next cozy recipe — subscribe to my totally FREE newsletter so you’ll always have comfort food favorites at your fingertips. 💌
If you enjoyed this recipe, please take a moment to leave ⭐️⭐️⭐️⭐️⭐️ star rating and a quick comment — I love hearing from you and it helps our community of bakers and cooks!
📸 And if you Gram… don’t forget to share your photo on Instagram — tag me @gonnawantseconds so I can cheer you on and share your creations!
Thanks for stopping by my kitchen today — happy cooking, friends! 💗 Kathleen
Shredded Beef Enchiladas
Ingredients
The Meat:
- 3 pounds boneless beef chuck roast
- salt
- black pepper
- 2 tablespoons bacon grease or vegetable oil
- 1 large yellow onion chopped
- 4-6 large cloves garlic rough chopped
- 1 (28-ounce) can crushed tomatoes
- 1 cup water
- 2 tablespoons chili powder
- 1 tablespoon ground cumin
- 1 tablespoon dried oregano
- 3 bay leaves
- 2 tablespoons apple cider vinegar
- 2 tablespoons Worcestershire sauce
- 1/2 teaspoon sugar
Enchiladas
- 8 (8-inch) Flour Tortillas
- shredded meat
- 3/4 cup sour cream
- 2 cups extra-sharp cheddar cheese shredded~divided
- 2 cups Monterey Jack cheese shredded~divided
- 1/2 cup fresh cilantro roughly chopped
Instructions
Make the Meat and Sauce:
- Preheat oven to 275°F (135°C).
- Pat chuck roast (3 pounds) dry with paper towels. Season both sides generously with salt and pepper. In an ovenproof Dutch oven, heat bacon grease or vegetable oil (2 tablespoons) over medium heat until it's hot and begins to shimmer. Add chuck roast and brown on both sides, about 5 minutes per side. Remove the roast to a plate and set aside. Add onion (1 large) and garlic (4-6 large), reduce the temperature to medium-low, and saute until soft and translucent, about 7-8 minutes.
- Add the roast back to the Dutch oven, along with any pan juices that have accumulated, the crushed tomatoes (1 can), water (1 cup), chili powder (2 tablespoons), cumin (1 tablespoon), oregano (1 tablespoon), bay leaves (3), apple cider vinegar (2 tablespoons), Worcestershire sauce (2 tablespoons), and sugar (1/2 teaspoon). Bring the mixture to a boil and cover. Place in the preheated oven and cook for 3-3 1/2 hours, or until the roast is falling-apart tender.
- Remove the roast to a shallow pan and shred with 2 forks. Add 1 cup of the pan sauce. Add salt and pepper to taste (I added 2 teaspoons of salt and 1/2 teaspoon of pepper). Set aside.
- Add 1 cup of water to the pan sauce and salt and pepper to taste (I added 1 1/2 to 2 teaspoons of salt and 3/4 teaspoon pepper).
Assemble Enchiladas:
- Preheat the oven to 350°F (177°F).
- Add 1/2 cup of pan sauce to a 9 X 13-inch baking dish.
- Set aside 1 cup of the cheddar and 1 cup of the Jack for the top of the enchiladas.
- Fill each tortilla with an equal amount of shredded beef (about 1/3 cup), 1 1/2 tablespoons of sour cream, a layer of cheddar, and a layer of the jack. Roll up tightly and place seam side down in the baking dish.
- Ladle cooled pan sauce evenly over top of the enchiladas, then sprinkle with cheese. (You'll probably have extra sauce)
- Bake in the preheated oven until the sauce is bubbly and the cheese is melted about 20-25 minutes. Garnish with cilantro and serve.
Fans Also Made:


Notes
- Braising: Because the meat braises in the oven, it will be succulently tender when done. Remember, the given cooking time is an approximation. Your cooking time can and likely will vary depending on the exact size of your roast, your exact oven temperature (these vary), and how well your Dutch oven seals.
- Beef chuck roast: The best tip for this authentic Mexican beef enchilada recipe involves using a beef chuck roast which adds a ton of tender flavor. Be sure to pat it dry before browning to help create that nice crust that coaxes out layers of yum as it braises in the oven!
- You’ll also want to toss the beef in your pan sauce (which we’ll now call enchilada sauce) before assembling your shredded beef enchiladas.
- Tortillas: This particular recipe also calls for using flour tortillas instead of corn. They’re tender, versatile, and often blister just a tad when cooked which adds yet another scrumptious layer of complex flavor. Plus, I find them easier to work with. If you prefer corn tortillas, which are admittedly a more authentic choice, feel free to use them!
- In order to prevent your tortillas from getting soggy, some people recommend frying them until they’re crispy before wrapping up the meat and cheese. If you make this recipe with corn tortillas, frying them is an important step because it also makes them pliable and easy to roll up.
- Truthfully, I’ve never had an issue with this recipe getting soggy and I do not fry my tortillas. But, if you’d like to try frying the tortillas, I recommend frying them just a little bit. Don’t overdo it they’ll have time to cook in the oven too.
- Sauce: After the beef gets shredded, toss it with one cup of the (spectacular) sauce before assembling the enchiladas. Don’t skip this, the sauce toss is an important step in making the meat taste so good.
- Don’t forget to add some of the sauce to the bottom of the pan before you assemble the enchiladas. It prevents the enchiladas from sticking to the bottom of the pan and makes sure they don’t get too tough on the underside.
- If you have leftover sauce do not throw it away. It’s too good to go to waste. Use it for eggs ranchero or toss it in with some rotisserie chicken for quick chicken tacos.
- Cheese: Make sure to note that the cheese mixture is divided. Half of the cheese is used inside the enchiladas—it gets all melty and delicious and blends with that savory shredded beef.
- The other half is reserved to sprinkle on top of enchiladas once they’re assembled. Believe me, smothering your enchiladas in melted cheese is exactly what you want.
- Feel free to switch up the type of cheese you use. While the cheddar/Monterey jack combination is excellent with this recipe, I sometimes use cotija and pepper jack cheese instead. Both are wonderful and can be switched out to vary the dish.
- Make it Spicy: Some people (like my son) really like these enchiladas served spicy! In order to heat up the enchilada sauce, you can add the cayenne powder in addition to the chili powder. Alternatively, you can add hot sauce at step 3 of the instructions, along with the crushed tomatoes.
- Sour Cream: There are a lot of things you could use as a sour cream substitute with this recipe (cottage cheese, evaporated milk, etc.), but my favorite has always been plain yogurt. It’s a little less flavorful than having sour cream on the enchiladas, but if you have picky guests that can sometimes be a good thing.

Wow, my mom loved this so much, she asked me to make it again next Sunday!
Yaaay! Thanks, Daisy 🙂
Can you give a substitute in your recipes for cilantro? It’s just not a favorite of mine, tastes foul in my mouth. Thanks Sandra
I would add some fresh parsley!
Hi there, I’m making this tomorrow for dinner. Couple questions? 1. Can I do this in the crock pot or stove instead? It’s still hot and would like to avoid oven use, as long as it won’t alter the flavor. 2. Can I add Serrano and Anaheim chili’s while braiding the meat?
Thank you. I’ll let you know how it turns out.
Hi Nicole. Yes, this can be made in the crockpot but I haven’t worked on exact directions. Sorry! Yes, the chilis would be a great addition! <3
Wow .. going to make this weekend ..
This recipe makes some of the best enchiladas I’ve ever had, including those I’ve eaten in Baja California. When I make them again, I will double the sauce ingredients because I had none leftover and just barely enough to cover the enchiladas before baking them. And, the sauce is amazing! I have two comments about the recipe itself. 1. The cooking/prep time listed is like 1 hour and should probably be more like 4 hours. 2. In the reference about spicing it up, there’s a mention of adding hot sauce to it after the chicken broth but I find no mention of chicken broth in the actual recipe. Can you expand on this, please? I braise a lot and I was a bit short on time when I made these so I cheated by starting them at about 375 for the first hour and then dropping the temperature into the braising range. They still turned out amazing and fork tender. Bottom line…my wife and I absolutely loved these enchiladas!
Hi Gene! Wow! I’m honored that you think these are some of the best enchiladas you’ve had! Thank you. You are right, there was an error in my recipe notes that I’ve amended regarding when to add the optional hot sauce. It should have read “you can add hot sauce at step 3 of the instructions, along with the crushed tomatoes.” Thank you for pointing that out! 🙂
I’m going to make this going add a can of Rotel with the crushed tomatoes and make in Crock-Pot…
Let us know how it comes out! 🙂
Oh my gosh – I am so making these this weekend for dinner next week. I too am always looking for ways to prepare dinner faster during the week. I have made your Chicken Enchiladas ever since you first posted it and those are the best! I always keep that enchilada sauce on hand to use on lots of things. I also prefer flour tortillas in my enchiladas (I think the corn ones get mushy) so I disagree with the other post about these not being enchiladas. Maybe “authentic” enchiladas are not made with flour tortillas but I think you have to make things to suit your taste. I am looking forward to making these and know they will turn out great, as have all the other recipes from your site that I’ve tried. Thank you for sharing so many great recipes!
They’re not enchiladas with flour tortillas. Maybe wet burritos, but not enchiladas.