This post may contain affiliate links. Please read our disclosure policy.
If you’ve ever had the iconic banana pudding from Magnolia Bakery, you already know—it’s rich, creamy, and completely unforgettable. But what if I told you that you can make a version at home that’s just as dreamy… and maybe even better?
This recipe is everything you love about the classic: silky vanilla pudding, perfectly ripe bananas, and soft, cake-like cookies layered together into one irresistible dessert. But here’s where it stands out—this version is balanced, not overly sweet, with a smoother texture and a more pronounced vanilla flavor in every bite. The real secret? It’s all about timing, layering, and a few small technique tweaks that make a big difference—like fully covering the bananas and letting the pudding set properly.
Growing up, banana pudding was always a big-deal dessert in my family—usually made in a big bowl with lots of love and just enough patience to let everything come together. That nostalgic, creamy, layered magic is exactly what we’re recreating here… just with a little Gonna Want Seconds upgrade.
Let’s make this banana pudding!
If you love easy, no-bake desserts like this, be sure to try my Eclair Cake, Brownie Trifle, or English Trifle next—or browse my full collection of no-bake dessert favorites.

What Is Magnolia Bakery Banana Pudding?
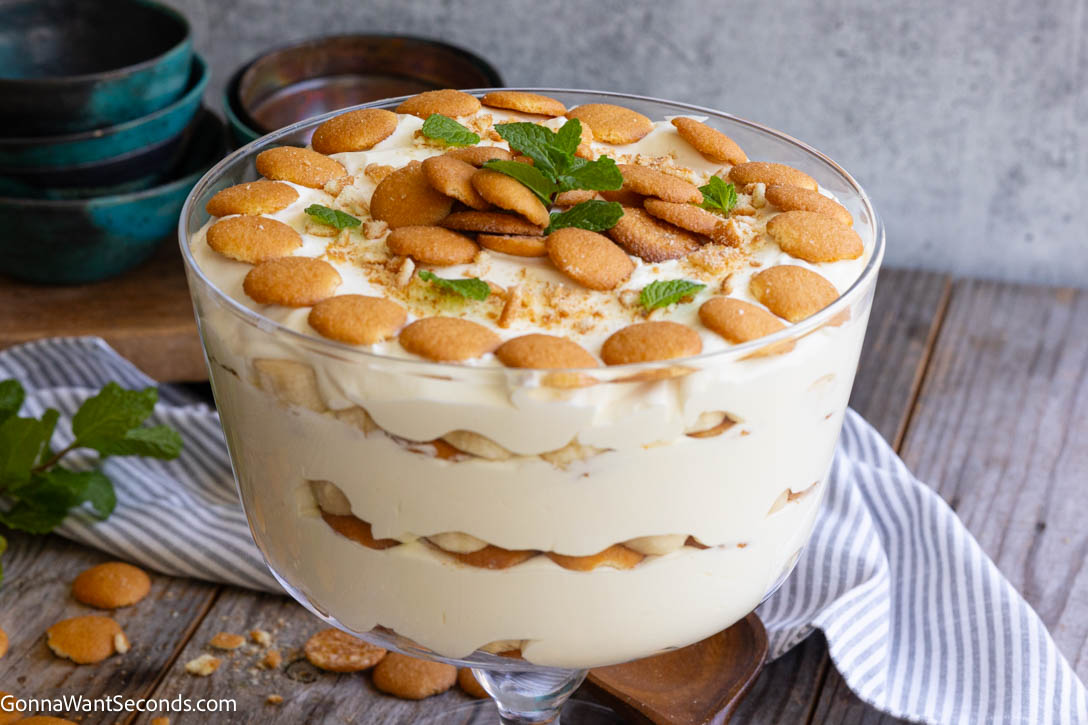
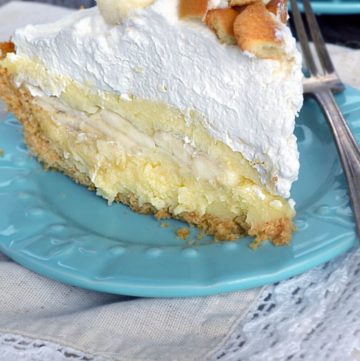
Magnolia Bakery banana pudding is a classic no-bake dessert made with layers of vanilla pudding, whipped cream, bananas, and vanilla wafers. As it chills, the cookies soften into a cake-like texture, creating a light, creamy dessert that’s known for its smooth consistency and balanced sweetness.
Unlike traditional banana pudding, which is often thicker and custard-based, Magnolia-style pudding is lighter and fluffier, with a signature layered texture that’s become famous nationwide.
At a Glance
• No-bake dessert: No oven, no stove—just mix, layer, and chill.
• 6 simple ingredients: Classic, easy-to-find ingredients that come together beautifully.
• Quick to assemble: Ready in about 20 minutes, then the fridge does the rest.
• Best after chilling: The texture is perfect after 4–12 hours when the layers have fully set.
✨ Before You Begin
✨ Plan ahead for chilling: This dessert transforms as it sits. While it’s technically ready after 4–6 hours, overnight chilling gives you that signature Magnolia Bakery texture.
✨ Use ripe (but not overripe) bananas: Look for bananas that are bright yellow with a few brown speckles. Too ripe and they’ll turn mushy.
✨ Start with cold ingredients: Ice-cold water and cold cream are key for proper pudding set and a fluffy whipped texture.
✨ Handle bananas last: Slice and prep them right before layering to keep them fresh and beautiful.
Why This Banana Pudding Recipe Works
• Whipped cream instead of Cool Whip: Creates a lighter, more natural, airy texture.
• Sweetened condensed milk + pudding mix: Gives the perfect balance of richness and structure.
• Layering + time: Allows the wafers to soften into that signature cake-like consistency.
• Moisture control: Drying the bananas helps keep the layers creamy, not watery.
It’s the combination of technique and timing that turns simple ingredients into something truly special.
Banana Pudding Ingredients + Key Notes
This is just a quick glance at what you’ll need. For exact measurements and the full ingredient list, head down to the recipe card below.
Sweetened condensed milk: Adds rich sweetness and creamy body that defines the flavor.
Ice-cold water: Helps properly hydrate and set the pudding mix.
Instant vanilla pudding mix: The backbone of the filling — make sure it’s instant, not cook-and-serve.
Heavy whipping cream: Whipped to soft peaks for a light, airy texture.
Vanilla wafers: Classic choice that softens beautifully into cake-like layers.
Bananas: Fresh, ripe bananas provide sweetness and contrast.
🥣 How to Make Magnolia Bakery Banana Pudding
Here’s a quick look at how to assemble this easy banana pudding (full instructions in the recipe card below).

Make the pudding base: Whisk together sweetened condensed milk and cold water until smooth. Add pudding mix and whisk for about 2 minutes until thickened. Cover and refrigerate 3–4 hours until fully set.
Whip the cream: Beat heavy cream until soft peaks form.
Fold together: Gently fold the whipped cream into the chilled pudding until smooth and fluffy.
Prep the bananas (anti-browning method):
In a shallow bowl, combine the juice of ½ lemon with 1 cup water. Add sliced bananas, flip gently to coat, then transfer to a clean kitchen towel and lightly pat dry before using.
Layer: In a trifle dish or bowl, layer vanilla wafers, bananas, and pudding mixture. Repeat layers, finishing with pudding on top.
Chill: Cover and refrigerate for at least 4–6 hours, preferably overnight.
Pan option (great for potlucks):
This banana pudding can also be made in a 9×13-inch baking dish instead of a trifle bowl. It’s easier to transport, serves a crowd beautifully, and is my go-to when bringing this to potlucks.
How to Layer Banana Pudding for the Perfect Texture
The way you layer banana pudding makes a big difference in the final texture. A few small adjustments can take it from good to absolutely perfect.
Start with a layer of cookies. This gives the pudding a sturdy base and helps the cookies soften evenly as the dessert chills.
Add an even layer of bananas. Spread the slices out so every bite gets fresh banana flavor instead of a few heavy pockets.
Top with pudding to seal the layer. This helps protect the bananas from too much air exposure and encourages the layers to meld together beautifully.
Repeat balanced layers. Try to keep the cookies, bananas, and pudding fairly even throughout so one part of the dish doesn’t end up too dry or too heavy.
Finish with pudding on top. A final layer of pudding keeps the top soft, smooth, and pretty for serving.
⭐ Pro Tips
⭐ Overnight is the magic window:
This is when the wafers soften into that signature cake-like texture.
⭐ Don’t skip drying the bananas:
Excess moisture can thin out your pudding layers.
⭐ Soft peaks are key:
Over-whipped cream will make the pudding dense instead of light.
⭐ Use a deep dish:
More layers = better texture and presentation.
⭐ Slice bananas evenly:
Uniform slices give you better layering and texture in every bite.
⚠️ Common Mistakes to Avoid
This recipe is simple, but a few small mistakes can affect the final texture and flavor. Here’s what to watch for.
Overmixing the pudding mixture. Once the whipped cream is folded in, be gentle. Overmixing can knock out the air and make the filling heavier.
Using underripe bananas. Bananas that are still too firm or green-tinged won’t have the sweetness or soft texture you want here.
Not chilling long enough. The pudding needs time to set and the wafers need time to soften. This dessert really does get better after several hours in the fridge.
Letting the bananas sit too long before layering. Slice them right before assembly so they stay fresh-looking and flavorful.
Over-chilling for too long. After a full day or more, the layers can become very soft. Still tasty, but less like that classic Magnolia-style texture.

🕒 What to Expect (Texture Timeline)
- 0–2 hours: Layers are distinct, and the wafers are still slightly crisp.
- 4–6 hours: The wafers begin to soften, and the pudding thickens—good, but not peak texture yet.
- 8–24 hours: This is the sweet spot. The layers are soft, creamy, and beautifully cake-like.
- 2–3 days: Still delicious, but the bananas soften more and the layers become much softer overall.
If you’re serving guests, aim for that overnight sweet spot.
How to Keep Bananas from Browning
The best way to keep bananas from browning in banana pudding is to briefly soak them in a mixture of lemon juice and water, then pat them dry before layering.
This slows oxidation without adding a strong lemon flavor — and the drying step keeps your pudding from getting watery.
Is Banana Pudding Too Sweet? Here’s How to Fix It
If you’ve ever had banana pudding that felt a little too sweet, you’re not alone — that’s one of the most common complaints with Magnolia-style versions. Here are a few easy ways to keep the flavor balanced while still rich and creamy.
Add a pinch of salt. Just a small amount helps balance the sweetness and deepen the overall flavor.
Use real whipped cream instead of whipped topping. Fresh whipped cream is less sweet and gives the pudding a more natural, balanced taste.
Add extra fresh banana layers. Bananas bring natural fruit flavor that helps balance the richness of the pudding.
Storing + Make-Ahead + Shelf Life
Refrigerator:
Store covered for up to 3 days.
Best texture window:
8–24 hours after assembling.
Make-ahead tip:
You can prepare the pudding mixture a day in advance and assemble later.
Freezing:
Not recommended — the texture will break down.

Frequently Asked Questions
◆ Can I make banana pudding ahead of time?
Yes! In fact, it’s best that way. Making it ahead gives the wafers time to soften and the layers time to settle into that signature creamy, cake-like texture.
◆ Can I use Cool Whip instead of whipped cream?
Yes, you can, but the texture will be a little heavier and less fresh-tasting. For the lightest, fluffiest Magnolia-style result, freshly whipped cream is the better choice.
◆ Why are my bananas turning brown?
Bananas naturally oxidize once they’re sliced and exposed to air. Briefly soaking them in diluted lemon juice and patting them dry helps slow browning without adding too much lemon flavor.
◆ How long does banana pudding last?
It’s best within 2–3 days. After that, the bananas start to soften more and the overall texture becomes looser.
◆ Can I use different cookies?
Absolutely. Vanilla wafers give the most classic Magnolia-style flavor and texture, but Chessmen cookies or shortbread cookies are also popular options.
Still have questions? Drop them in the comments — I love helping you cook with confidence! 💗
More Banana Desserts and No-Bake Favorites
If you love the creamy, layered texture of this banana pudding, here are a few more desserts to try next.
- Banana Pudding Cake brings all the flavors of classic banana pudding into a soft, bakery-style cake with rich banana flavor in every bite.
- Banana Pudding Cookies are a fun twist on the classic, with soft, chewy cookies packed with banana pudding flavor.
- No Bake Lemon Icebox Cake is cool, creamy, and layered with bright lemon flavor — perfect when you want something refreshing and easy.
- Million Dollar Pie is a light, creamy no-bake dessert with a tropical twist that’s always a crowd favorite.
- Creamy Fruit Salad is sweet, fluffy, and packed with fruit — an easy, nostalgic side that doubles as dessert.
Tried This Recipe?
Hungry for more cozy, crave-worthy recipes? Subscribe to my FREE newsletter — I share new recipes every week plus reader favorites you don’t want to miss!
I’d love to hear what you think! Please leave a comment below and a ⭐⭐⭐⭐⭐ rating and let me know how it turned out — or what fun variations you tried.
Tip for mobile readers: scroll just a bit to tap the stars — thank you!
Thanks for stopping by my kitchen today — happy cooking, friends! ❤️ Kathleen

Best Banana Pudding (Magnolia Bakery-Style)
Ingredients
- 1 (14-ounce) can sweetened condensed milk
- 1 1/2 cups ice-cold water
- 1 (3.4-ounce) package instant vanilla pudding mix
- 3 cups heavy whipping cream
- 1 (11-ounce) box vanilla wafers
- 4–5 ripe bananas sliced
Instructions
- Make pudding base: In a large bowl, add sweetened condensed milk (1 can) and cold water (1 1/2 cups) and beat with a hand mixer on medium speed until smooth (about 30–60 seconds). Add the instant pudding (1 package) and continue beating for 1–2 minutes, until fully smooth and slightly thickened. Cover and refrigerate for at least 3–4 hours, or until set.👉 It should look like a very loose pudding at this stage—not fully set yet.
- Whip cream: In a separate bowl, beat heavy whipping cream (3 cups) using a hand mixer, until soft peaks form.
- Combine: Gently fold the whipped cream into the chilled pudding mixture until smooth and airy.
- Layer: In a large dish, add a layer of vanilla wafers, followed by sliced bananas, then pudding. Repeat layers until all ingredients are used, finishing with pudding on top.
- Chill: Cover and refrigerate for at least 4 hours before serving.
Fans Also Made:


Notes
- Overnight is the magic window: This is when the wafers soften into that signature cake-like texture.
- Don’t skip drying the bananas: Excess moisture can thin out your pudding layers.
- Soft peaks are key: Over-whipped cream will make the pudding dense instead of light.
- Use a deep dish: More layers = better texture and presentation.
- Slice bananas evenly: Uniform slices give you better layering and texture in every bite.
Nutrition

Leave a Reply