This post may contain affiliate links. Please read our disclosure policy.
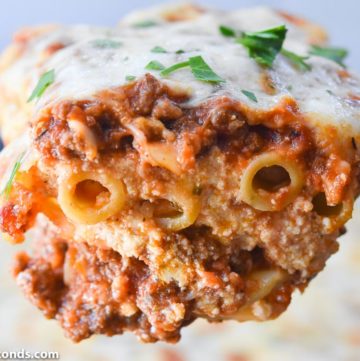
Baked ziti with ricotta is a decadent Italian delicacy that rises high above many typical pasta recipes. Though simple to assemble, this ziti pasta exudes sophistication and confidence in all its splendor. People will think you spent hours in the kitchen.
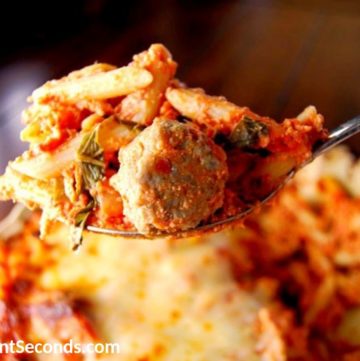
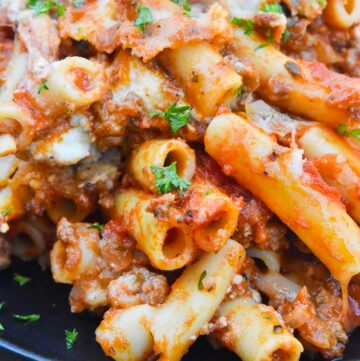
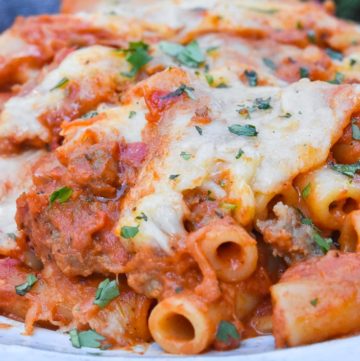
There are plenty of recipes for this hearty classic, but none as divinely inspired as this (IMHO!). The melty mozzarella topping, Italian meat sauce, and beautiful ricotta filling are broken into bite-sized portions by the amiable ziti pasta. It’s enough to make you salivate. Baked ziti with ricotta is perfect for a cozy family dinner or a decadent potluck course.
If you love delicious cheesy baked pasta as much as we do, I hope you’ll try our quick and easy weeknight ravioli lasagna, shortcut cannelloni, and shortcut stuffed shells. For more hearty, oven-baked dinner ideas, browse my complete collection of Casserole Recipes.

What I Love About Baked Ziti with Ricotta Recipe
I love that this baked ziti with ricotta is so simple to make even though it tastes like a million bucks! With an easy 20-minute prep time, you can still get it in the oven for a family meal even on a busy schedule. The recipe is also flexible, so its easy to suit personal tastes and dietary restrictions.
It tastes just like grandma used to make in less than half the time! Here are some other reasons to fall in love with this recipe.
- Hearty and filling
- Robust meat sauce with garlic
- Easy 20-minute prep
- Plenty of melty cheese
- On the table in under an hour

Baked Ziti with Ricotta Recipe Notes
- Pasta Water: I know I sound like a broken record, but it is so important to salt the pasta water. I find that 1-2 tablespoons is adequate for about 4 quarts of water. The pasta absorbs some of the water as it cooks so you want that water to be well-seasoned. If you have any doubt at all, try a taste test. Cook just a little bit of pasta both ways and taste them.
- Al Dente: You’ll also want to cook your ziti pasta al dente which is still a little firm in the middle. Of course, cook it to your liking. I’m just saying that since pasta is the cornerstone of your dish, you want well-seasoned pasta that isn’t mushy when you take it out of the oven.
- Layers: Believe it or not, it does matter how you set up your layers in your baked ziti with ricotta. You should always start with pasta, meat sauce and then ricotta. Of course, spread a layer of meat sauce on the bottom of the pan first to prevent the ziti from sticking. Layering in this manner will ensure that there is just the right amount of each ingredient in every bite.
- Let It Rest! Lastly, be sure to let your baked ziti with ricotta rest for 10-15 minutes before serving. This is not a myth or an old wives’ tale as some people claim. The reason for this is to let your dish ‘set up’ so that all the beautiful flavors can mingle, and you don’t end up with a soupy mess upon serving.
- Pan Size: Our recipe fills a Pyrex 9X13 to the absolute maximum pan capacity. We pressed the top layer gently down with the back of a large spatula. If you happen to have a ceramic 9X13-inch dish with an ever so slightly larger capacity, I suggest using that.
- Spillovers: Place the filled baking dish on a rimmed baking sheet before placing it in the oven. It will catch any spillovers (I’ve never had any, even in my Pyrex dish) but it also makes it easier to move the baking dish in and out of the oven.

Baked Ziti with Ricotta Ingredients
- Veggies: While it can be tempting to throw this baked ziti with ricotta together in one shot, make sure you take the time to sauté the onion. Sautéing veggies before adding them to a recipe helps rid them of their bitterness and brings out their sweet mellow characteristics. It adds layers of aroma and flavor to any dish.
- Spaghetti Sauce: It is also important to choose a great-tasting spaghetti sauce for this recipe. Don’t go in search of the cheapest sauce on the grocery store shelf. Your baked ziti with ricotta will taste so much better with a quality spaghetti sauce. Of course, you can make your own but that will take much longer, and it certainly isn’t necessary for a great-tasting dish.
- Meat: I prefer ground beef for this recipe, but other ground meats will work too. Feel free to use ground turkey or ground chicken if that is what you are used to cooking with.
- Spices: Lastly, I know the nutmeg sounds a little misplaced in the ricotta filling, but I promise you don’t want to skip it. This is the ‘secret ingredient’ that gives your dish that extra something special and it adds to the fragrant aromas that tempt the tummy!
- Ziti Pasta
- Salt & Pepper
- Italian Seasoning
- Ricotta
- Eggs
- Mozzarella
- Parmesan Cheese
How To Make Baked Ziti With Ricotta

- Spread half of the meaty sauce to the bottom of the baking dish.
- Spread half of the cooked pasta over the meat sauce.
- Repeat the layers then spread half of the ricotta mixture.
- Repeat the remaining layers. Cover and bake. Add the remaining cheese. Bake until the cheese melts.
- Let stand 15 minutes before serving.
***See the full instructions below.
Storing + Freezing + Make-Ahead
Storing your ziti sauce is so simple. I just take the leftovers and put them in an airtight container in the fridge. It makes a fantastic brown bag lunch the next day but there often isn’t enough left. Inevitably, someone gobbles it up before the night is out! Depending on how much you have left, you can separate and store in single-serve portions too.
- How Long Can You Keep This In The Fridge? If you have made this dish ahead of time and parked it in the fridge, you should cook it within 2 days.
- If you are storing leftovers, the USDA recommends 3-4 days if stored properly in an airtight container at or below 40 degrees Fahrenheit. Be sure to observe the 2-hour window for serving at potlucks and get-togethers.
- Can You Freeze This? Absolutely, you can freeze this baked ziti with ricotta. Simply prepare as directed and cool to room temperature. Then wrap and freeze accordingly. I often make a double batch and freeze one of them for a ready-made meal during the busy week.
- You can also freeze your baked ziti in single-serve portions that are easy to pull out a couple at a time. It makes great afterschool snacks for teenagers and even better weekend lunches for the busy family!
- Make Ahead Tips: You can certainly prepare this dish ahead of time for convenience and there are a couple of different ways you can do it. First, you can put the whole thing together, cover it, and park it in the fridge instead of the oven.
- You can also go ahead and prepare the meat sauce ahead of time, label it, and freeze it by itself. Just toss it in the fridge to slowly thaw the day before you’re ready to cook. When you want to make your baked ziti with ricotta, boil the ziti and mix the filling. It’ll be ready for the oven in no time flat.
- Food Safety: If you’d like more info on food safety check out this link.
Serving Recommendations
I like to serve this with my fully loaded Mediterranean salad or a simple green salad tossed with my easy-peasy homemade balsamic vinaigrette, simple roasted peppers, or my roasted green beans loaded with pancetta and sweet roasted shallots!
In our family, a meal isn’t complete without a side of bread! This is delicious with my truly amazing garlic bread, copycat Olive Garden bread sticks, or yummy garlic and herb parker house rolls.
Top everything with my tiramisu, strawberry tiramisu, or little, incredibly amazing, Italian Christmas cookies, Italian wedding cookies, amaretti cookies, or ricotta cookies!
How to Halve the Recipe
-
Sauce: Use 1 pound ground beef, 1 jar (24 oz) spaghetti sauce, and half of the seasonings.
-
Ricotta filling: Use 12 ounces ricotta, 1 egg, ½ cup mozzarella, ½ cup Parmesan, and half the spices.
-
Pasta: Use 6 ounces (half a standard box) of ziti.
-
Topping: Use 1 cup shredded mozzarella for the top layer.
Best Baking Dish for Half a Recipe
-
A 9×9-inch square baking dish or a 2-quart rectangular dish is ideal.
-
If using glass (Pyrex), keep the oven temperature at 350°F; if metal, drop it slightly to 325°F to avoid over-browning before the center heats through.
Baking Time
-
Bake covered for 25–30 minutes, then uncover and bake an additional 8–10 minutes until the cheese is melted and bubbly.
-
As always, let it rest 10–15 minutes before slicing for neat, layered servings.
More Delicious Baked Pastas
- Baked Mostaccioli
- Baked Ziti With Sausage
- Baked Spaghetti
- Chicken Lasagna
- Million Dollar Spaghetti (Viral for almost 10 years!)
- Spaghetti Pie
Tried This Recipe?
💌 Hungry for more cozy recipes? Subscribe to my FREE newsletter so you never miss a new family favorite. 💌
If you make this Baked Ziti with Ricotta, I’d love to hear how it turned out! Please leave a comment below and a ⭐⭐⭐⭐⭐ rating!
Thanks for stopping by my kitchen today — happy cooking, friends! ❤️ Kathleen
Baked Ziti with Ricotta
Ingredients
Sauce:
- 2 tablespoons olive oil
- 1 cup onion chopped
- 1 tablespoon garlic minced
- 2 pounds ground beef
- 1 1/2 teaspoons salt
- 1 teaspoon black pepper
- 2 (24-ounce) jars spaghetti sauce
- 3 teaspoons Italian seasoning
Ricotta Filling:
- 24 ounces ricotta
- 2 large eggs
- 1/4 teaspoon nutmeg
- 1 teaspoon Italian seasoning
- 1 cup mozzarella, shredded
- 1 cup parmesan cheese, grated
Pasta:
- 12 ounces ziti pasta uncooked
Topping:
- 2 cups mozzarella shredded
Instructions
- Preheat oven to 350°F (177ºC).
- Make Sauce: Heat olive oil (2 tablespoons), over medium-high heat, in a large, high-sided skillet. Add onion (1 cup)and saute until translucent, about 5-7 minutes. Moderate heat so as not to brown onion. Turn heat to medium-low, add minced garlic (1 tablespoon), and cook until fragrant, 1-2 minutes.
- Add beef (2 pounds), salt (1 1/2 teaspoons), and black pepper (1 teaspoon) to skillet and cook, over medium heat, until no longer pink; drain as needed. Stir in spaghetti sauce (2 jars) and add Italian seasoning (3 teaspoons).
- Make Ricotta Filling: In a large bowl, combine ricotta cheese (24 ounces), eggs (2), nutmeg (1/4 teaspoon), Italian seasoning (1 teaspoon), mozzarella cheese (1 cup), and Parmesan (1 cup).
- Pasta: Cook pasta (12 ounces) according to package directions. Drain well.
- Assembly: Add 1/2 cup of sauce to the bottom of a 13x9-inch baking dish and swirl to cover the bottom. Spread 1/2 of cooked pasta in the baking dish, then spoon a 1/2 of the meat sauce, then dollop 1/2 ricotta mixture-spreading it into an even layer with an offset spatula. Repeat with remaining layers, ending with ricotta mixture.Place filled baking pan on a rimmed cookie sheet.
- Cover and bake for about 40 minutes or until a thermometer reads 160°. Uncover; sprinkle with remaining 2 cups mozzarella cheese. Bake 10 minutes longer or until cheese is melted. Let stand 15 minutes before serving.
Fans Also Made:

Notes
- Pasta Water: I know I sound like a broken record, but it is so important to salt the pasta water. I find that 1-2 tablespoons is adequate for about 4 quarts of water. The pasta absorbs some of the water as it cooks so you want that water to be well-seasoned. If you have any doubt at all, try a taste test. Cook just a little bit of pasta both ways and taste them.
- Al Dente: You’ll also want to cook your ziti pasta al dente which is still a little firm in the middle. Of course, cook it to your liking. I’m just saying that since pasta is the cornerstone of your dish, you want well-seasoned pasta that isn’t mushy when you take it out of the oven.
- Layers: Believe it or not, it does matter how you set up your layers in your baked ziti with ricotta. You should always start with pasta, meat sauce and then ricotta. Of course, spread a layer of meat sauce on the bottom of the pan first to prevent the ziti from sticking. Layering in this manner will ensure that there is just the right amount of each ingredient in every bite.
- Let It Rest! Lastly, be sure to let your baked ziti with ricotta rest for 10-15 minutes before serving. This is not a myth or an old wives’ tale as some people claim. The reason for this is to let your dish ‘set up’ so that all the beautiful flavors can mingle, and you don’t end up with a soupy mess upon serving.
- Pan Size: Our recipe fills a Pyrex 9X13 to the absolute maximum pan capacity. We pressed the top layer gently down with the back of a large spatula. If you happen to have a ceramic 9X13-inch dish with an ever so slightly larger capacity, I suggest using that.
- Spillovers: Place the baking dish on a rimmed baking sheet before placing it in the oven. It will catch any spillovers (I’ve never had any, even in my Pyrex dish) but it also makes it easier to move the baking dish in and out of the oven.
Nutrition
On your phone? Check the web story here.

My family loved this! My husband liked it enough he wants me to make more so he can take to work for lunch for him and his coworkers. Funny, I told everyone all afternoon “we’re having baked ziti”, and then realized all I had was rotini haha. Nothing wrong with “big” ziti, right? 🤣🤣
Hi Rebecca! Nothing wrong with switching up the pasta. So happy this was a hit at your house!Thank you so much for leaving a comment and the 5 star rating!
Made this for the first time ever. It was amazing!! Your directions were perfect, I wouldn’t change a thing. It will be a regular in my house! It may even replace a holiday supper.
Thank you!
Hi Helen. Im so happy this has made the “Regulars List!” Thats the best compliment ever.
I just wanted to say thank you for this recipe! It has become a regular for my household, my husband asks for it at least once a month. I’m disabled and it’s such an easy recipe for me to make while also being a crowd pleaser, and people assume it was a lot more difficult than it is. Thank you for sharing!
(The only substitution I make it that I use 1lb of Italian sausage and 1 of beef, instead of both beef. We really like the flavor it adds)
Hi Jessica! Im so happy that this is a regular in your house! Thanks so much for leaving a comment and the 5 star rating! I hope you find many more recipes you love here.
This was a good recipe. I added about 3/4 lb of mushrooms, about 1 lb raw spinach, and an eggplant to make it a little healthier. I had a slightly larger lasagna pan and that kept it from overflowing. I used rigatoni noodles because I ran out of the ziti, but it is probably better with a slightly smaller noodle. I used fresh herbs from the garden and homemade sauce. For medium hungry eaters it would be 25 servings in my pan (12- 16 bigger eaters) when served with a side salad.
That’s fantastic, Julianna! Thank you for sharing your tweaks, positive feedback, and 5-star rating!
I’m cooking this delicious sounding ziti this weekend for my family. There will be 7 of us in all. Will the portion size be enough with three hungry men and 4 women? I have a deep dish lasagna pan and didn’t know if I should do one and a half recipe?
Hey Mary. I think the single recipe should be enough. I hope you have a wonderful time!