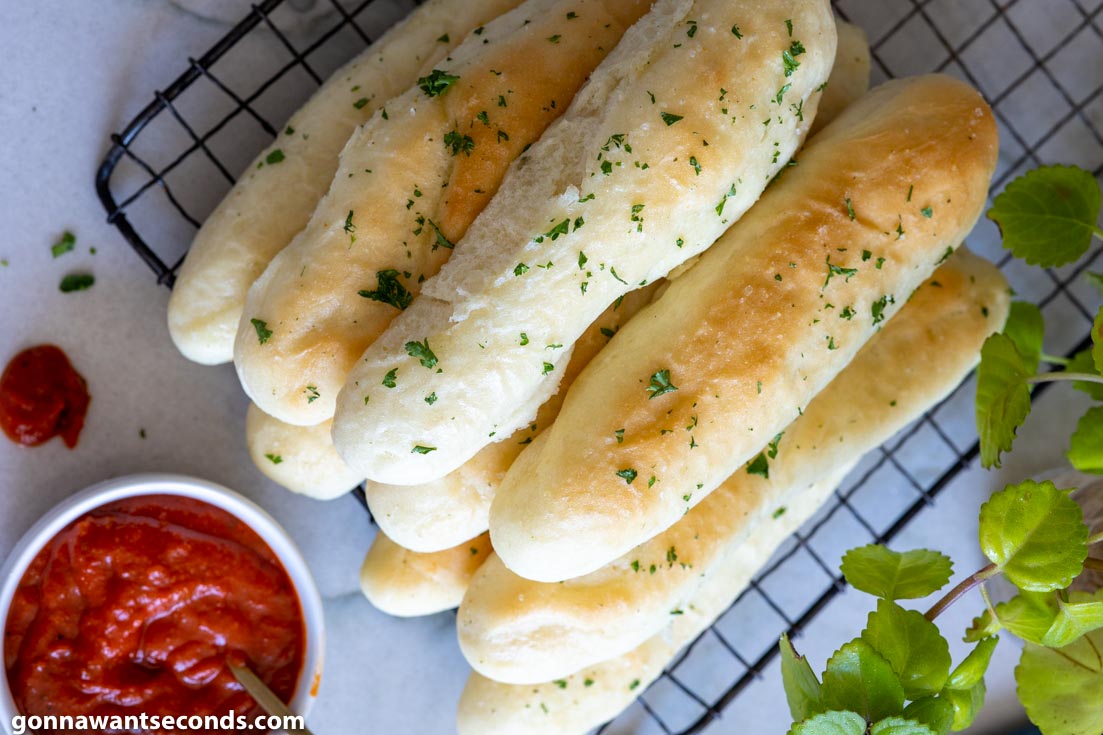
Olive Garden breadsticks recipe is one of those simple copycat recipes, everyone loves. I mean, isn’t that why we go to Olive Garden, to begin with?
Those warm doughy butter-brushed bread bites have just enough garlic to please the palate and leave you craving more. Plus, they go with almost everything! These breadsticks are to meals what sopes are to Mexican food – absolutely de-lish and near perfect!
Speaking of homemade bread…..If you need something fast, you can make beer bread, or something more substantial like my roasted tomato and cheese bruschetta and follow it up with a candy-crowned apple bread for dessert (divinely inspired).
Forget takeout, let’s bake breadsticks…

Olive Garden Breadsticks Recipe
I love love, love that I can have Olive Garden breadsticks without leaving the house or paying for takeout. They’re so tender, soft, and fluffy they practically bring tears to my eyes. Then there’s the garlic butter they’re slathered in. Carbs have never tasted so go!
You only need 6 pantry staples to put these together. Believe it or not, making these breadsticks isn’t at all difficult. The hardest thing is waiting for the dough to rise thinking of how yummy those warm garlic breadsticks are gonna’ taste.

Olive Garden Breadsticks Video Tutorial
On your phone? Check the web story here.
What You’ll To Make These Copycat Olive Garden Breadsticks
- Water: The temperature of your water is critical here since you’re working with active dry yeast. If the water is too cool, the yeast may not completely dissolve, and it can interfere with gluten development. You’ll probably need a thermometer to ensure it’s between 110-115 degrees Fahrenheit. The warmer water temperature will ensure your yeast starts feeding and multiplying.
- Yeast: This recipe calls for fast-acting instant yeast. Using this particular variety shortens the traditional rising time by as much as half. You’ll also notice that you’re adding sugar to the yeast water before letting it proof. If the yeast doesn’t bubble then it may be old, and you’ll need a newer batch. Yeast feeds on sugar, so your solution should bubble (or foam) and rise as it sits.
- Butter: You’ll need unsalted butter to make your breadsticks. The recipe already calls for salt and using unsalted butter allows us to control the amount of salt in our recipe. In the right amounts, salt reduces bitterness and enhances sweet umami flavors.
- All-Purpose Flour: I use unbleached flour.

How to Make Homemade Breadsticks
Proofing Yeast- the reason you proof the yeast is to confirm it’s alive and therefore active. You will simply combine the water, yeast, and sugar, in the bowl of a standing mixer and whisk it together. Allow to sit. After 10 minutes it should rise and foam. If it doesn’t then it’s gone bad, toss it and start with new yeast (make sure it hasn’t expired).
Mix- Next you’ll mix in flour, salt, and melted butter until combined.
Knead – Then you’ll knead in the mixer with the dough hook.
Transfer and Rise- Transfer the dough ball to an oiled bowl, loosely cover, allow to rise for about 1 1/2 hours. The ideal temperature for letting the dough rise is 80-90 degrees Fahrenheit. Lower temps will slow the process and higher temps can kill the yeast.
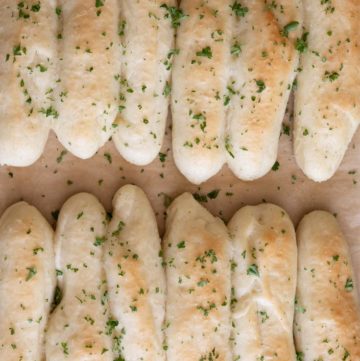
Punch Down and Shape –Punch dough down and divide into 12 equal pieces, about 2 ounces each. Roll each piece out into a 7-inch long rope and place it on a parchment-lined baking sheet.
Cover Baking Sheet – Cover the baking sheet with plastic wrap and let rise a second time, for 1 hour. If you aren’t using it, and haven’t heat up the oven, it’s a great place to let your dough rise but any warm dry place will work. The rising time is kind of a guideline. You really want to ensure your dough doubles in size before moving on to the next step in the process.
Bake – Bake 10 – 12 minutes until golden then brush with garlic butter.

How Long Can You Keep This In The Fridge?
- These are at their most flavorful and their best texture the day you make them. I’ve literally never had a leftover Olive Garden breadsticks recipe. In the crazy event that you do, they’ll keep in the fridge for up 2-3 days. They don’t go bad after that, but they will dry out.
- Technically, the only reason you’re refrigerating them is that you’ve covered them with garlic butter. The best thing to do is to place the completely cooled breadsticks in a resealable bag and squeeze all the air out before sliding them into the fridge.
- You can eat the leftovers cold or wrap them in foil and toss them in a 350-degree oven for about 5-6 minutes to warm and soften them up.

Can You Freeze This Olive Garden Breadsticks Recipe?
- Yes!! You can keep your Olive Garden Breadsticks frozen for 3 months. Here’s what I suggest. Make the breadsticks and shape. Do not let them have the second rise. Freeze them. When ready to make, thaw and let it have the second rise and bake.


Serving Recommendations
One of the best things about these is that they can be served with just about anything at all. I could actually just eat them all by themselves, but they do go great with a creamy Olive Garden chicken alfredo. Throw together a fresh green salad and dinner is served!
You could also whip up a velvety one-pot Zuppa Toscana and use the breadsticks to sop up all the creamy goodness in the bottom of the bowl. They’re also great with my Pasta Fagioli, Italian Sausage Soup, or Italian Chicken Soup!
Step By Step How To Make

- Whisk together water, yeast, sugar until yeast is dissolved. Allow mixture to rest.
- Add flour, salt, and sugar. Mix in a stand mixer until combined. Mix more flour and knead until becomes smooth and elastic.
- Remove dough from the mixer and form into a bowl. Oil a mixing bowl and place dough in it. Loosely cover the dough with plastic wrap.
- Let it rise for about 1 and a half hours.
- Punch dough down and divide into 12 equal pieces.
- Roll each piece into a 7-inch long rope.
- Place it in a parchment-lined baking sheet. Cover with plastic wrap and let it rise for the second time for 1 hour.
- Mix together the topping ingredients.
- Bake in a 400°F preheated oven for 10-12 minutes.
- Remove from oven and brush with topping.


More Bread Recipes
- Bisquick Banana Bread
- Southern Cornbread
- Jalapeno Cornbread
- Moist Banana Bread
- Lemon Zucchini Bread
- Butter Swim Biscuits
- Bo Berry Biscuit
- Cat Head Biscuits
- Garbage Bread
- 7-Up Biscuits
- Quick Dinner Rolls
TRIED THIS RECIPE?
Remember, we have new recipes every week! Have you subscribed to our free, no-strings-attached email?
If you’ve tried this or any other recipe on my website, please leave a review. I love hearing your feedback! ⭐⭐⭐⭐⭐
Olive Garden Breadsticks
Ingredients
Ingredients:
- 1 cup plus 2 tablespoons water 110-115 degrees
- 1 envelope fast-acting instant yeast
- 2 tablespoons granulated sugar divided
- 3-3 1/2 cups all-purpose flour
- 1 3/4 teaspoons salt
- 3 tablespoons unsalted butter melted
Topping:
- 2 tablespoons unsalted butter melted
- 1/2 teaspoon garlic salt
Instructions
- Yeast. In the bowl of a standing mixer, whisk together the water (1 cup plus 2 tablespoons), yeast (1 envelope), and 1/2 teaspoon sugar until yeast is dissolved. Allow mixture to rest for 10 minutes so the yeast can proof and rise and foam.
- Combine. Attach the dough hook. Mix in 2 cups flour, salt (1 3/4 teaspoon), melted butter (3 tablespoons), and 2 1/2 teaspoons of remaining sugar until combined. With the mixer set on low, mix in more flour, 1/4 cup at a time, until the dough begins to pull away from the sides of the bowl. Turn the mixer on medium and knead until the dough becomes smooth and elastic. Remove dough from the mixer and form it into a ball. The dough should be slightly tacky, but not sticky.
- Rise. Oil a mixing bowl and place dough in it. Turn to coat the entire surface with oil. Loosely cover the dough with plastic wrap and place in a warm, draft-free area until the dough doubles in size, about 1 1/2 hours.
- Shape. Punch dough down and divide into 12 equal pieces using a pastry knife, about 2 ounces each. Roll each piece out into a 7-inch long rope and place on a parchment-lined baking sheet
- Second rise. Cover the baking sheet with plastic wrap and let rise a second time, for 1 hour. Preheat oven to 400°F.
- Mix together the topping ingredients; set aside.
- Bake in preheated oven for 10-12 minutes, or until golden brown. Remove from oven and immediately brush with topping. Serve warm!
Fans Also Made:


Notes
- Proofing Yeast- the reason you proof the yeast is to confirm it's alive and therefore active. You will simply combine the water, yeast, and sugar, in the bowl of a standing mixer and whisk it together. Allow to sit. After 10 minutes it should rise and foam. If it doesn't then it’s gone bad, toss it and start with new yeast (make sure it hasn’t expired).
- Mix- Next you'll mix in flour, salt, and melted butter until combined.
- Knead - Then you'll knead in the mixer with the dough hook.
- Transfer and Rise- Transfer the dough ball to an oiled bowl, loosely cover, allow to rise for about 1 1/2 hours. The ideal temperature for letting the dough rise is 80-90 degrees Fahrenheit. Lower temps will slow the process and higher temps can kill the yeast.
- Punch Down and Shape -Punch dough down and divide into 12 equal pieces, about 2 ounces each. Roll each piece out into a 7-inch long rope and place it on a parchment-lined baking sheet.
- Cover Baking Sheet - Cover the baking sheet with plastic wrap and let rise a second time, for 1 hour. If you aren’t using it, and haven't heat up the oven, it's a great place to let your dough rise but any warm dry place will work. The rising time is kind of a guideline. You really want to ensure your dough doubles in size before moving on to the next step in the process.
- Bake - Bake 10 – 12 minutes until golden then brush with garlic butter.
Nutrition

My daughter wants to be baker someday, she tried this one and we are impressed!
OMG, Susan, you made my day 🙂 Thank you so much!
Has anyone tried making this recipe using a bread machine?