This post may contain affiliate links. Please read our disclosure policy.
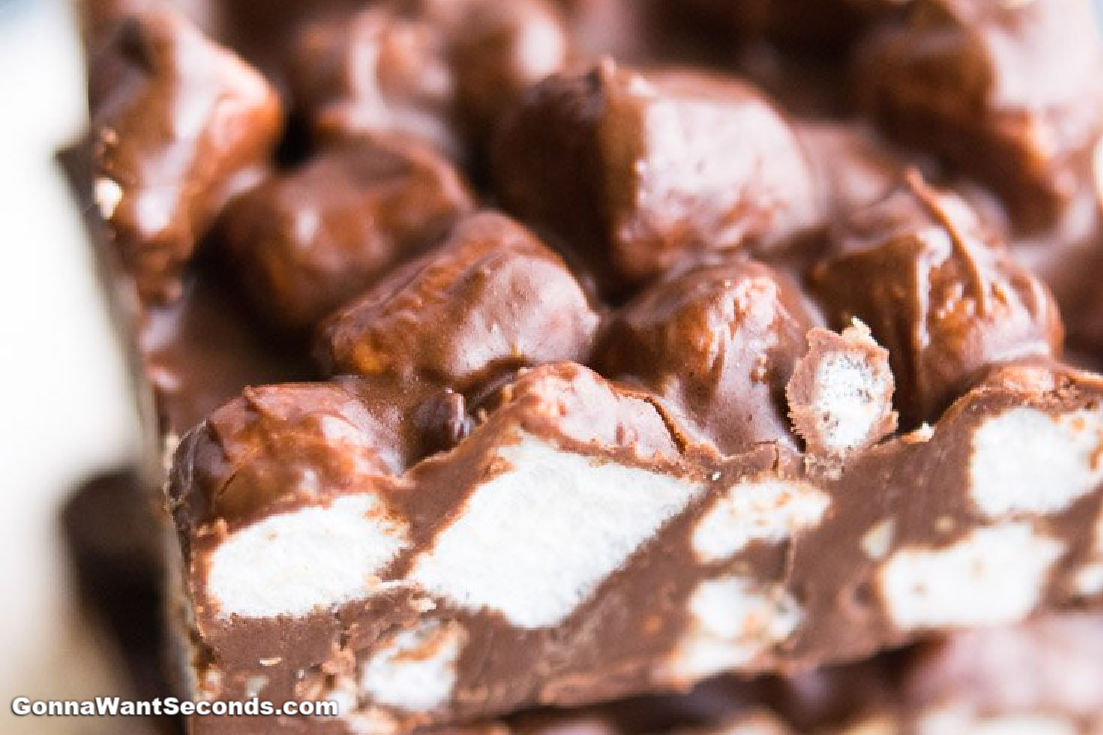
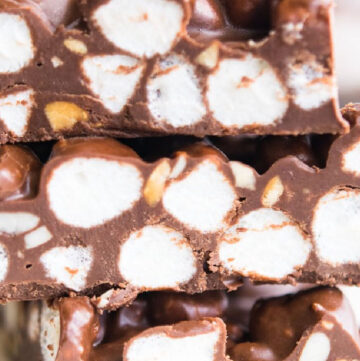
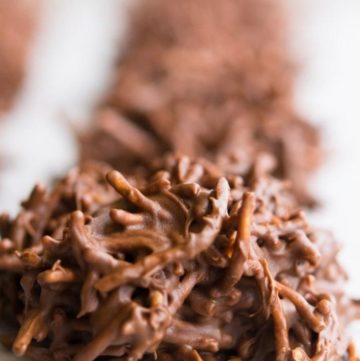
Three ingredients — nutty peanut butter, smooth chocolate, and fluffy marshmallows — come together in this ridiculously easy Rocky Road Candy. It’s everything you love about the classic ice cream flavor, turned into a chewy, fudgy bite that’s perfect for holiday platters, bake sales, and last-minute gifts.
This isn’t a traditional cooked fudge (no candy thermometer, no soft-ball stage!), but you still get that nostalgic fudge-style texture with all the crunchy, gooey rocky road mix-ins. If you love simple, old-fashioned candy recipes like Easy Fudge, Tiger Butter Fudge, Polar Bear Paws, and Buckey Recipe, this Rocky Road Candy is going to slip right into your holiday rotation.
I hope this becomes one of those recipes you can throw together in ten minutes whenever you need “just one more thing” for a dessert tray. 🎄🍫

✨ Before You Begin
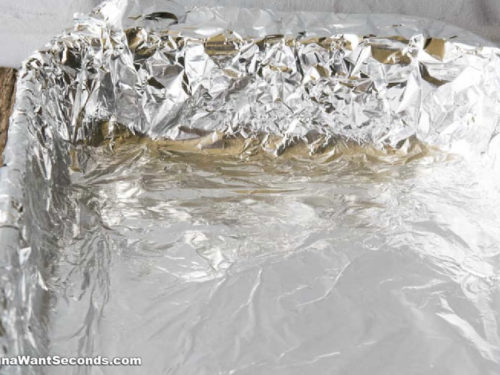
✨ Line the pan well. Use foil with an overhang so you can lift the candy straight out of the 9×13 pan for easy cutting and serving.
✨ Don’t skip the spray. Even with foil, a light coat of nonstick spray keeps the chocolate from clinging and makes cleanup a breeze.
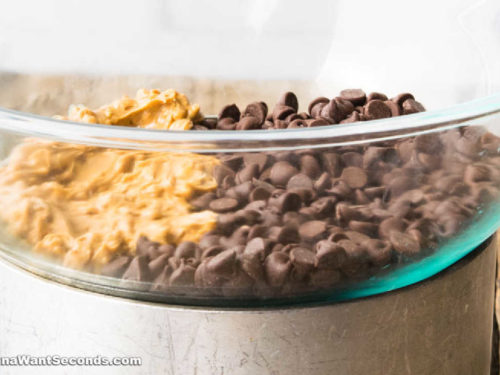
✨ Melt gently. Use a double boiler or a very low microwave power setting so the chocolate and peanut butter melt smoothly without scorching.
✨ Work quickly. Once the warm chocolate mixture hits the marshmallows, things start to set. Stir, spread, and get it into the pan promptly.
✨ Chill before cutting. Let the candy firm up completely in the fridge so you get clean, neat squares instead of smears and smudges.
Rocky Road Candy Ingredients + Key Notes
This is just a quick glance at what you’ll need. For exact measurements and the full ingredient list, head down to the recipe card below.
-
Semi-sweet chocolate chips – Give the candy a deep, classic chocolate flavor and help it set firmly once chilled.
-
Chunky peanut butter – Adds nuttiness, a little crunch, and creamy richness that keeps the texture fudgy instead of hard.
-
Mini marshmallows – Stay soft and pillowy inside the chocolate, giving you that signature rocky road look and gooey bite.
How to Make Rocky Road Candy

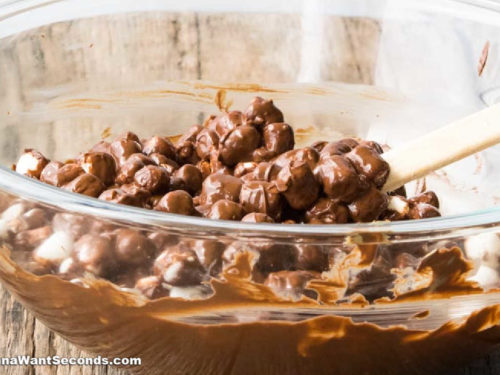
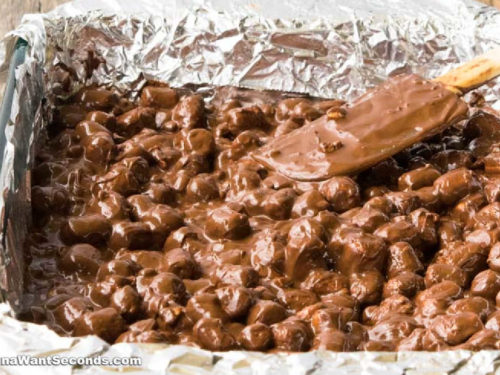
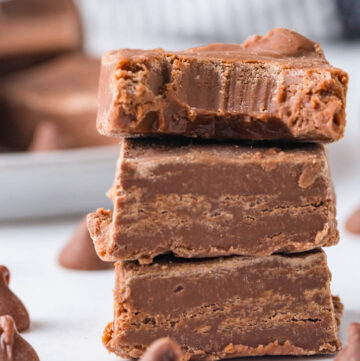
Prep the pan. Line a 9×13-inch baking pan with foil, pressing it into the corners and up the sides with a little overhang for easy lifting, then lightly spray the foil with nonstick cooking spray. Melt the chocolate mixture. In a double boiler (or a heat-safe bowl set over a pot of barely simmering water), gently melt the semi-sweet chocolate chips and chunky peanut butter together, stirring often, until the mixture is smooth and glossy. Fold in the marshmallows. Remove from the heat, quickly fold in the mini marshmallows until they’re evenly coated, then scrape the mixture into your prepared pan and spread it into an even layer. Chill and cut. Refrigerate until completely set, then lift the candy out using the foil overhang and cut it into squares.
Recipe Notes
-
Pan size: A 9×13 pan will give you thinner, bite-size pieces that are perfect for candy trays. If you want thicker squares, you can use a smaller pan (like 9×9) and cut fewer, larger pieces.
-
Peanut butter texture: Chunky peanut butter gives you little nutty bits throughout, but you can swap in creamy peanut butter if that’s what you have—your candy will just be a bit smoother.
-
Mix-ins: You can fold in a handful of chopped peanuts or walnuts along with the marshmallows if you like an extra-crunchy rocky road.
⭐ Pro Tips
-
⭐ Use good-quality chocolate chips. Better chocolate melts more smoothly and gives you richer flavor. Semi-sweet keeps the candy balanced instead of overly sweet.
-
⭐ Avoid natural peanut butter. The separated oils in natural peanut butter can make the candy greasy or cause the chocolate mixture to seize. Use a regular, well-stirred chunky peanut butter for best results.
-
⭐ Don’t overheat the chocolate. If you’re using the microwave, heat in short bursts (about 20–30 seconds), stirring after each one, and stop as soon as things are mostly melted. Residual heat will finish the job.
-
⭐ Work fast once the marshmallows go in. The cooler marshmallows will start to firm up the chocolate mixture. Fold gently but quickly so you don’t knock them down into mush.
-
⭐ Customize your mix-ins. If you want to lean even closer to rocky road ice cream, you can fold in chopped toasted nuts along with the marshmallows, just keep the total add-ins similar so the candy still holds together.
🔬 The Candy Science
Traditional fudge relies on cooked sugar syrup — you boil a mixture of sugar, dairy, and flavorings to a precise temperature, then cool and beat it to create ultra-fine sugar crystals and that classic fudgy texture. That’s why fudge recipes often call for a candy thermometer and careful timing.
This Rocky Road Candy takes a shortcut. Here, the structure comes from cooled, solidified chocolate and peanut butter, not from cooked sugar. Chocolate chips contain cocoa butter that firms up when chilled, and the peanut butter adds fat and solids that help the candy set into sliceable bars without becoming rock-hard.
Mini marshmallows bring in pockets of air and a bit of stabilizing sugar and gelatin, so you get that chewy-gooey contrast without extra steps. And because there’s no condensed milk, the overall sweetness stays in check while still delivering a fudge-like bite. It’s “cheater fudge” in the best possible way.

Storing + Freezing + Make-Ahead Tips
Storing
- Store Rocky Road Candy in an airtight container, layered with parchment or wax paper to keep the pieces from sticking together. It keeps well at cool room temperature for about 3–4 days, or up to a week in the refrigerator.
Freezing
- You can freeze Rocky Road Candy for longer storage. Arrange the cut pieces on a baking sheet to firm up, then transfer to a freezer-safe container with parchment between layers. Freeze for up to 2 months. Thaw overnight in the fridge or on the counter until the texture feels pleasantly chewy again.
Make-Ahead
- This is a fantastic make-ahead treat. Make the full pan 1–2 days before you need it, chill, cut into squares, and store in a sealed container. The flavors meld and the texture actually improve a bit as it sits.
What to Serve With Rocky Road Candy
Holiday Candy Platters
For a festive dessert table, serve Rocky Road Candy alongside other easy treats like Microwave Fudge, White Chocolate Caramel Fudge, and Peanut Butter Pretzel Bites. The mix of textures — chewy, crunchy, and creamy — makes every plate feel like a candy shop sampler.
Cozy Cookies + Bars
If you’re building cookie tins or dessert boxes, tuck in a few squares of Rocky Road Candy with your Carmelitas, Italian Christmas Cookies, Chewy Ginger Cookies, Haystacks, and classic Cream Cheese Spritz Cookies. The chocolate-marshmallow combo is a fun surprise next to buttery shortbreads and sugar cookies.

Frequently Asked Questions
Can I use milk chocolate instead of semi-sweet?
Yes, you can use milk chocolate chips if you prefer a sweeter candy. Just know that milk chocolate is a bit softer, so the finished candy may not be quite as firm. Keep it chilled for the best texture.
Can I use natural peanut butter?
I don’t recommend it. Natural peanut butter tends to be oilier and can cause the mixture to separate or set up greasy. A standard creamy or chunky peanut butter from a jar works best.
Do I have to refrigerate Rocky Road Candy?
Yes, the candy sets up best in the fridge and holds its shape better when stored chilled. You can leave it at cool room temperature for a few hours when serving, but keep leftovers refrigerated.
Can I make this ahead for gifting?
Absolutely. Rocky Road Candy is a great make-ahead treat. Make it up to 3 days in advance, slice it, and store it in an airtight container in the fridge. Package pieces in candy boxes or tins just before gifting.
Still have questions? Drop them in the comments — I love helping you bake and cook with confidence! 💗
Tried This Recipe?
💌 And while you’re here, don’t miss the next cozy recipe — subscribe to my totally FREE newsletter so you’ll always have comfort food favorites at your fingertips. 💌
If you enjoyed this recipe, please take a moment to leave ⭐️⭐️⭐️⭐️⭐️ star rating and a quick comment — I love hearing from you and it helps our community of bakers and cooks!
📸 And if you Gram… don’t forget to share your photo on Instagram — tag me @gonnawantseconds so I can cheer you on and share your creations!
Thanks for stopping by my kitchen today — happy cooking, friends! 💗 Kathleen
Rocky Road Candy
Ingredients
- 12 ounces semi-sweet chocolate chips
- 1 cup chunky peanut butter
- 4 cups mini marshmallows
Instructions
- Line a 9X13 inch baking pan with aluminum foil, pushing it into the corners and up the sides of the pan; allow the excess to overhang the pan edges. Spray foil with nonstick cooking spray.
- Melt chocolate chips (12 ounces) and peanut butter (1 cup) in a double boiler.
- When the mixture is melted, fold in marshmallows (4 cups) and pour into the prepared pan.
- Refrigerate until the candy is set.
Notes
- Use good-quality chocolate chips. Better chocolate melts more smoothly and gives you richer flavor. Semi-sweet keeps the candy balanced instead of overly sweet.
- Avoid natural peanut butter. The separated oils in natural peanut butter can make the candy greasy or cause the chocolate mixture to seize. Use a regular, well-stirred chunky peanut butter for best results.
- Don’t overheat the chocolate. If you’re using the microwave, heat in short bursts (about 20–30 seconds), stirring after each one, and stop as soon as things are mostly melted. Residual heat will finish the job.
- Work fast once the marshmallows go in. The cooler marshmallows will start to firm up the chocolate mixture. Fold gently but quickly so you don’t knock them down into mush.
- Customize your mix-ins. If you want to lean even closer to rocky road ice cream, you can fold in chopped toasted nuts along with the marshmallows, just keep the total add-ins similar so the candy still holds together.

interesting, you always amaze me with your work.very impressive
i like this blog…
Engineering Jobs | Careers & Recruitment at Jobscharger.com
http://www.jobscharger.com/JobIndustry/Engineering-11-.html
Hey Kathleen, hope your just taking a break and that everything is ok with you. Miss you!
Latest News Updates Bollywood, Hollywood, Dating & Fashion
Online Bollywood News and Reviews
http://www.onlinebollywood.net/
So you have all of the major food groups covered there, I will have to try it!
Mmmmm…this fudge looks incredible!! 😀
Yum, chocolate and marshmallows AND peanut butter? Priceless. I'd love you to join my dessert linky, Crazy Sweet Tuesday sometime. (The link runs through Friday.)
chocolate, peanut butter, and marshmallows….score! looks delicious.
Wow that sounds like a great recipe – thanks to your mama!
Mary x
Darn! How I wish I stumbled into this post last Christmas. This will make an amazing Christmas treat for all the kids in our neighborhood! Looking forward to your future posts! Happy New Year 🙂
oh drool! what an amazing christmas treat! i hope you had a lovely holiday!
My family would love this, me too:) It sounds yummy!
My husband especially likes rocky road fudge. Wishing you a wonderful new year filled with your favorite things.
My mom made something similar – colored marshmallows rolled into a chocolate log, then sliced into “cookies”
Yum and love how easy it is! Merry Christmas Kathleen!
will ha ve to try this version my son loves peanut butter! Merry Christmas!
Yes! This does look irresistible. Thank you for sharing this deliciousness with me. I'm about to leave for Colorado, but I'm glad I had a chance to check in before I depart! Many blessings to you and yours!
Love rocky road fudge…used to make it back in my 20's and early 30's. It's been a long time. Looks fabulous!! Merry Christmas!
Denise @ Creative Kitchen
Mmmmmm…this looks irresistible!
This is definitely the best fudge I've laid my eyes on. Yum!