
This post may contain affiliate links. Please read our disclosure policy.
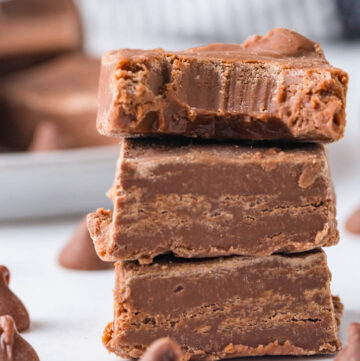
This 3-Ingredient Fudge is rich, creamy, and unbelievably simple—just chocolate chips, sweetened condensed milk, and vanilla, all melted together in the microwave for the easiest fudge you’ll ever make. It slices beautifully, stacks well on dessert trays, and feels like a little bite of nostalgia in every square.
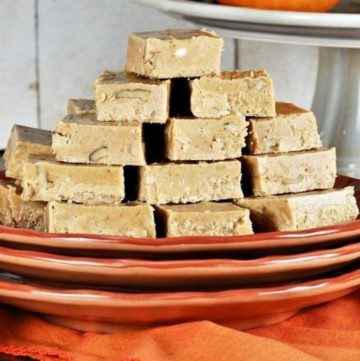
If you love easy chocolate treats like my Brownies, Brownie Bites, Fudge Pie, and Sugar Cream Pie, this quick fudge is going to slide right into your permanent holiday (and everyday!) rotation. It’s the kind of recipe you can memorize and whip up whenever you need a fast, impressive sweet to share.
Pull up a stool at my kitchen counter and let’s make the easiest fudge you’ll ever fall in love with.

✨ Before You Start
✨ Use the right pan. An 8×8-inch pan gives you thick, satisfying pieces. A 9×9 will work in a pinch, but your fudge will be a bit thinner.
✨ Line with parchment for easy lifting. Leave a little overhang on two sides so you can lift the whole slab out in one piece for clean slicing.
✨ Microwave gently. Chocolate scorches easily, so short bursts + lots of stirring is the name of the game. Stop when it’s mostly melted and let stirring finish the job.
✨ Choose your chocolate wisely. Semi-sweet chips set firmer and taste less sweet; all milk chocolate stays softer and extra sweet. You can even mix the two.
✨ Don’t skip the chill. The fudge needs time to firm up in the fridge—plan on at least 2 hours, or even better, overnight if you want ultra-neat squares for gifting.
3-Ingredient Fudge Ingredients + Key Notes
This is just a quick glance at what you’ll need. For exact measurements and the full ingredient list, head down to the recipe card below.
-
Semi-sweet chocolate chips – You’ll need about 3 cups (a standard 12-ounce bag plus half of another, or measure by volume). Semi-sweet gives you a firm, sliceable fudge that isn’t cloyingly sweet. You can use all milk chocolate chips for a sweeter, softer fudge, or even a 50/50 blend of semi-sweet and milk. Avoid “baking melts” or candy coating here—real chocolate chips melt and set better.
-
Sweetened condensed milk – One 14-ounce can is the secret that makes this “no-fail.” It brings sugar, richness, and milk solids that help the fudge set without any tricky cooking stages. Be sure you’re using sweetened condensed milk, not evaporated milk—they are not interchangeable.
-
Vanilla extract (or another favorite) – Vanilla rounds out the chocolate flavor and keeps this from tasting flat. Almond, peppermint, or orange extract are all delicious variations; just remember a little goes a long way, especially with peppermint.
-
Optional but recommended: a pinch of salt – If you don’t mind “cheating” the 3-ingredient name just a bit, a small pinch (about ¼ teaspoon fine sea salt) does wonders to balance the sweetness and sharpen the chocolate flavor.

⭐ Pro Tips for Perfect 3-Ingredient Fudge
⭐ Trust the texture, not the timer. Microwaves vary wildly. Once the chocolate is mostly melted and glossy, stop heating and rely on stirring to finish the job. Overheating chocolate is the quickest way to grainy or oily fudge.
⭐ Cut smaller than you think. This fudge is rich. Bite-sized squares (about 1–1½ inches) are perfect for dessert trays and gift boxes and help stretch a single pan for a crowd.
⭐ Warm your knife for pretty slices. Run a sharp knife under hot water, wipe it dry, then cut straight down through the chilled fudge. Clean and warm the knife again every few cuts for bakery-style edges.
⭐ Know your chocolate choice. Using all milk chocolate? Expect a softer, sweeter fudge that’s best kept chilled until serving. Using mostly semi-sweet? You’ll get a firmer, more balanced square that holds better at room temperature.
⭐ Make it your own. Once the basic fudge is spread in the pan, you can sprinkle the top with flaky sea salt, crushed peppermint, chopped nuts, or holiday sprinkles before chilling for a fun twist without changing the easy base recipe.
How to Make 3-Ingredient Fudge

Here’s a quick, anxiety-free overview so you know what’s coming before you even pull out the pan.
Prep the pan. Line an 8×8-inch baking dish with parchment paper, leaving an overhang on two opposite sides to create “handles.” If you’d like, lightly mist the pan with cooking spray first so the parchment stays put while you spread the fudge.
Melt the chocolate and condensed milk. In a large microwave-safe bowl, combine the chocolate chips and sweetened condensed milk. Microwave on 50–70% power in 30-second intervals, stirring well after each burst, until the mixture is mostly melted and starting to look glossy. This usually takes about 1½–2 minutes total, but go by the look, not the clock—stop as soon as most of the chips are soft, and let stirring finish melting the rest.
Add flavorings. Once the mixture is completely smooth, stir in the vanilla extract (and a pinch of salt, if using) until fully combined. The mixture will be thick and shiny, almost like very soft frosting.
Pour and smooth. Scrape the fudge mixture into your prepared pan and spread it into an even layer with a spatula or offset spatula. Work it into the corners and smooth the top as best you can—it will set just how you leave it.
Chill and slice. Refrigerate for at least 2 hours, or until firm. For the cleanest cuts, chill 3–4 hours or overnight. Use the parchment handles to lift the fudge out of the pan, place it on a cutting board, and cut into small squares. Wipe your knife between cuts for extra neat pieces.
🔬 The Science of 3-Ingredient Fudge
Traditional fudge involves carefully cooking sugar, butter, and milk to a specific temperature, then cooling and beating to form tiny sugar crystals. Delicious—but fussy.
This “3-ingredient” version uses a shortcut:
-
Chocolate chips already contain cocoa solids, sugar, and cocoa butter. When melted, they give you the backbone of a smooth, rich candy.
-
Sweetened condensed milk is regular milk with most of the water removed and sugar added. The milk proteins and sugar help the chocolate set into a sliceable block, while the high sugar content keeps the texture soft and fudgy rather than hard and snappy like pure chocolate.
-
As the mixture cools in the fridge, the cocoa butter in the chocolate firms up and the condensed milk thickens, so the fudge goes from pourable to sturdy, with that classic creamy bite.
Think of it as a very thick, stable chocolate ganache that’s engineered to be as forgiving as possible—no thermometers required.
Storing + Reheating + Freezing + Make-Ahead Tips
Storing
- Once the fudge is firm and sliced, store it in an airtight container with parchment or wax paper between layers to keep the pieces from sticking. It will keep in the refrigerator for up to 2 weeks and in a cool room (away from heat or sunlight) for several days, depending on how warm your kitchen runs.
Reheating
- You generally won’t “reheat” fudge, but if it’s very cold and you’d like a slightly softer bite, set a few pieces out at room temperature for 15–20 minutes before serving. Avoid microwaving individual pieces—they can melt or develop hot spots very quickly.
Freezing
- Fudge freezes beautifully, which makes this a fantastic make-ahead recipe for holidays and gifting.
-
Wrap the whole slab or individual pieces tightly in plastic wrap, then place in a freezer-safe container or zip-top bag.
-
Freeze for up to 2–3 months.
-
Thaw overnight in the fridge, then bring to room temperature briefly if you prefer a softer texture.
-
Make-Ahead
- This is an ideal make-ahead treat:
-
Make the fudge 1–3 days before you plan to serve or gift it for the easiest timing.
-
Leave it in the pan, covered, or slice and store in an airtight container until you’re ready to plate up or box for gifts.
-
Food Safety
- If you’d like more info on food safety, check out this link.
What to Serve With 3-Ingredient Fudge
A little square of fudge is perfect on its own, but it really shines as part of a bigger spread—think holiday dessert tables, potlucks, or family movie nights.
Cozy Holiday Mains
Round out your menu with comforting mains that pair beautifully with a rich, chocolatey dessert. Try my Johnny Marzetti Casserole, Chicken Tetrazzini, or Crockpot Pork Tenderloin for a hearty centerpiece before you bring out a tray of fudge.
Party-Ready Apps & Nibbles
If you’re serving this fudge at a holiday party, it’s lovely alongside savory bites like Ham and Cheese Pinwheels, Grape Jelly Meatballs, Red Lobster Sausage Balls, or Cowboy Queso. The sweet-salty contrast keeps everyone coming back for “just one more” bite of everything.
Sweet Finishes for a Dessert Bar
Build a full dessert buffet with other crowd-pleasing treats like Peach Cobbler, Italian Christmas Cookies, Chocolate Crinkle Cookies, Possum Pie, Churro Cheesecake, or Berry Chantilly Cake. Tucking a tray of 3-Ingredient Fudge in among cakes and cobblers adds a fun, grab-and-go element to your spread.

✦ Frequently Asked Questions
✦ Can I use milk chocolate, white chocolate, or a mix?
Yes! You can absolutely play with the chocolate here. All semi-sweet will give you a firmer, less sweet fudge. All milk chocolate makes it softer and sweeter (best kept chilled until serving). White chocolate behaves a little differently—it’s softer and sweeter still—so if you experiment with it, I recommend mixing it with at least half semi-sweet chips to help the fudge set nicely.
✦ Why is my fudge too soft or not setting?
The most common reasons are:
-
Using all milk chocolate (which naturally sets softer)
-
Not chilling the fudge long enough
-
A very warm kitchen or serving environment
Chill the fudge for at least 2–4 hours, or overnight. If you love the flavor of milk chocolate but want a firmer set, try using half semi-sweet, half milk chocolate chips next time and keep the pieces chilled until serving.
✦ Do I have to keep this fudge in the fridge?
For the firmest texture and best shelf life, I recommend storing it in the refrigerator, especially if your kitchen runs warm or you used milk chocolate. That said, the fudge is fine sitting out on a cool dessert table for a few hours during a party or gathering.
✦ Can I make this on the stovetop instead of in the microwave?
Yes! Add the chocolate chips and sweetened condensed milk to a heavy-bottomed saucepan and melt over low heat, stirring constantly until smooth. Remove the pan from the heat and stir in the vanilla (and a pinch of salt, if using), then continue with the recipe as written. Just be sure to keep the heat low and stir frequently so the chocolate doesn’t scorch.
✦ How long will this fudge last?
If stored in an airtight container in the refrigerator, this fudge will keep well for up to 2 weeks. For longer storage, freeze it (tightly wrapped) for 2–3 months. It’s a fantastic make-ahead option for holiday tins, teacher gifts, and cookie trays.
Still have questions? Drop them in the comments — I love helping you bake and cook with confidence! 💗

Tried This Recipe?
💌 And while you’re here, don’t miss the next cozy recipe — subscribe to my totally FREE newsletter so you’ll always have comfort food favorites at your fingertips. 💌
If you enjoyed this recipe, please take a moment to leave ⭐️⭐️⭐️⭐️⭐️ star rating and a quick comment — I love hearing from you and it helps our community of bakers and cooks!
📸 And if you Gram… don’t forget to share your photo on Instagram — tag me @gonnawantseconds so I can cheer you on and share your creations!
Thanks for stopping by my kitchen today — happy cooking, friends! 💗 Kathleen
3 Ingredient Fudge
Ingredients
- 3 cups semi-sweet chocolate chips
- 1 (14-ounce) can sweetened condensed milk
- 1 teaspoon vanilla extract
Instructions
- Line an 8x8-inch baking dish with parchment paper, leaving an overhang on the sides. In a large microwave-safe bowl, combine chocolate chips (3 cups) and sweetened condensed milk (1 can).
- Microwave on high in 30-second intervals, stirring after each, until chocolate is completely melted and the mixture is smooth (about 2 minutes total).Stir in vanilla extract (1 teaspoon) until fully combined.
- Pour the fudge into your prepared pan, smoothing the top with a spatula.Refrigerate for at least 2 hours or until firm. Lift from the pan and cut into squares.Keep in an airtight container in the fridge for up to 2 weeks.
Fans Also Made:


Notes
- Trust the texture, not the timer. Microwaves vary wildly. Once the chocolate is mostly melted and glossy, stop heating and rely on stirring to finish the job. Overheating chocolate is the quickest way to grainy or oily fudge.
- Cut smaller than you think. This fudge is rich. Bite-sized squares (about 1–1½ inches) are perfect for dessert trays and gift boxes and help stretch a single pan for a crowd.
- Warm your knife for pretty slices. Run a sharp knife under hot water, wipe it dry, then cut straight down through the chilled fudge. Clean and warm the knife again every few cuts for bakery-style edges.
- Know your chocolate choice. Using all milk chocolate? Expect a softer, sweeter fudge that’s best kept chilled until serving. Using mostly semi-sweet? You’ll get a firmer, more balanced square that holds better at room temperature.
- Make it your own. Once the basic fudge is spread in the pan, you can sprinkle the top with flaky sea salt, crushed peppermint, chopped nuts, or holiday sprinkles before chilling for a fun twist without changing the easy base recipe.

Leave a Reply