This post may contain affiliate links. Please read our disclosure policy.
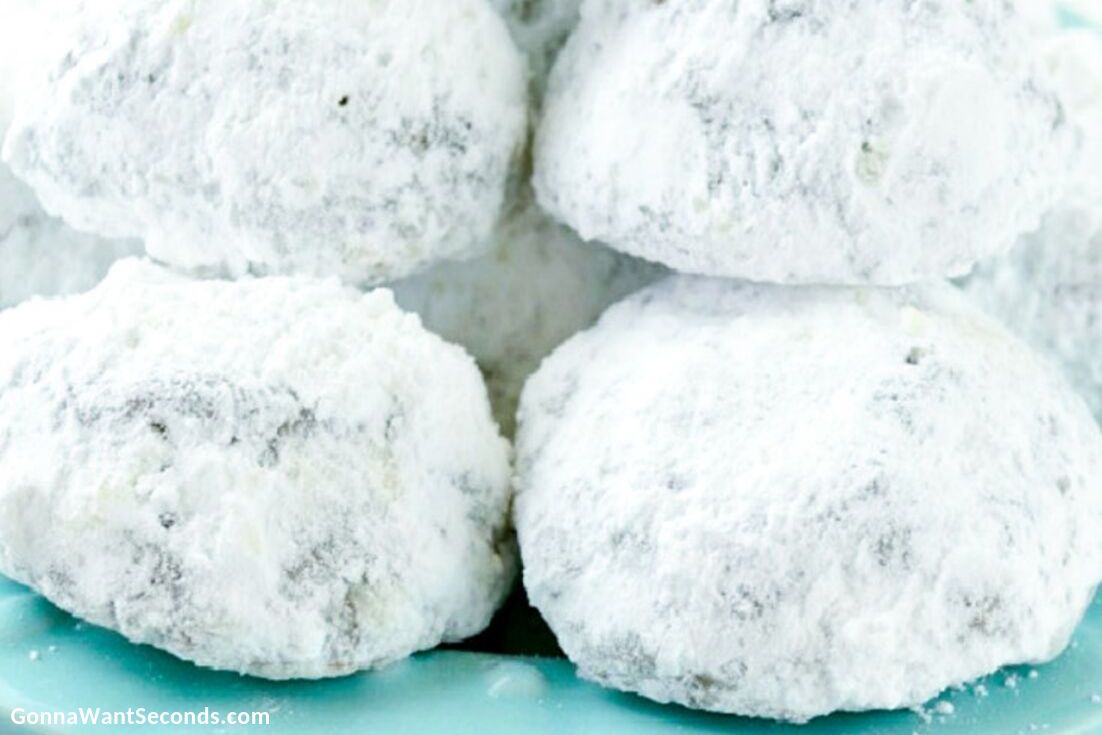
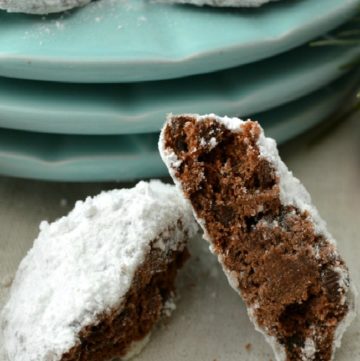
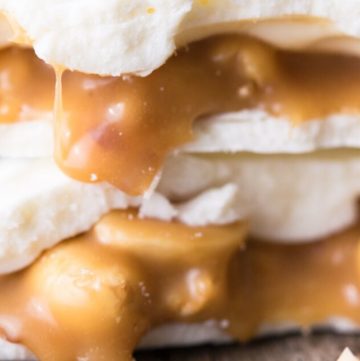
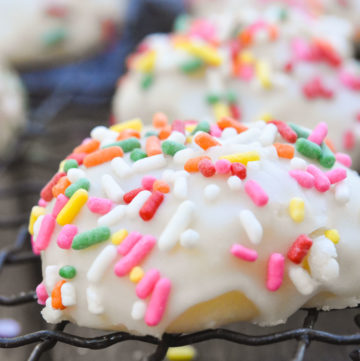
Chocolate Snowball Cookies are rich, double-chocolate holiday cookies wrapped in a fluffy blanket of powdered sugar. They’re everything you love about classic snowballs, but with a big chocolate twist—cocoa in the dough, mini chocolate chips in every bite, and a sweet, snowy coating.
They’re perfect for Christmas cookie trays, holiday gifting, or anytime you want a cookie that looks fancy but is secretly simple. The dough comes together quickly, chills in the fridge, and bakes into tender little chocolate bites that almost melt in your mouth.
You might also love adding these to your holiday cookie lineup: Italian Christmas Cookies, Chocolate Crinkle Cookies, Christmas Sugar Cookies, and Chocolate Christmas Cookies.

Before You Start ✨
✨ Chill time matters. This dough is soft and buttery, so it needs at least 2 hours in the fridge to firm up. That chill time keeps your cookies round and helps them bake up tender.
✨ Use mini chocolate chips. Regular chips are a little too chunky for these small cookies. Mini chips tuck into the dough so you get chocolate in every bite without the cookies falling apart.
✨ Line your pans. A silicone baking mat or parchment paper keeps the bottoms from getting too dark and makes cleanup easy.
✨ Have your powdered sugar ready. You’ll roll the cookies in powdered sugar while they’re still warm, then again once they’re cool. Set it up before they come out of the oven so you’re ready to go.
✨ Trust texture over time. Because the dough is dark from cocoa, it’s harder to see traditional browning cues. You’ll rely more on how the cookies look and feel than on the clock.
Chocolate Snowball Cookies Ingredients + Key Notes
This is just a quick glance at what you’ll need. For exact measurements and the full ingredient list, head down to the recipe card below.
-
All-purpose flour: The structure of your cookies. It combines with the butter to make that classic shortbread crumb—firm enough to hold a round shape but still wonderfully tender.
-
Unsweetened cocoa powder: Gives the dough its deep chocolate flavor and dark color. Cocoa also acts like a “dry” ingredient here, helping keep the dough from spreading and contributing to the sandy, melt-in-your-mouth texture.
-
Salt: Just a pinch, but it’s important—salt sharpens the chocolate flavor and keeps the cookies from tasting flat or overly sweet.
-
Unsalted butter: The backbone of these snowballs. Butter provides richness and that classic shortbread “snap” when you bite in. Let it come to room temperature so it creams easily with the sugar.
-
Granulated sugar: Sweetens the dough and helps create a light, slightly crisp edge while the centers stay tender. Using granulated sugar instead of powdered in the dough gives you a slightly more structured, classic shortbread texture.
-
Vanilla extract + rum extract: Vanilla rounds out the chocolate while the rum extract adds a subtle, cozy holiday note. It won’t make the cookies taste like rum—just a little deeper and more festive.
-
Mini chocolate chips: A very generous amount! Mini chips ensure chocolate in every bite without overwhelming the structure of the cookie. Regular-size chips are more likely to make the dough crumble.
-
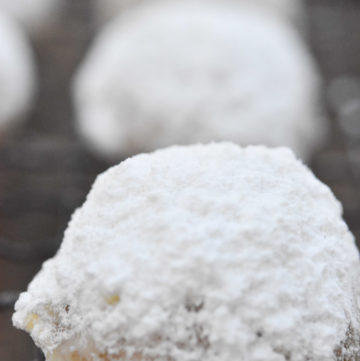
Powdered sugar (for rolling): This isn’t in the dough—it’s for that thick, snowy coating. Rolling the cookies while warm makes the first layer cling, and a second roll after cooling builds that pretty, fluffy finish.

⭐ Pro Tips for the Best Chocolate Snowball Cookies
⭐ Let the dough chill thoroughly.
Give the dough at least 2 hours in the fridge so it firms up. Cold dough keeps your cookies round and helps them bake up tender instead of spreading or slumping.
⭐ Don’t overbake—especially with chocolate dough.
Because the dough is dark, you won’t see much browning. Start checking at 12 minutes and look for matte, set tops and dry bottoms. If you wait for visible browning, they’ll turn dry instead of sandy and delicate.
⭐ Roll in powdered sugar twice.
The first roll while the cookies are warm helps the sugar melt into a light, clinging layer. The second roll after they’ve cooled completely builds that thick, snowy coat everyone loves on a snowball cookie.
⭐ Use your hands to fix crumbly dough, not extra flour.
If the chilled dough feels a bit crumbly when you scoop it, just squeeze and roll each portion in your hands until it comes together. Adding more flour will dry the cookies out—warmth and a gentle squeeze are usually all they need.
⭐ Stick with mini chocolate chips.
Mini chips tuck neatly into the dough and keep the cookies nicely round and sturdy. Regular-size chips can poke out, cause cracks, and make these little cookies more fragile.
How to Make Chocolate Snowball Cookies
Here’s a quick look at how to assemble this easy Chocolate Snowball Cookies recipe (full instructions in the recipe card below).
Mix the dough.
Whisk together the flour, salt, and cocoa in a bowl. In a separate bowl, cream the butter and sugar until light and fluffy, then mix in the vanilla and rum extract. Add the dry ingredients on low speed just until a soft dough forms, then stir in the mini chocolate chips. Cover and chill for at least 2 hours, until firm.
Shape and bake.
Preheat your oven to 350°F and line baking sheets with parchment or silicone mats. Roll the chilled dough into 1-inch balls and place them about 2 inches apart. Bake for 12–15 minutes, until the tops look matte and set and the bottoms feel dry but not hard. With chocolate cookies, it’s harder to see browning, so trust the texture more than the exact bake time.
Coat in powdered sugar.
Let the cookies cool on the pan just until they’re still very warm but easy to handle. Roll each one in powdered sugar, then cool completely on a wire rack. Once they’re cool, roll them in powdered sugar a second time for that thick, snowy coating.
🔬 The Science of Chocolate Snowball Cookies
All-granulated sugar vs. powdered sugar in the dough.
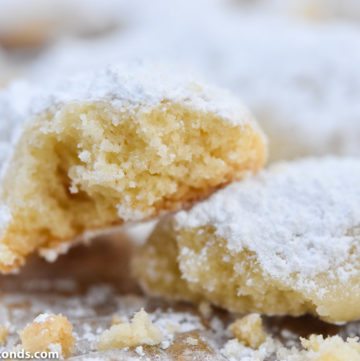
Traditional wedding cookies often use powdered sugar in the dough, which creates an ultra-tender, “dissolving” texture. Using granulated sugar here gives you a slightly more structured shortbread crumb. The sugar crystals cream with the butter to incorporate air, then melt in the oven, contributing to both sweetness and a delicate, sandy bite.
Why cocoa makes doneness harder to see.
Because the dough is already dark from cocoa, you don’t get that clear golden-brown signal you’d see on a vanilla cookie. The surface color barely changes as it bakes, which is why we focus on texture cues—matte tops and dry bottoms—rather than color. Overbaking is the fastest way to lose that tender snowball texture.
Egg-free, high-butter dough = “short” texture.
There’s no egg in this recipe, so the only real structure comes from flour, cocoa, and butter. This is exactly what creates that classic shortbread/snowball crumb: rich, buttery, and slightly crumbly instead of chewy. The high butter content “shortens” the gluten strands, so the cookies stay delicate.
Chilling for shape and flavor.
Chilling the dough firms the butter so the cookies don’t spread, but it also gives time for the flour to fully hydrate. That rest helps the dough bake more evenly and can slightly deepen the flavor as everything marries together.
Storing + Reheating + Freezing + Make-Ahead Tips
Storing
- Store completely cooled Chocolate Snowball Cookies in an airtight container at room temperature for up to 5–6 days. If the powdered sugar absorbs a bit over time, you can always sift a little extra on top right before serving.
Reheating
- These cookies are delicious at room temperature, but if you like them just slightly warm, you can place a few on a baking sheet and warm them in a 300°F oven for 3–5 minutes. Let them cool for a minute before eating so the centers set again.
Freezing
- You can freeze the dough or the baked cookies:
-
Dough balls: Shape the chilled dough into balls, freeze on a baking sheet until firm, then transfer to a freezer bag. Bake from frozen, adding 1–2 minutes to the bake time, and watch for the same doneness cues.
-
Baked cookies: Freeze fully cooled cookies in a single layer, then transfer to an airtight container with parchment between layers. Thaw at room temperature and re-roll in powdered sugar if needed.
-
Make-Ahead
This recipe is very make-ahead friendly. You can:
-
Prepare the dough and refrigerate it for up to 2–3 days before baking.
-
Bake the cookies a day or two before serving and store them in an airtight container. If you want a super-fresh look, save the second powdered sugar roll for the day you plan to serve them.
Food Safety
- If you’d like more info on food safety, check out this link.
Serving Recommendations
These Chocolate Snowball Cookies are made for holiday gatherings and cozy nights in.
-
Cozy Hot Drinks: Pair a plate of cookies with Homemade crockpot hot chocolate or a mug of keoke coffee, coffee or tea. The rich chocolate and snowy coating are perfect with a warm drink.
-
Holiday Cookie Platters: Add them to a Christmas cookie spread alongside Italian wedding cookies, Biscoff cookies, pfeffernusse cookies, and cream cheese spritz cookies for a beautiful mix of shapes, colors, and textures.
-
Sweet Finishes: Serve them as a bite-size sweet after a big holiday meal, maybe next to creamy fruit salad or a slice of sugar cream pie for guests who love a dessert buffet.

✦ Chocolate Snowball Cookies FAQs
✦ How do you tell when chocolate snowball cookies are done?
Chocolate Snowball Cookies are tricky because the cocoa makes it hard to see browning. They’re done when the tops look matte and set (not shiny), the edges feel slightly firm, and the bottoms are dry to the touch but not dark or burnt. Start checking around 12 minutes and trust the texture more than the bake time.
✦ Are these the same as traditional Mexican wedding cookies or pecan snowballs?
They’re very similar in texture but different in flavor. Classic wedding cookies usually use nuts (like pecans or walnuts) and no cocoa. These Chocolate Snowball Cookies skip the nuts and add cocoa plus mini chocolate chips for a rich, double-chocolate twist on the same tender, crumbly style.
✦ How do I know if I’ve overbaked them?
If the cookies feel hard and very firm when they come out of the oven, they’ve gone a bit too far. Properly baked cookies will feel set and dry on the bottom but still light and tender. Remember, they’ll continue to firm up as they cool. With chocolate cookies, if you wait for visible browning, they’ll almost always end up dry—so go by matte tops and dry bottoms instead.
✦ Can I use regular chocolate chips instead of mini chips?
You can, but mini chips really do work best here. Regular chocolate chips are larger and can create cracks or weak spots in these small cookies, making them more fragile. If you only have regular chips, chop them a bit before folding them into the dough.
✦ Can I make the dough ahead of time and bake later?
Yes! You can keep the dough chilled in the refrigerator for up to 2–3 days. If it feels very firm when you’re ready to shape, let it sit at room temperature for a few minutes until it’s just soft enough to roll into balls.
Still have questions? Drop them in the comments — I love helping you bake with confidence! 💗
More Holiday Desserts You’ll Love
If you’re building a whole dessert table, don’t stop with Chocolate Snowball Cookies!
-
Lebkuchen Cookies – Classic German spice cookies that feel super old-world and Christmassy; great for anyone who loves warm spices.
-
Vanillekipferl – Tender almond crescent cookies dusted in powdered sugar; visually pretty and very traditional for holiday cookie trays.
-
Almond Butter Cookies – Keeps you in the nutty/almond lane, which pairs nicely with snowballs and your almond dessert cluster.
-
7 Layer Bars – An easy, throw-together bar that works beautifully on holiday dessert buffets and hits that nostalgic, sweet tooth.
-
Almond Joy Cookies – Coconut, chocolate, and almond feel indulgent and festive.
-
Razzleberry Pie – A showpiece pie option that feels special enough for Christmas or New Year’s and lets you send folks to a bigger dessert as well.
Tried This Recipe?
💌 Want more cozy comfort food in your inbox? Join my FREE newsletter and never miss a new family favorite — I’d love to cook together every week.
If you enjoyed this recipe, please take a moment to leave a ⭐️⭐️⭐️⭐️⭐️ star rating and a quick comment — I love hearing from you, and your feedback helps our whole cooking community!
📸 And if you Gram… share your photo on Instagram and tag me @gonnawantseconds so I can cheer you on and feature your beautiful creation!
Thanks for stopping by my kitchen today — happy cooking, friends! 💗 Kathleen
Chocolate Snowball Cookies
Ingredients
- 2 cups all-purpose flour
- 1/2 teaspoon salt
- 1/2 cup unsweetened cocoa powder
- 1 1/4 cup unsalted butter at room temperature
- 3/4 cup granulated sugar
- 1 teaspoon vanilla extract
- 1/2 teaspoon rum extract
- 8 ounces mini chocolate chips
- 1 cup powdered sugar
Instructions
- Make the dry mixture. In a medium bowl, whisk together the flour, salt, and cocoa powder until everything is evenly combined. Set aside.
- Cream the butter and sugar. In a large mixing bowl, beat the butter and granulated sugar together with an electric mixer on medium speed until the mixture is pale, light, and fluffy, about 1 minute. Add the vanilla and rum extract and mix just until combined.
- Finish the dough. With the mixer on low speed, gradually add the flour mixture and mix just until a soft dough forms and no dry streaks remain. Add the mini chocolate chips and mix or stir just until they’re evenly distributed. Cover the bowl and refrigerate the dough for at least 2 hours, or until firm enough to roll.
- Preheat and prepare the pans. When you’re ready to bake, preheat the oven to 350°F. Line baking sheets with silicone baking mats or parchment paper.
- Shape the cookies. Scoop and roll the chilled dough into 1-inch balls, pressing the dough together with your hands if it feels a little crumbly. Place the dough balls on the prepared baking sheets about 2 inches apart. They won’t spread much, but they do need a little breathing room.
- Bake. Bake in the preheated oven for 12–15 minutes, or until the cookies look set and the tops are matte, not shiny. Ovens vary, so trust the texture and visual cues more than the clock!The bottoms should be dry to the touch but not dark. Ovens vary, so start checking around the 12-minute mark to avoid over-baking—these are meant to stay tender and slightly sandy, not crisp.these are done when they look set and feel dry on the bottom, not when the timer beeps.
- Coat in powdered sugar (twice!). Let the cookies cool on the baking sheet just until they’re still very warm but cool enough to handle. Roll each warm cookie in powdered sugar and place on a wire rack to cool completely. Once the cookies are fully cooled, roll them in powdered sugar a second time for a thick, snowy coating.
Fans Also Made:
Nutrition

Leave a Reply