
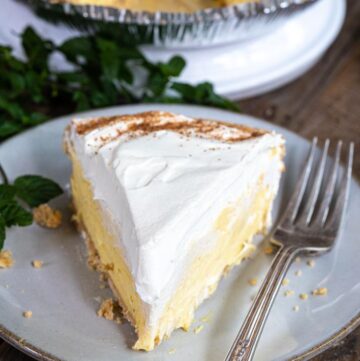
Buttermilk pie is a classic Southern recipe that is a luscious, buttery, silky smooth custard pie and sure to please. The filling is so simple to make and has that vanilla custard taste with a little lemon and nutmeg. The texture is silky smooth, and cuts beautifully! What an amazing combo of flavors!
Serve with powdered sugar, whipped cream, or fresh fruit. This simple but classic pie is a family-friendly dessert yet it’s elegant enough for company.
If you love old-fashioned pies as much as I do, I hope you’ll try our chess pie, sugar cream pie, butterscotch pie, and diner favorite, banana cream pie!

BUTTERMILK PIE RECIPE INGREDIENTS
- Pie crust: I use Pillsbury Pie Crust in the refrigerated aisle. Or make your own crust!
- Salted butter: Use real butter. If you only have unsalted butter available (like me!), add 1/4 teaspoon of salt in addition to the called for a pinch of salt in the recipe.
- Granulated sugar: White sugar to sweeten the filling.
- Eggs: I use large eggs and yolk
- Flour: All-purpose flour
- Buttermilk: Whole Buttermilk is preferred, but reduced fat can be used.
- Vanilla extract: 100% real vanilla extract
- Lemon zest: About one lemon will make 1 teaspoon of zest. Some other recipes also include lemon juice but we greatly prefer just the lemon zest!
- Freshly grated nutmeg: Grate the nutmeg nut, or you can also use ground nutmeg.
- Salt: Table salt
- Powdered Sugar + Whipped Cream + Whipped Topping: Use whichever of these you’d like to garnish and embellish the pie. I prefer a dollop of whipped cream. Remember if you’re using a frozen whipped topping to thaw overnight in the fridge.
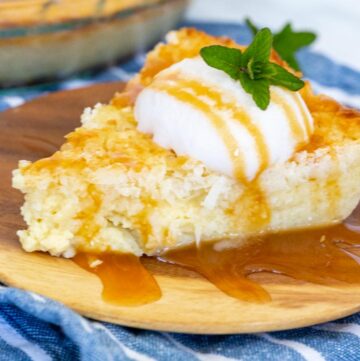
- Caramel Drizzle: Many people enjoy this pie with a nice caramel drizzle on top. If you’d like to try it, grab some caramel sauce at the market. Personally, with the nutmeg and lemon, I prefer it without the caramel.
- Fresh Berries: I love to add fresh berries on the top of a slice of pie. It adds gorgeous color and the flavors are lovely with the pie.

TIPS
- Before Starting: Place eggs, buttermilk, and butter on the counter for room temperature ingredients. I also take out the pie crust and let it rest at room temperature for a few minutes. The crust is easier to unroll.
- Pie Dish: You can use an 8 or 9-inch pie dish. I prefer to make this in an 8-inch pie plate. The pie is, obviously taller, and I think it has a more generous look. If you use a 9-inch pie plate, the pie will be thinner so you will probably need to cut a few minutes off baking time.
- Blind Baking: If the crust begins to puff up during blind baking, use the tip of a sharp knife to gently puncture the crust where it’s puffing up.
- Pie Shield: If you have an aluminum pie shield for an 8-inch pie, you will need it. If you don’t have one, you can easily make one yourself with aluminum foil.
- When baking the pie with the filling (Step 3 of making pie filling), I make a pie shield out of foil. I make sure only the crust edge is covered so the filling is exposed. The filling will rise and may hit the foil, so slightly lift the edges of the foil to avoid having the filling hit the foil during baking. When done, you will have a beautifully browned filling and crust that is not burned.
- How to make a foil pie shield: Using foil, pull enough foil from the container to form a square. Fold in half, then half again, forming a square (making a quarter of the original size). With the cut edges on the outside of the square, tear out the center of the folded part of the foil so that when unfolded, an open circle is created. Make the opening large enough to cover the pie crust, but make sure there is a little overhang. Lift the overhang up to expose the filling while covering the pie crust edge. This might be a little art project, but your pie will look amazing. Once blind-baked, keep your pie shield. You will need it in Step 3 when making the pie filling.
- Tenting The Whole Pie: As mentioned above, you’ll need to shield the crust edges. You will also, likely, need to tent the entire pie during the baking process. When the custard gets a nice golden brown, loosely cover the top of the pie with foil.
- How To Tell When Pie Is Done: The custard will be set but the center may be just a little jiggly.

STORING + FREEZING + MAKE-AHEAD
- How Long Can You Keep This in The Fridge? Once made, your buttermilk pie will last up to four days in the fridge.
- Can You Freeze This? Wrap tightly in plastic wrap, then foil. The pie can be frozen for two to three months. I would recommend freezing without the topping, then brûlée once thawed.
- Make-Ahead: This recipe requires refrigeration for at least 4 hours, so make this ahead!
- Food Safety: If you’d like more info on food safety check out this link.
HOW TO MAKE BUTTERMILK PIE

- Blind bake the pie crust.
- Make the pie filling: In a mixing bowl, add melted butter and sugar and whisk.
- Add the eggs, egg yolk, and flour.
- Whisk until the mixture is evenly combined.
- Stir in buttermilk, vanilla, lemon zest nutmeg, and a pinch of salt then whisk until smooth.
- Pour the filling into the crust. Bake and refrigerate after.
- Topping: Sprinkle the top of the pie with sugar and broil until it caramelizes.
- Slice and serve.
***See the full instructions below.
MORE PIE RECIPES
- Million Dollar Pie
- Chocolate Pudding Pie
- Peach Pie
- Pineapple Pie
- Atlantic Beach Pie
- Chocolate Cream Pie
- Peaches And Cream Pie
- Sweet Potato Pie With Condensed Milk
- Banana Coconut Cream Pie (Lawry’s Restaurant Copycat!)
TRIED THIS RECIPE?
If you’ve tried this recipe or any other recipe on my website, please leave a review. I love hearing your feedback! ⭐⭐⭐⭐⭐

Buttermilk Pie
Ingredients
Crust:
- 1 pie crust
- 1 large egg white
Pie Filling:
- 1/2 cup salted butter, (add 1/4 salt teaspoon to compensate) melted and cooled slightly
- 1 1/2 cups granulated sugar
- 3 large eggs, room temperature
- 1 large egg yolks, room temperature
- 3 tablespoons flour
- 3/4 cup whole buttermilk, room temperature
- 1 tablespoon vanilla extract
- 1 teaspoon lemon zest
- 1/8 teaspoon freshly grated nutmeg optional
- pinch salt
Optional Toppings:
- powdered sugar to serve (optional)
- whipped cream or whipped topping
- fresh berries
- caramel sauce
Instructions
Blind Baking Crust
- Arrange the oven rack to the lower third of the oven cavity. Place baking sheet on rack. Preheat oven to 425ºF (218ºC).
- Roll pie crust out, on a very lightly floured surface, into a 12-inch circle. Fit pie crust in an 8-inch standard pie plate. Fold edges under, and decoratively crimp or pinch the edges.
- Prick the bottom of the crust 8 to 10 times, all over, with a fork. Brush the entire inside of the crust with an egg white. Chill until crust is firm, 1 hour, or freeze for 20 minutes.
- After chilling the crust, remove from the fridge or freezer then line the pastry with aluminum foil or parchment paper. Fill to the top with dried beans or pie weights.
- Bake the crust at 425°F (218ºC), on the arranged oven shelf, on the hot baking sheet, for 4 to 5 minutes, or until the edges of the crust are dry. Remove weights and foil; bake for 2 more minutes or until the bottom of the crust dries out and loses its raw appearance. Cool on a wire baking rack. Reduce oven temperature to 350ºF (177ºC).


Make Pie Filling:
- In a medium mixing bowl, add melted butter and sugar and whisk to evenly combined. Add the eggs, egg yolk, and flour and whisk until mixture is evenly combined.
- Stir in buttermilk, vanilla, lemon zest nutmeg, and pinch of salt then whisk until smooth and emulsified.
- Place the blind baked pie crust on a cool rimmed baking sheet. Carefully pour the filling into the crust. Cover the crust with a pie shield.
- Bake for 40-50 minutes, (45 minutes is perfect in my oven) or until the center of the pie is golden, set, and the custard puffs. The entire pie will likely need to be loosely tented with foil so it doesn't get too brown.
- Set pie on a wire baking rack to cool. When pie has cooled, place in the fridge for 4 hours minimum or overnight.


Topping:
- After pie has been refrigerated and the custard is cold, remove from fridge. If the pie has any moisture on the top of it, very gently dab it dry with paper towels. Sprinkle top of pie with 2 tablespoons of sugar evenly over surface (you can tilt the pie if needed to distribute the sugar evenly).
- Place pie under the broiler, 5 inches from the heating element. As the sugar melts, turn the pie often so sugar melts and caramelizes evenly. Once caramelized, remove from oven to a wire rack and allow the sugar to set, 1-2 minutes. Serve!
- Set pie on a bakers rack and allow topping to cool slightly. Serve.


Notes
- Before Starting: Place eggs, buttermilk, and butter on the counter for room temperature ingredients. I also take out the pie crust and let it rest at room temperature for a few minutes. The crust is easier to unroll.
- Pie Dish: You can use an 8 or 9-inch pie dish. I prefer to make this in an 8-inch pie plate. The pie is, obviously taller, and I think it has a more generous look. If you use a 9 inch pie plate, the pie will be thinner so you will probably need to cut a few minutes off baking time.
- Blind Baking: If the crust begins to puff up during blind baking, use the tip of a sharp knife to gently puncture the crust where it’s puffing up.
- Pie Shield: If you have an aluminum pie shield for an 8-inch pie, you will need it. If you don’t have one, you can easily make one yourself with aluminum foil.
- When baking the pie with the filling (Step 3 of making pie filling), I make a pie shield out of foil. I make sure only the crust edge is covered so the filling is exposed. The filling will rise and may hit the foil, so slightly lift the edges of the foil to avoid having the filling hit the foil during baking. When done, you will have a beautifully browned filling and crust that is not burned.
- How to make a foil pie shield: Using foil, pull enough foil from the container to form a square. Fold in half, then half again, forming a square (making a quarter of the original size). With the cut edges on the outside of the square, tear out the center of the folded part of the foil so that when unfolded, an open circle is created. Make the opening large enough to cover the pie crust, but make sure there is a little overhang. Lift the overhang up to expose the filling while covering the pie crust edge. This might be a little art project, but your pie will look amazing. Once blind-baked, keep your pie shield. You will need it in Step 3 when making the pie filling.
- Tenting The Whole Pie: As mentioned above, you’ll need to shield the crust edges. You will also, likely, need to tent the entire pie during the baking process. When the custard gets a nice golden brown, loosely cover the top of the pie with foil.
- How To Tell When Pie Is Done: The custard will be set but the center may be just a little jiggly.
Nutrition
On your phone? Check the web story here.

WOW! Just wooooow! This pie is in my top of the list now.
Hey Rose. So happy you like this pie. It’s one of my favorites! Thanks so much for leaving a comment and the 5 star rating!