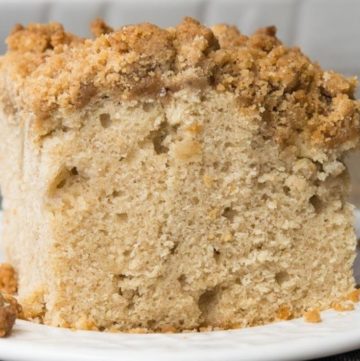
I love a well-baked scone and my apple scones recipe will show you how to make a beautiful pastry that is not too dry and has little pieces of crisp apple hidden inside. These little gems will turn out perfect every time, topped with sparking sugar and vanilla-scented glaze.
Move over Great British Baking Show, this apple scone will get some attention! Serve with whipped cream, jam, or butter.
If you’re looking for more delicious scones, I hope you’ll check out our maple pecan scones (my fall favorite!), pumpkin scones, and strawberry scones next!

APPLE SCONES INGREDIENTS
- Apple – I used a Granny Smith apple with holds its shape and has a nice tart taste. Any cooking apple is fine.
- Milk: Whole milk adds fat and moisture
- Sour Cream: More fat and moisture!
- All-Purpose Flour: The perfect flour for this recipe.
- Ground Cinnamon: Compliment the apple with this warm spice.
- Ground Nutmeg: More warm and nutty spice for the apples.
- Sugar: A scone needs to be a little sweet. Use this white granulated sugar for a clean, straightforward bit of sweetness.
- Sparkling Sugar: This is used to top the scone. It adds a little sparkle and crunch.
- Confectioners’ Sugar: Used for the glaze, powdered sugar melts nicely with just a little liquid.
- Vanilla: Add this extract for some vanilla scent in the glaze.

TIPS
- Make Space: Clear out some space in your refrigerator/freezer. You will be placing the butter, flour mixture, and dough in and out of the refrigerator or freezer while making the scones.
- Keep It Dry + Cool: When working with this dough, keep all the ingredients cool and try not to handle the dough with your hands too much. I use a bench scraper or fork when possible.
- It Starts Shaggy: This dough is easier to handle than most scone recipes, so once kneaded, the dough should be easy to handle. At first, it will be shaggy, but once kneaded, it should be shapable. Once the apples are added, make sure they stay tucked in the dough and the seams of the dough are well sealed.

STORING + FREEZING + MAKE-AHEAD
- How Long Can You Keep This in The Fridge? I recommend that once made, store your apple scones in an air-tight container and keep it on your countertop for not more than one day. This baked good is meant to be eaten right away and will dry out quickly.
- Can You Freeze This? Wrap the cooled scones tightly and freeze for up to three months. When ready to eat, full thaw, place it in the toaster oven and enjoy.
- Make-Ahead: This dessert can be made several hours ahead of time. Just loosely cover (don’t seal tightly).
- Food Safety: If you’d like more info on food safety check out this link.

HOW TO MAKE APPLE SCONES
- Make the dough.
- Shape the dough into 12-inch squares. Sprinkle apples on top and press them into the dough.
- Roll out the dough, reshape, and seal the edges.
- Flour the dough and cut it to make triangles.
- Brush each scone with heavy cream and sprinkle with coarse sugar.
- Bake.
- Make the glaze and drizzle over cooled scones.
***See the full instructions below.
MORE APPLE DESSERTS
- Apple Crumb Pie
- Applesauce Cake
- Bisquick Apple Cobbler
- Sour Cream Apple Pie
- Apple Bundt Cake
- Apple Cobbler
- Apple Blondies
- Caramel Apple Sheet Cake
- Apple Crisp
- Cracker Barrel Fried Apples
- Apple Bread (with pecan praline glaze!)
- Apple Coffee Cake
TRIED TIHS RECIPE?
Please leave a review, I love hearing your feedback! ⭐⭐⭐⭐⭐

Apple Scones
My apple scones is a well-baked pastry that isn't too dry and with crisp apples inside, topped with sparking sugar and vanilla-scented glaze for perfection.
Servings: 8 scones
Ingredients
- 10 tablespoons unsalted butter, very cold
- 1 1/2 cups (from 1 large apple) apple, peeled and cut into cubes
- 1/2 cup milk
- 1/2 cup sour cream
- 2 cups all-purpose flour
- 1/2 cup sugar
- 1 1/2 teaspoon dried ground cinnamon
- 1/2 teaspoon dried ground nutmeg
- 2 teaspoon baking powder
- 1/4 teaspoon baking soda
- 1/2 teaspoon salt
- 2 tablespoons heavy cream
- coarse sparkling sugar
Glaze
- 3/4 cup confectioners' sugar
- 1 tablespoon (plus more if needed) milk
- 1 teaspoon vanilla
Instructions
- Adjust the oven rack to the middle of the oven. Heat oven to 400ºF (204ºF). Line a baking sheet with parchment paper; set aside.
- Using a box grater, grate butter (10 tablespoons) and freeze.
- Whisk the milk and sour cream together, then place in the refrigerator.
- Whisk flour, sugar, cinnamon, nutmeg, baking soda, baking powder and salt in a medium sized bowl. Remove butter from freezer and add to the flour mixture. Toss mixture with a fork until butter is dusted with flour evenly. Continue to use a fork, pastry blender, or 2 butter knives to combine until the mixture comes together in pea-sized crumbs. Try not to handle the dough too much with your hands so the butter does not melt.
- Add the cold milk mixture to flour mixture, gently folding with a spatula until just combined
- Flour a work surface and toss mixture onto work surface. Dust dough with flour and knead with your hands 6 to 8 times until the dough comes together. Add flour to prevent sticking, as needed. Refrigerate for 5 minutes.
- Shape the dough into a 12 inch square. Sprinkle apples on top and press them into the dough. Fold into thirds, bringing one edge to the center, then bring the opposite edge to the center, like an envelope. Roll out the dough with a rolling pin just to even out and flatten the dough. Reshape into a long rectangle. Then, bring the short end to the center and bring the opposite short end to the center of the dough. Roll out the dough into a 6 1/2 by 6 1/2 square making sure edges are sealed.
- Flour the dough. You should have a nice square of dough that is somewhat easy to work with. Cut the square in half, then half again in the opposite direction, forming four equally sized squares. Then, cut each square diagonally, making 8 triangles. Arrange each triangle on prepared sheet pan. Brush each scone with heavy cream and sprinkle with course sugar.
- Bake for approximately 20 minutes or until lightly browned. Remove from baking sheet and cool on a wire rack.
Make Glaze:
- In a small bowl, whisk together ingredients. If glaze is too thick, very gradually add more milk, until desired thickness. Drizzle over cooled scones.
Fans Also Made:


Notes
- Make Space: Clear out some space in your refrigerator/freezer. You will be placing the butter, flour mixture, and dough in and out of the refrigerator or freezer while making the scones.
- Keep It Dry + Cool: When working with this dough, keep all the ingredients cool and try not to handle the dough with your hands too much. I use a bench scraper or fork when possible.
- It Starts Shaggy: This dough is easier to handle than most scone recipes so once kneaded, the dough should be easy to handle. At first, it will be shaggy, but once kneaded, it should be shapable. Once the apples are added, make sure they stay tucked in the dough and the seams of the dough are well sealed.
Nutrition
Serving: 1scone | Calories: 410kcal | Carbohydrates: 56g | Protein: 5g | Fat: 19g | Saturated Fat: 12g | Monounsaturated Fat: 5g | Cholesterol: 52mg | Sodium: 196mg | Potassium: 237mg | Fiber: 2g | Sugar: 30g | Vitamin A: 635IU | Vitamin C: 2mg | Calcium: 97mg | Iron: 2mg
DID YOU MAKE THIS RECIPE? I'D LOVE TO SEE!Tag @GonnaWantSeconds or #gonnawantseconds on Instagram!
© Gonna Want Seconds. Content and photographs are copyright protected. Sharing of this recipe is both encouraged and appreciated. Copying and/or pasting full recipes to any social media/website/blog is strictly prohibited.

We love this scones so much! I searched some of your scone recipes, we’ll make the strawberry scones soon!
Yaaay, we’re glad you like this, Carmela 🙂
Let us know how strawberry scones turns out! <3