This post may contain affiliate links. Please read our disclosure policy.
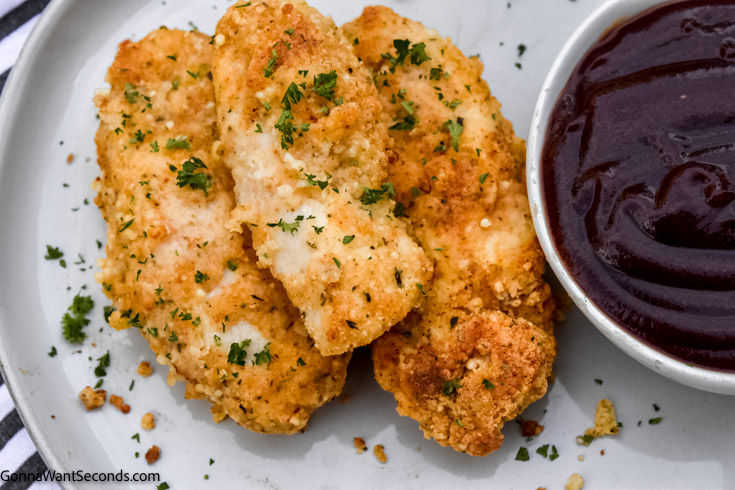
These Bisquick Chicken Fingers are what weeknight dreams are made of — golden and crispy on the outside, juicy and tender inside, and ready in just 20 minutes. They’re the kind of cozy, no-fuss dinner that makes everyone happy and disappears fast.
They’re one of my favorite easy Bisquick recipes for busy nights when you want crispy baked chicken without pulling out the fryer.
I love recipes like this — simple, nostalgic, and downright satisfying. If you’re a fan of family favorites like my Bisquick Chicken and Dumplings, Bisquick Chicken Pot Pie. And if you’re looking for even more easy, family-friendly meal ideas, be sure to browse my full Chicken Dinner Recipes—it’s packed with recipes you’ll make again and again.
❤️ They’re fast, flavorful, and fuss-free — just the kind of recipe we all need more of.

Why This Recipe Works
-
Oven-baked — no messy frying, but still perfectly crispy.
-
Bisquick coating keeps things light, crunchy, and flavorful.
-
Parmesan adds depth and a savory punch.
-
Ready in under 20 minutes from start to finish!
Before You Start
✨ Quick cleanup tip: Line your baking sheet with parchment or foil for easy cleanup and crispier bottoms.
✨ Cut evenly: Slice chicken into uniform strips so they bake evenly and stay juicy.
✨ Don’t skip the butter drizzle! It adds a golden, crispy finish that tastes like pan-fried without the mess.
✨ Shake well: Sealing and shaking the bag ensures every piece gets evenly coated — and it’s fun for kids to help!
✨ Use fresh Parmesan: Pre-grated works, but freshly grated melts better and adds a richer, nutty flavor.
Ingredients for Bisquick Chicken Fingers
This is just a quick glance at what you’ll need. For exact measurements and the full ingredient list, head down to the recipe card below.
-
Bisquick: The secret shortcut for the crispest, most reliable coating.
-
Parmesan cheese: Adds a salty, cheesy richness to the breading.
-
Garlic salt & paprika: The perfect seasoning duo for flavor and color.
-
Butter: Helps create that golden, irresistible crust.
-
Chicken breasts: Tender, juicy, and cut into perfect dipping-size strips.

⭐ Pro Tips
⭐ Don’t overcrowd the pan. If the chicken strips are too close together, they’ll steam instead of crisp. Use two pans if needed!
⭐ Want a little spice? Add a pinch of cayenne or a dash of hot sauce to the egg mixture for a subtle kick.
⭐ Make it ahead: You can prep and bread the chicken a few hours in advance, store in the fridge, and bake right before serving.
⭐ Crispier finish: After baking, pop them under the broiler for 1–2 minutes for extra crunch — just keep a close eye so they don’t burn.
Frequently Asked Questions
Can I use chicken tenders instead of chicken breasts?
Absolutely! They’re the perfect size, so you can skip slicing altogether.
Can I make these in an air fryer?
Yes! Air fry at 400°F for 9–11 minutes, flipping halfway through. They turn out extra crispy this way.
How do I store leftovers?
Refrigerate in an airtight container for up to 3 days. Reheat in a 375°F oven for about 8 minutes, or until warmed and crisp again.
Can I freeze Bisquick Chicken Fingers?
You sure can! Flash-freeze on a baking sheet until solid, then store in freezer bags for up to 2 months. Reheat directly from frozen at 400°F until heated through.
How to Make Bisquick Chicken Fingers

What to Serve With Bisquick Chicken Fingers
Round out your meal with a mix of fresh, cozy, and sweet favorites:
Fresh + Crisp Sides
My KFC Coleslaw, Carrot Salad, or House Salad with Buttermilk Dressing add a cool, refreshing crunch that balances the crispy chicken beautifully.
Comforting Potatoes
Pair with my classic Macaroni Salad, Buttered Potatoes or Air Fryer Potato Wedges for the ultimate comfort combo.
Sweet Finishes
End your meal with something classic and cozy — Toll House Cookies, Peanut Butter Cookies, or Banana Cake with Cream Cheese Frosting — the perfect sweet treat after a savory bite.
More Savory Bisquick Recipes
- Sausage Balls With Cream Cheese
- Bisquick Breakfast Casserole
- Impossible Cheeseburger Pie
- Impossibly Easy Ham And Swiss Pie
- John Wayne Casserole
- Impossible Taco Pie
Tried This Recipe?
💌 Hungry for more cozy recipes? Subscribe to my FREE newsletter so you never miss a new family favorite. 💌
And don’t forget to leave a ⭐⭐⭐⭐⭐ rating below if you loved these crispy Bisquick Chicken Fingers! Tag me on Instagram @gonna_want_seconds — I’d love to see your plate!
Thanks for stopping by my kitchen today — happy cooking, friends! ❤️ Kathleen
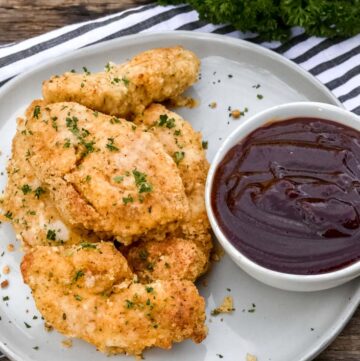
Bisquick Chicken Fingers
Ingredients
- 2/3 cup Bisquick
- 1/2 cup grated Parmesan
- 1/2 teaspoon garlic salt
- 1/2 teaspoon paprika
- 1/4 teaspoon black pepper
- 3 boneless skinless chicken breast halves, cut crosswise into 1/2-inch strips
- 1 large egg, lightly beaten
- 3 tablespoons butter, melted
Instructions
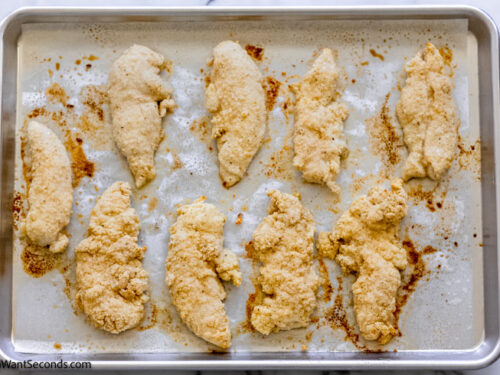
- Preheat oven to 450°F (232°C). Line a baking sheet with foil or parchment then spray with cooking spray.
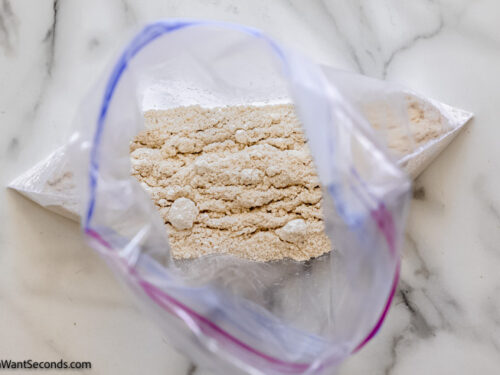
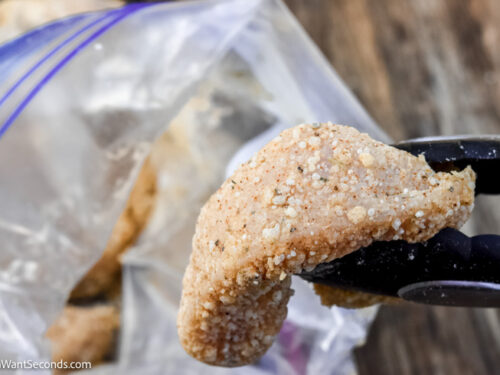
- In a 1-gallon resealable plastic bag, combine Bisquick (2/3 cup), Parmesan (1/2 cup), garlic salt (1/2 teaspoon), paprika (1/2 teaspoon), and black pepper (1/4 teaspoon). Close the bag and shake to combine the ingredients.

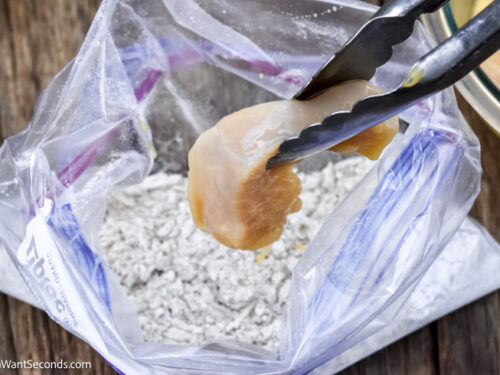
- Dip half the chicken strips in the egg mixture, shaking off the excess egg. Place chicken in Bisquick mixture, seal the bag, and shake to evenly coat. Place coated chicken on the prepared baking sheet.
- Repeat with remaining half of the chicken.
- Drizzle melted butter (3 tablespoons) over chicken strips.
- Bake for 12 to 14 minutes, carefully turning after 6 minutes with a spatula, or until there is no longer pink in the center of the chicken.


Nutrition
On your phone? Check the web story here.

I doubled it for my 2 picky eater sons. They loved it!
Yaay! That’s a winner 🙂 Thanks, Kim
You didn’t mention that an instant thermometer is a must in the kitchen and one could use that as a guide for doneness at 165-168 degrees instead of cutting them, checking for color, just sayin……………………BTW, Loved the recipe
as most of them you post and will give it a go but I’ll make the “Bisquick” from scratch, because I have the time, Thanks, Vinnie