This post may contain affiliate links. Please read our disclosure policy.
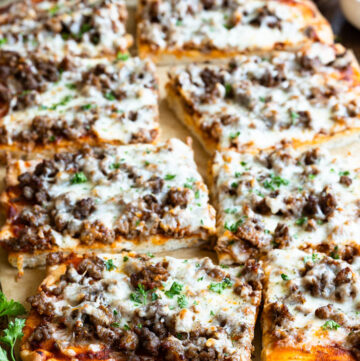
School lunch pizza is pure nostalgia, bringing back memories of those cheesy squares from cafeteria pizza day—crispy on the bottom, soft in the middle, and loaded with melty mozzarella. My homemade version tastes even better than you remember, with a rich, zesty sauce, hearty layers of beef and sausage, and gooey cheese that makes every bite irresistible.
It’s the perfect recipe for weeknight dinners, game-day spreads, or anytime you’re craving comfort food. And since it bakes up in a sheet pan and slices neatly into squares, it’s just as easy and shareable as the school classic—only fresher, cheesier, and way more delicious.
This recipe is designed for a standard half-sheet pan (18 x 13 inches), the most common size in home kitchens. If you’re using a different size, simply adjust your dough thickness and bake time for the best results.
If your crew loves pizza night as much as mine, try mixing it up with my sheet pan BBQ chicken pizza for another crowd-pleasing twist, or keep it simple with my Bisquick pizza crust for another time when you want a quick and easy smaller pizza.

Why This Recipe Works
- Nostalgic flavor, made better at home: This recipe recreates the beloved cafeteria classic with a fresher crust, heartier toppings, and gooier cheese.
- Sauce with balance and depth: A touch of sugar (or even grated carrot) smooths out the acidity of the tomatoes, while Worcestershire and extra tomato paste add savory richness. Stirring in balsamic or red wine vinegar at the end keeps the sauce bright and tangy instead of dull or bitter.
- Cheese that melts just right: Whole milk, low-moisture mozzarella gives you creamier melt and better browning than part-skim, so every slice is cheesy perfection.
- Hearty, meaty topping: The mix of sausage, beef, and onion ensures a satisfying, full-flavored bite in every square.
- Crispy-yet-tender crust: Par-baking the dough guarantees it cooks through, while a quick finish directly on the oven rack makes the bottom extra crisp. For even more flavor, brushing the edges with olive oil, garlic powder, and salt before baking adds golden color and a savory finish.
- Simple sheet-pan method: Baking in a half-sheet pan means no tricky shaping, quick cleanup, and perfect square slices—just like school lunch day, only way tastier.

Before You Begin
- Let the dough rest (optional): For even better flavor and structure, cover your dough and let it rise for 30 minutes before pressing it into the pan. This short rest activates the yeast and gives a subtle boost to texture.
- No kneading required: This dough is soft and slightly wet, so there’s no need to knead or punch it down. Just stir it together until combined, then gently press it into the pan with oiled fingertips.
- Make the sauce ahead: For the best flavor, simmer the sauce and refrigerate overnight. The finishing splash of vinegar keeps it tangy and bright.
- Use whole milk mozzarella: Whole milk, low-moisture mozzarella melts creamier and browns more evenly than part-skim—worth the extra touch for that perfect cheesy top.
- Par-bake the crust: Give the dough a quick bake before adding toppings. This sets the surface so it doesn’t turn soggy once the sauce and meat go on, while still leaving the center tender.
- Cool before slicing: Let the pizza rest for a few minutes after baking. This helps the cheese set and gives you cleaner, neater squares.

Frequently Asked Questions
Can I make the sauce ahead of time? Yes! In fact, the sauce tastes even better if you simmer it the day before and refrigerate overnight. Adding the vinegar at the end keeps the flavor bright and tangy.
What’s the best mozzarella for this pizza? Whole milk, low-moisture mozzarella melts smoother and browns more evenly than part-skim. It’s the secret to that golden, bubbly top!
Do I really need to par-bake the crust? Yes—this step is important. Par-baking sets the dough so the sauce and toppings don’t make it soggy, but it still bakes up tender in the center.
Can I switch up the toppings? Definitely. The sausage-and-beef combo gives that classic school-lunch flavor, but pepperoni, veggies, or even a meatless version all work great.
How can I get the crust extra crispy? Here’s a bonus tip! After the final bake, carefully transfer the pizza (without parchment) directly to the oven rack for 1–2 minutes. This gives you a restaurant-style crispy bottom while keeping the inside tender.

School Lunch Recipe Ingredients
- Pizza Dough: This recipe calls for 1 pound of prepared commercial pizza dough.
- Olive Oil: Used in both the sauce and the crust. You can swap with vegetable or canola oil in a pinch, but olive oil adds the best flavor.
- Worcestershire Sauce: Adds savory depth to the sauce. If you don’t have it, a dash of soy sauce or fish sauce makes a good substitute.
- Mozzarella Cheese: Whole milk, low-moisture mozzarella melts smoother and browns more evenly than part-skim. For a twist, try provolone or a mozzarella-provolone blend.
- Italian Sausage + Ground Chuck: The combo gives a hearty, classic flavor. You can use all beef, all sausage, or substitute with ground turkey or chicken if you’d like.
- Balsamic Vinegar: Stirred into the sauce at the end of simmering for a tangy finish. Red wine vinegar also works well here, but I love the little bit of sweetness balsamic adds.
- Cornmeal: Sprinkled on the pan for texture and to keep the crust from sticking. If you don’t have cornmeal, semolina flour works beautifully.

What to Serve With School Lunch Pizza
Pizza night isn’t complete without a few easy sides and something sweet to finish. Here are my favorite pairings:
Fresh + Crisp Sides
- A simple green salad with my red wine vinaigrette, Mediterranean salad, or grinder salad balances the cheesy richness of the pizza.
- Coleslaw, like my KFC coleslaw copycat, adds a cool, crunchy contrast.
- Sheet Pan Mediterranean Vegetables bring a roasted, savory side that’s hearty yet wholesome—perfect if you want to sneak in extra veggies or try the pizza with our simple roasted peppers — no peeling required!
Comfort Food Pairings
-
Garlic bread or Olive Garden breadsticks are perfect for soaking up extra sauce.
-
A cozy bowl of tomato basil soup makes this pizza feel like the ultimate comfort meal.
Sweet Finishes
-
Keep the nostalgic theme going with chocolate Texas sheet cake, or Coca Cola cake. Both of these have been reader favorites for years!
-
For a lighter, fruity option, try strawberry tiramisu for a refreshing sweet ending.
Storing + Reheating + Freezing + Make-Ahead
Storing:
- Leftover pizza can be stored in an airtight container in the refrigerator for up to 3–4 days. For best results, separate layers with parchment paper so the slices don’t stick together.
Reheating:
- Oven (best method): Place slices on a baking sheet, cover loosely with foil, and warm at 350°F for 10–15 minutes until heated through.
- Crispier finish option: Remove the foil during the last 2 minutes, or place the pizza directly on the oven rack to crisp the bottom.
- Microwave (quick option): Heat on a microwave-safe plate in short bursts, but note the crust won’t stay crisp.
Freezing:
- Wrap baked and cooled slices individually in plastic wrap, then place in a freezer bag. Freeze for up to 2 months. Thaw in the fridge overnight before reheating in the oven.
Make-Ahead:
- Sauce: Can be made a day in advance. Refrigerate, then stir in the vinegar just before using to keep the flavor bright.
- Dough: If using homemade dough, you can prepare it the night before and refrigerate it, covered. Let it rest at room temperature for 30 minutes before pressing into the pan.
- Assemble Ahead: You can par-bake the crust, cool it, and store it wrapped for up to 24 hours. Add sauce, toppings, and cheese just before the final bake.
Food Safety:
- If you’d like more info on food safety, check out this link.
How To Make School Lunch Pizza

More Sheet Pan Easy Dinners
Tried This Recipe?
I’d love to hear how your School Lunch Pizza turned out! ⭐⭐⭐⭐⭐ Your reviews help other readers (and our cozy GWS community) know what to expect—and they always make my day.
Don’t forget to snap a photo and tag me on Instagram @gonna_want_seconds so I can cheer you on. And if you haven’t already, be sure to subscribe to my newsletter (totally free + we never share your info!) for more family-friendly comfort food recipes you’ll actually want seconds of. 🍕💌
School Lunch Pizza
Ingredients
Sauce
- 1 (6-ounce) can tomato paste
- 1 1/2 cups water
- 1/3 cup olive oil
- 1/2 teaspoon Worcestershire sauce
- 2 cloves garlic minced
- 1/2 teaspoon salt
- 1/2 teaspoon pepper
- 1 1/2 teaspoons dried Italian seasoning
- 1/2 teaspoon dried onion powder
- 1/2 teaspoon sugar
- 1 teaspoon balsamic vinegar
Crust
- 1 pound commercial pizza dough
- 3 tablespoons olive oil
- 3 tablespoons cornmeal
Toppings
- 1/2 pound Italian sausage
- 1/2 pound ground chuck
- 1/4 cup onion finely chopped
- 1/2 teaspoon pepper
- 1/2 teaspoon salt
- 4 cups mozzarella cheese shredded
Instructions
Make Sauce
- In a medium saucepan, whisk together the tomato paste (1 can), water (1 1/2 cups), olive oil (1/3 cup), Worcestershire sauce (1/2 teaspoon), garlic (2 cloves), salt (1/2 teaspoon), pepper (1/2 teaspoon), Italian seasoning (1 1/2 teaspoons), onion powder (1/2 teaspoon), and sugar (1/2 teaspoon) until smooth.
- Place over medium-low heat and bring to a gentle simmer. Stir occasionally and let simmer uncovered for 15–20 minutes, or until slightly thickened and flavors are well blended.
- Remove the saucepan from the heat, then stir in balsamic vinegar (1 teaspoon).
- Cool the sauce to room temperature. For best flavor, cover and refrigerate the sauce overnight to allow the flavors to fully develop.
Arrange Crust
- Preheat at 400ºF (204ºC). Add 3 tablespoons of olive oil to a half-sheet pan and use a pastry brush to spread it evenly across the surface. Lightly dust the pan with cornmeal (3 tablespoons).
- Take the pizza dough (1 pound) and gently press or stretch it into a rectangle that fits the bottom of the pan. If the dough pulls back or feels tight, pause and let it rest for around 5 minutes before stretching again.
- Bake the crust for 7–8 minutes, or until the surface looks set (no longer doughy) and starts to develop a light golden color. Remove from oven.
Make Meaty Topping
- In a skillet over medium-high heat, cook sausage (1/2 pound), ground beef (1/2 pound), salt (1/2 teaspoon), pepper (1/2 teaspoon), and chopped onion (1/4 cup) until browned and crumbly. Drain excess grease.
Assembly
- Spread sauce over the partially baked crust, evenly top with meat mixture, then sprinkle cheese over the top.
- Bake for 8–10 minutes, or until cheese (4 cups) is melted and lightly browned. Cool for 5 minutes before slicing into squares. Serve hot.


Notes
- Let the dough rest (optional): For even better flavor and structure, cover your dough and let it rise for 30 minutes before pressing it into the pan. This short rest activates the yeast and gives a subtle boost to texture.
- No kneading required: This dough is soft and slightly wet, so there’s no need to knead or punch it down. Just stir it together until combined, then gently press it into the pan with oiled fingertips.
- Make the sauce ahead: For the best flavor, simmer the sauce and refrigerate overnight. The finishing splash of vinegar keeps it tangy and bright.
- Use whole milk mozzarella: Whole milk, low-moisture mozzarella melts creamier and browns more evenly than part-skim—worth the extra touch for that perfect cheesy top.
- Par-bake the crust: Give the dough a quick bake before adding toppings. This sets the surface so it doesn’t turn soggy once the sauce and meat go on, while still leaving the center tender.
- Cool before slicing: Let the pizza rest for a few minutes after baking. This helps the cheese set and gives you cleaner, neater squares.

Leave a Reply