This post may contain affiliate links. Please read our disclosure policy.
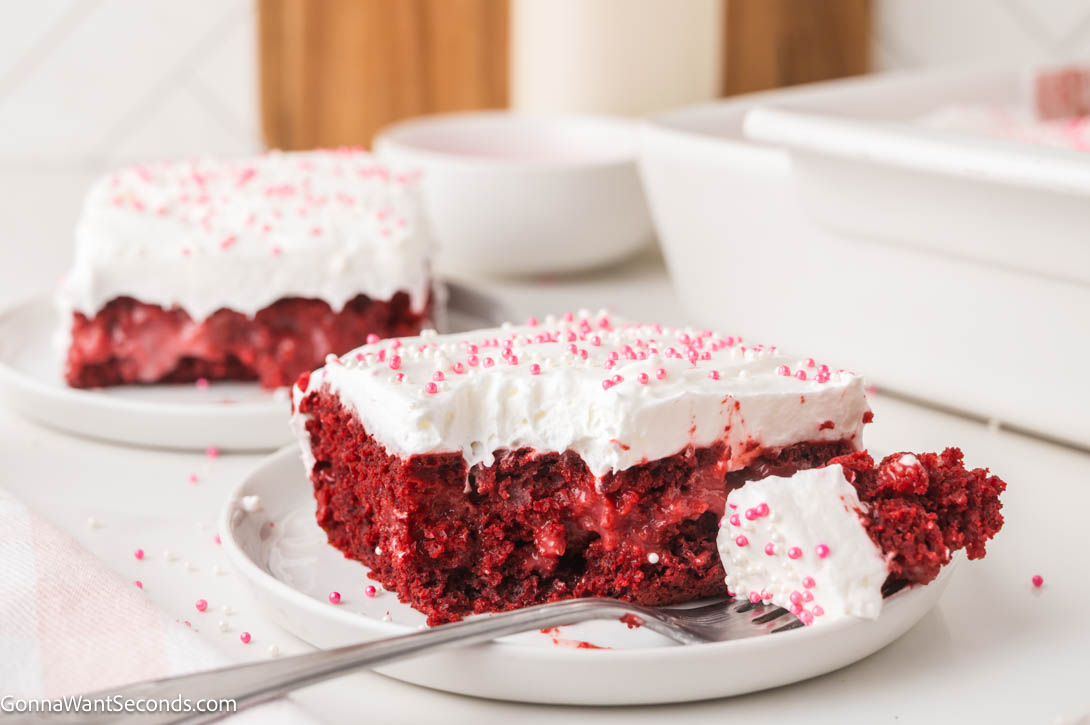
If you love red velvet desserts that feel nostalgic, festive, and a little extra without being complicated, this red velvet poke cake is calling your name. This chilled poke cake is ultra-moist, filled with creamy cheesecake pudding, and topped with a fluffy layer of whipped topping and pink sprinkles for the prettiest finish.
This recipe works so well because the soft red velvet cake gets poked while it’s still tender, letting that rich cheesecake pudding soak into every bite. The added yogurt keeps the cake plush and moist, while the Cool Whip topping keeps things light and dreamy — no heavy frosting required. It’s a no-fuss dessert that disappears fast at potlucks, holidays, and family gatherings.
Cold, creamy, plush, and vividly red with pops of pink sprinkles, this is the kind of cake that tastes even better straight from the fridge.
Poke cakes are one of my favorite desserts for feeding a crowd because they’re easy, nostalgic, and get better with time. If you love this red velvet version, be sure to check out my Chocolate Poke Cake for a rich, classic option, Strawberry Poke Cake when you’re craving something bright and fruity, and Red White and Blue Poke Cake for holidays and celebrations when you want a fun, festive twist.
Alright friend — let’s make something sweet together. 💗

✨ Before You Start
✨ Use a metal or glass 9×13 baking dish and grease it well so the cake releases cleanly.
✨ Let the cake cool at least one full hour before poking — this prevents tearing.
✨ A wide straw or the handle of a wooden spoon works perfectly for even holes.
✨ Chill time matters! The pudding needs time to fully set inside the cake.
✨ For the prettiest slices, wait until the cake is fully cold before serving.

Red Velvet Poke Cake Ingredients + Key Notes
Cake
-
Red Velvet Cake Mix – A reliable shortcut that delivers classic flavor and color.
-
All-Purpose Flour – Strengthens the boxed mix slightly so it holds up to the pudding.
-
Vegetable Oil – Keeps the crumb moist and tender.
-
Water – Activates the mix and balances moisture.
-
Vanilla Yogurt – The secret upgrade. Adds moisture, richness, and a subtle tang that complements red velvet beautifully.
Filling
-
Cheesecake Pudding Mix – Creates that creamy, slightly tangy filling without extra effort.
-
Whole Milk – Needed for proper pudding thickness and richness.
Topping
-
Cool Whip (thawed) – Light, fluffy, and perfect for a poke cake finish.
-
Pink Sprinkles – Optional, but highly encouraged for a festive pop.
Cool Whip Swap:
If you prefer homemade, whip 1 cup heavy cream with 2–3 tablespoons powdered sugar and 1 teaspoon vanilla to stiff peaks. This replaces one 8-oz tub of Cool Whip.

🥣 How to Make Red Velvet Poke Cake

Start by preheating your oven to 350°F and greasing a 9×13 baking dish well so the cake releases easily later. Stir together the cake mix, flour, oil, water, and vanilla yogurt until smooth, then pour the batter into the prepared pan and bake until a toothpick inserted in the center comes out clean.
Once the cake is baked, let it cool for at least an hour. When it’s completely cool, use a straw or the handle of a wooden spoon to poke holes evenly across the surface — this is what allows the creamy filling to soak into every bite.
Whisk the cheesecake pudding mix with the milk until smooth, then pour it slowly over the cake, making sure it fills all those little holes. Transfer the cake to the refrigerator and let it chill until the pudding is fully set.
When everything is nice and cold, spread the Cool Whip gently over the top and finish with pink sprinkles. Slice, serve chilled, and enjoy.
⭐ Pro Tips
⭐ Don’t rush the cooling
If the cake is still warm when you add the pudding, it won’t set properly and can turn gummy instead of creamy.
⭐ Gentle spreading is key
When adding the whipped topping, use an offset spatula and a light hand so you don’t pull pudding back up through the holes.
⭐ Make it party-ready
This cake actually gets better after a few hours in the fridge — perfect for make-ahead entertaining.
🔬 Baking Science: Why This Poke Cake Works
The added flour reinforces the structure of the boxed cake mix, preventing sogginess once the pudding is added. Yogurt contributes acidity and fat, which tenderize the crumb while keeping it plush. Poking holes increases surface area so the pudding distributes evenly instead of pooling — giving you creamy flavor in every bite.
What to Serve With Red Velvet Poke Cake
Fresh + Crisp Sides
A bowl of fresh strawberries or mixed berries adds a bright contrast to the rich cake.
Cozy Drink Pairings
Serve with hot coffee, cold brew, or a glass of milk for a classic combo.
Sweet Finishes
If you’re building a dessert table, this pairs beautifully with Red Velvet Cupcakes, Red Velvet Crinkle Cookies, or Frosted Fudge Brownies.

Storing + Freezing + Make-Ahead Tips
Storing
- Cover the cake tightly with plastic wrap or store it in an airtight container in the refrigerator. Red velvet poke cake will keep well for 3–4 days, and the texture actually improves after the first day as everything settles together.
Reheating
- This cake is meant to be served chilled, so reheating isn’t recommended. If it feels too cold straight from the fridge, let individual slices sit at room temperature for about 10–15 minutes before serving.
Freezing
- Freezing is not ideal once the pudding and whipped topping are added, as the texture can become watery when thawed. If you need to freeze, do so before adding the pudding and topping, then thaw completely and finish assembling fresh.
Make-Ahead
- This is a fantastic make-ahead dessert. You can prepare the entire cake up to 24 hours in advance, keep it covered in the fridge, and add sprinkles just before serving for the prettiest presentation.
Food Safety
- If you’d like more info on food safety, check out this link.
✦ Frequently Asked Questions
✦ Can I make this ahead of time?
Yes — this is a perfect make-ahead dessert. It actually tastes even better after a few hours in the fridge because the pudding has time to soak in and fully set.
✦ How long does red velvet poke cake last?
Store it covered in the refrigerator for up to 3 days for best texture and freshness.
✦ Can I freeze red velvet poke cake?
I don’t recommend freezing it once it’s topped, because the whipped topping can weep and change texture after thawing.
✦ Can I use a different pudding flavor?
Absolutely. Vanilla or white chocolate pudding both work great if you want a milder flavor than cheesecake.
Still have questions? Drop them in the comments — I love helping you bake + cook with confidence! 💗

More Easy Desserts to Make Next
Tried This Recipe?
💌 And while you’re here, don’t miss the next cozy recipe — subscribe to my totally FREE newsletter so you’ll always have comfort food favorites at your fingertips. 💌
If you enjoyed this recipe, please take a moment to leave ⭐️⭐️⭐️⭐️⭐️ star rating and a quick comment — I love hearing from you and it helps our community of bakers and cooks!
📸 And if you Gram… don’t forget to share your photo on Instagram — tag me @gonnawantseconds so I can cheer you on and share your creations!
Thanks for stopping by my kitchen today — happy cooking, friends! 💗 Kathleen

Red Velvet Poke Cake
Ingredients
- 1 (13.25-ounce) box red velvet cake mix
- 1/4 cup all-purpose flour
- 1/2 cup vegetable oil
- 1 cup water
- 1/4 cup vanilla yogurt
Filling
- 1 (3.4-ounce_ package cheesecake pudding mix
- 2 cups whole milk
Topping
- 1 (8-ounce) container Cool Whip thawed
- 1-2 tablespoons pink sprinkles
Instructions
- Start by preheating your oven to 350ºF and greasing your baking dish with butter.
- Then stir together the cake mix, flour, oil, water, and yogurt.
- Pour into your baking dish and bake for about 25 minutes, or until a toothpick comes out clean. Then cool for at least 1 hour.
- Once cool, use your straw to poke holes in the cake, about ½ -1 inch apart.
- Then whisk together the pudding mix and milk, then pour on top of the cake. Let chill in the fridge for at least 30 minutes.
- Once completely cooled and set, spread the cool whip over the top and add the sprinkles.
- Slice into 12 pieces, serve, and enjoy!

Notes
- Don’t rush the cooling. If the cake is still warm when you add the pudding, it won’t set properly and can turn gummy instead of creamy.
- Gentle spreading is key. When adding the whipped topping, use an offset spatula and a light hand so you don’t pull pudding back up through the holes.
- Make it party-ready. This cake actually gets better after a few hours in the fridge — perfect for make-ahead entertaining.
Nutrition

Leave a Reply