
This post may contain affiliate links. Please read our disclosure policy.
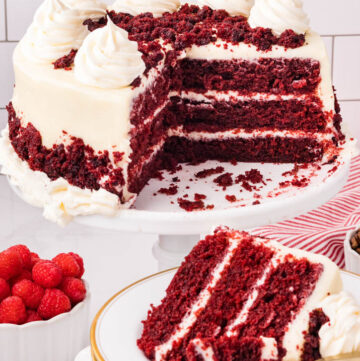
There are pretty cakes… and then there’s this red velvet cake. Tall, plush layers in that signature deep red, stacked high with swoops of tangy cream cheese frosting and finished with crumbles, pecans, and berries — it’s the kind of showstopper that looks right at home on a wedding dessert table, Christmas buffet, or big birthday celebration. Every bite is soft, velvety, and just rich enough, with that classic hint of cocoa and tang that makes red velvet so unforgettable.
This recipe is my go-to “big occasion” red velvet because it’s been carefully tested for both flavor and practicality in a real home kitchen. The batter bakes up beautifully in three 9-inch pans, three 8-inch pans, or a tall two-layer cake, so you can use the pans you already own. You’ll get bakery-style results with simple ingredients, plus options for classic red food coloring or red velvet emulsion so you can choose your perfect shade and flavor. If you love special-occasion cakes like my Strawberry Cake, Hummingbird Cake, Banana Pudding Cake, and Pineapple Upside Down Cake, this red velvet is the crown jewel you’ll come back to again and again.

Before You Start ✨
✨ Choose your pan setup. This batter works beautifully in three 9-inch pans, three 8-inch pans (a little taller), or two 9-inch pans for a taller two-layer cake. I’ve included gram weights so you can divide the batter evenly no matter which route you take.
✨ Use a kitchen scale if you can. I like to use gram measurements for this recipe— it keeps the layers perfectly even and helps prevent over-mixing while you’re fussing with the batter.
✨ Room-temperature dairy and eggs are non-negotiable. Let your buttermilk and eggs come to room temp so the batter comes together smoothly and bakes up with a fine, velvety crumb.
✨ Prep the pans well and let the cakes cool in the pan. A quick spray and parchment round on the bottom make the layers release like a dream, even if you use basic non-stick spray. Leaving the cakes in the pans until completely cool helps keep red velvet from drying out.
✨ Decide on your red “boost.” You can use classic liquid red food coloring or LorAnn Red Velvet Emulsion. The food coloring gives a brighter red; the emulsion bakes up a little deeper in color with a slightly more chocolatey first bite. Both are delicious — pick your favorite.
Red Velvet Cake Ingredients + Key Notes
Chocolate Base
- Unsalted butter (¼ cup / 56.5g, melted) – Used to bloom the cocoa and espresso powder. Because you’re blooming in fat (not water), you can use either natural or Dutch-processed cocoa here. The butter also adds richness and a bit of classic cake flavor.
- Unsweetened cocoa powder (3 tablespoons / 16g) – Provides that subtle cocoa backbone. Red velvet isn’t meant to be a full chocolate cake; this amount keeps the crumb tender and the flavor balanced.
- Espresso powder (½ teaspoon) – You won’t taste coffee. It simply deepens the cocoa flavor and makes the chocolate notes taste more “chocolaty” and rounded.
Dry Ingredients
- All-purpose flour (2½ cups / 300g) – Provides structure. Measuring by weight helps prevent packing in too much flour, which would dry out a red velvet cake very quickly.
- Granulated sugar (1½ cups / 297g) – Sweetens the cake and helps keep it moist. Sugar also tenderizes the gluten so the crumb stays soft.
- Baking soda (1 teaspoon) – Reacts with the acidic ingredients (buttermilk, vinegar, and cocoa) to lift the cake. That’s what gives you those pretty, even layers.
- Fine salt (1 teaspoon) – Balances the sweetness and brings out the cocoa and tangy flavors.
Wet Ingredients
- Vegetable oil (1¼ cups / 247.5g) – Keeps the cake moist for days. Oil-based red velvet cakes tend to stay soft and tender even after refrigerating.
- Hot water (1 tablespoon) – Helps the wet ingredients come together and reinforce that velvety texture.
- Buttermilk (1 cup / 227g, well shaken, room temp) – Essential for classic red velvet flavor. Adds tang, keeps the crumb tender, and works with baking soda and vinegar for lift.
- Eggs (2 large, room temp) – Provide structure, richness, and stability so the cake slices cleanly.
- Seedless raspberry or strawberry jam (1 tablespoon) – Adds a subtle fruity note that plays beautifully with the tang and cocoa and helps with moisture and color.
- Red food coloring (2 tablespoons / 1 ounce) – Gives the cake its signature color. Liquid red coloring works best here to distribute evenly in the batter.
- Apple cider vinegar (2 teaspoons) – Reacts with the baking soda to help the cake rise and enhances that bright red hue.
- Vanilla extract (1 tablespoon) – Rounds out all the flavors and keeps the cake from tasting flat.
- Emulsion Option: You can use 2 tablespoons LorAnn Red Velvet Emulsion instead of the red food coloring. If you go this route, omit the vanilla extract. The emulsion gives a deeper red color and a slightly more chocolate-forward first bite.
Cream Cheese Frosting
- Cream cheese (2 blocks, 8 oz / 454g total, softened) – Use full-fat, brick-style cream cheese for the thickest, fluffiest frosting.
- Unsalted butter (1 cup / 226g, softened) – Adds richness and helps the frosting whip up light and smooth.
- Confectioners’ sugar (4 cups / 452g, sifted) – Sweetens and thickens the frosting. Sifting keeps it silky with no lumps.
- Vanilla extract (1 teaspoon) – Adds warmth and a bakery-style flavor to the frosting.
Garnish
- Pecans – Add a lovely crunch and a subtle nutty note that pairs beautifully with the tangy cake.
- Fresh raspberries – A pretty pop of color and gentle tartness that complements the richness of the cake and frosting
- Red Velvet Cake Crumbs – I use these when I have to trim the dome from the top of the cake.

How To Make Red Velvet Cake

Preheat the oven, prep three 9-inch (or 8-inch) pans with spray and parchment, then bloom the cocoa and espresso in melted butter. Whisk the dry ingredients in one bowl and the wet ingredients in another, stir in the cocoa mixture, then fold everything together just until smooth. Divide the batter evenly between the pans (about 450g per pan for 3 layers or 680g for 2 pans), bake until the centers spring back and a toothpick has a few moist crumbs, and cool completely in the pans. Beat together the cream cheese frosting, then stack the layers with frosting in between, add a quick crumb coat and chill, and finish with a smooth final layer of frosting plus red velvet crumbs, pecans, or raspberries.
⭐ Pro Tips for the Best Red Velvet Cake
⭐ Center-rack baking is key. Red velvet cakes brown quickly. Baking on the center rack (not the upper third) helps prevent domed tops and overly dark edges. If your oven has bad hot spots, you can gently rotate the pans front-to-back once halfway through baking, but avoid opening the door repeatedly — big temperature drops can cause cakes to fall.
⭐ Don’t overbake — follow the visual cues. Start by looking through the oven door: when the shine has disappeared from the very center, gently tap the center with a fingertip. If it springs back, do the toothpick test. You’re looking for a few moist crumbs, not a totally clean stick. If it feels liquid under the surface, close the oven door quickly and give it more time.
⭐ Let the cakes cool in the pan. Because red velvet tends to dry out, leaving the layers in their pans until they’re completely cool helps lock in moisture. The combo of non-stick spray + parchment rounds makes them release cleanly later, even with basic generic spray — no fancy can required.
⭐ Make-ahead layers work beautifully. Once the cakes are fully cool, remove them from the pans with the parchment, wrap each layer in a double layer of plastic wrap, and freeze flat (stacking no more than three high). Decorating is actually easier with cold or slightly frozen layers because they’re less fragile and shed fewer crumbs.
⭐ Scale up frosting for big decorations. For a simple smooth-sided cake, a single batch of frosting is enough. If you want piped borders and big swirls on top, plan on 1½ batches of frosting. After you’ve frosted the cake, you can beat in an extra ½ cup or so of confectioners’ sugar to the remaining frosting to make it a bit firmer for piping.
⭐ Crumb coat like a pro. A crumb coat is really just a sacrificial layer — it will be full of crumbs and scraped quite thin. Don’t pile it on; use a small amount of frosting, spread it thinly over the sides and top, then scrape most of it off. Chill to set, then add your final smoother layer for that crisp, clean look.
⭐ Tools make the finish easier. Use a flat icing spatula or bench scraper for the sides and an offset spatula for the top. Frost the sides first using a generous scoop of frosting from the top, then finish by pulling the frosting in from the edges toward the center to get a neat top edge. A 1M tip is perfect for simple shell borders and pretty swirls.
⭐ For crumb garnish, let the cake dry slightly. If you want those classic red velvet crumbs on the sides and top, crumble a bit of cake and let it air-dry briefly so it’s less sticky. Press the crumbs on with a cupped hand while the frosting is still fresh, then lightly press them in so they adhere.
🔬 The Baking Science Behind This Red Velvet Cake
Red velvet is all about balance — not too chocolatey, not just “red vanilla.”
-
Cocoa + acid + color. A small amount of cocoa powder gives a gentle chocolate flavor without turning this into a chocolate cake. The buttermilk and vinegar bring acidity, which not only helps the cake rise (thanks to baking soda) but also brightens the red color from the food coloring or emulsion.
-
Butter + oil = best of both worlds. Blooming the cocoa in melted butter wakes up the cocoa and espresso flavors. Using oil in the main batter keeps the cake moist and soft, even after refrigeration, where butter-heavy cakes can feel a bit firm.
-
Buttermilk + vinegar + baking soda. This trio creates a gentle chemical reaction that lightens the crumb and gives you that characteristic, slightly tangy red velvet flavor.
-
Why any cocoa works. Because the cocoa is bloomed in fat (butter), not water, you can use either natural or Dutch-processed cocoa here without worrying about it resisting hydration. If you were blooming the cocoa in water, you’d want Dutch-processed to avoid the “muddy” texture natural cocoa can get with straight water.

Storing + Freezing + Make-Ahead Tips
Storing
Once frosted, cover the cake loosely with plastic wrap or a cake dome and store it in the refrigerator for up to 4 days. For the best texture, let slices sit at room temperature for about 20–30 minutes before serving so the crumb and frosting can soften a bit.
Freezing
-
To freeze layers: Cool completely in the pans, then remove, keeping the parchment on the bottom. Wrap each layer in a double layer of plastic wrap, then freeze flat for up to 2 months. Thaw in the fridge (still wrapped) before assembling, or decorate while the layers are still cold for easier handling.
-
To freeze leftover slices: Wrap each slice in plastic wrap, then place in a freezer bag or airtight container. Freeze up to 2 months and thaw overnight in the fridge.
Make-Ahead
-
1–2 days ahead: Bake the layers, cool completely, wrap, and refrigerate or freeze. Make the frosting the day you plan to assemble and decorate.
-
Same day: Bake in the morning, cool completely in the pans, then assemble and decorate once cool. The crumb coat + short chill in the freezer makes the final frosting layer go faster and cleaner.
Food Safety
- If you’d like more info on food safety, check out this link.
What to Serve With Red Velvet Cake
Fresh + Crisp Sides
For a special occasion where this red velvet is the star dessert, I love to balance the table with something light and fresh. Try my Arugula Salad, Strawberry Spinach Salad, or Harvest Salad alongside a simple main — they add color and brightness without competing with dessert.
Comforting Mains
Red velvet cake feels right at home after a cozy, comfort-food dinner. Serve it after Chicken Tetrazzini, Million Dollar Chicken, Crockpot Pork Tenderloin, or Grilled Flank Steak for a classic “Sunday supper” style menu that will make everyone at the table very happy.
Sweet Finishes (for a Dessert Buffet)
If you’re building a dessert buffet, this cake pairs beautifully with other Southern classics like Pecan Pie Bars, Chocolate Chunk Cookies, Fudge Pie, or Berry Chantilly Cake. The mix of chocolate, fruit, and creamy textures makes every plate feel like a little tasting flight.

✦ Red Velvet Cake FAQs
✦ Can I bake this in three 9-inch pans?
Yes! This recipe is written to work in three 9-inch pans as well as three 8-inch or two 9-inch pans. The 9-inch layers will be a bit thinner and may bake slightly faster, so start checking for doneness on the early side of the time range. Using gram weights (about 450g per pan for 3 layers) keeps everything even.
✦ Can I use Dutch-processed cocoa?
You can use either natural or Dutch-processed cocoa here because the cocoa is bloomed in melted butter, not in water. Blooming in fat means you don’t have to worry about natural cocoa resisting hydration — just choose whichever you prefer or have on hand.
✦ What’s the difference between red food coloring and red velvet emulsion?
Liquid red food coloring gives a brighter red color and a clean finish. LorAnn Red Velvet Emulsion bakes up a little darker with a slightly more chocolate-forward first bite. I have used and tested both: the emulsion has a deeper flavor, but the aftertaste of the classic red coloring is a bit cleaner. Both work beautifully, so it’s really about what’s easy to find and what flavor profile you prefer.
✦ Do I have to rotate the pans while baking?
If your oven bakes fairly evenly, it’s less critical to rotate the pans — and in many cases, I don’t, because opening the door drops the oven temperature and jostling the pans can cause delicate cakes to fall. If you know your oven has strong hot spots, you can gently rotate the pans front-to-back once, about halfway through the baking time, and then close the door quickly.
✦ How will I know when the cake is done?
First, look: the centers should lose their shiny, wet look. Then gently tap the center with a fingertip — it should spring back. Finally, insert a toothpick; you’re looking for a few moist crumbs, not wet batter and not a completely dry stick. If it still feels liquid under the surface, close the oven door right away and continue baking.
✦ Can I make this ahead for a party?
Absolutely. Bake and cool the layers, wrap them well, and freeze. On the day you’re serving, make the frosting, assemble the cake while the layers are still cold (or just barely thawed), crumb coat, chill, then finish frosting and decorate. The cold layers are actually easier to stack and frost neatly.
Still have questions? Drop them in the comments — I love helping you cook with confidence! 💗
More Red Velvet Favorites
- Red Velvet White Chocolate Chip Cookies: Thick, chewy red velvet cookies studded with sweet white chocolate chips for the ultimate handheld red velvet treat that everyone reaches for first.
- Red Velvet Cake Balls: All the flavors of classic red velvet cake rolled into bite-sized treats, dipped in chocolate, and perfect for parties, gift boxes, or snacking straight from the fridge.
- Red Velvet Cupcakes: Soft, tender little red velvet cakes topped with swirls of tangy cream cheese frosting — ideal for birthdays, holidays, or anytime you want that bakery look with minimal fuss.
- Red Velvet Brownies: Fudgy, red-tinted brownies with a rich cocoa bite and a luscious cream cheese swirl — a fun, decadent twist when you’re craving something a little more indulgent than cake.
- Red Velvet Bundt Cake: A gorgeously sculpted bundt with a moist red velvet crumb and creamy glaze, easy to slice and stunning on the table with almost zero decorating stress.
- Red Velvet Crinkle Cookies: Crackly, powdered-sugar-coated cookies that bake up soft and chewy inside with that signature red velvet flavor — perfect for cookie trays and Christmas tins.
Tried This Recipe?
💌 While you’re here, don’t miss the next cozy recipe — subscribe to my totally FREE newsletter so you’ll always have comfort food favorites at your fingertips. 💌
If you enjoyed this recipe, please take a moment to leave ⭐️⭐️⭐️⭐️⭐️ star rating and a quick comment — I love hearing from you and it helps our community of bakers and cooks!
📸 And if you Gram… don’t forget to share your photo on Instagram — tag me @gonnawantseconds so I can cheer you on and share your creations!
Thanks for stopping by my kitchen today — happy cooking, friends! 💗 Kathleen
Red Velvet Cake
Ingredients
Dry Ingredients
- 2 1/2 cups all-purpose flour
- 1 1/2 cups granulated sugar
- 1 teaspoon baking soda
- 1 teaspoon fine salt
- 3 tablespoons unsweetened cocoa powder, (bloomed — not added to the dry bowl)
- 1/2 teaspoon espresso powder, (bloomed — not added to the dry bowl)
- 1 tablespoon hot water
Wet Ingredients
- 1 1/4 cups vegetable oil
- 1/4 cup unsalted butter melted and cooled
- 1 cup buttermilk well shaken + at room temperature
- 2 large eggs at room temperature
- 1 tablespoon seedless raspberry or strawberry jam
- 2 tablespoons (1 ounce) red food coloring
- 2 teaspoons apple cider vinegar
- 1 tablespoon vanilla extract
Frosting
- 2 (8-ounce) boxes cream cheese, softened
- 1 cup unsalted butter, softened
- 4 cups sifted confectionsers' sugar
- 1 teaspoon vanilla extract
Garnish
- pecans
Instructions
- Oven: Preheat the oven to 350°F (177ºC). Place a rack in the center of the oven.
- Mix the dry ingredients: In a large bowl, whisk together the flour (2 1/2 cups), sugar (1 1/2 cups), baking soda (1 teaspoon), and salt (1 teaspoon) until well combined. (The cocoa powder and espresso powder are bloomed separately in the next step).
- Bloom the cocoa: Stir the cocoa powder (3 tablespoons) and espresso powder (1/2 teaspoon) with 1 tablespoon hot water and mix until smooth and paste-like. Set aside.(You will add this below to the wet ingredients before adding the dry).
- Combine the wet ingredients: In a separate large bowl, whisk together the oil (1 1/4 cups), melted butter (1/4 cup), buttermilk (1 cup), eggs (2), jam (1 tablespoon), red food coloring (2 tablespoons), apple cider vinegar (2 teaspoons), and vanilla (1 tablespoon) until completely smooth.
- Add the bloomed cocoa paste. Whisk the cocoa-espresso paste into the wet mixture until fully incorporated.
- Combine dry and wet ingredients: Add the dry mixture to the wet mixture. Mix on low speed (or whisk gently by hand) just until the batter is smooth. Do not overmix.
- Prep the cake pans (right before filling): Coat the sides and bottom of three 9-inch round cake pans with a flour-based baking spray (such as Baker’s Joy).Line each pan with a parchment round, pressing it flat. Lightly spray the parchment as well to ensure the layers release cleanly.
- Pan Management (Critical for 3 Even Layers)Bake on the CENTER rack only. Red velvet browns fast; top-third baking causes doming and dark edges.Do NOT crowd the pans. Keep 2 inches of space between pans and oven walls for proper airflow.Rotate pans only once.Turn front-to-back halfway through baking (around 10–12 minutes) IF your oven has hot spots.If using dark nonstick pans: Reduce oven temp to 335°F to prevent over-browning.
- Evenly divide the batter among the three prepared cake pans. Bake for 18–22 minutes, or until the centers spring back lightly when touched and a toothpick comes out with a few moist crumbs (not fully clean).Do not overbake — red velvet dries quickly!
- Cool the cake layers: Run a thin knife around the edges to loosen. Invert each cake onto a plate, then flip again onto a cooling rack so the rounded tops face up. Cool completely before frosting.
- Make Frosting: In a medium mixing bowl, using an electric mixer beat together cream cheese (2 boxes) and butter (1 cup) until smooth. Gradually add powdered sugar (4 cups), beating on low speed, until combined. Add vanilla (1 teaspoons) and stir to combine.
- Assemble the cake: Place the first layer upside-down on a cake stand. Spread a generous, even layer of cream cheese frosting on top. Repeat with the second layer.Place the third layer on top and frost the entire cake.


Notes
- Center-rack baking is key. Red velvet cakes brown quickly. Baking on the center rack (not the upper third) helps prevent domed tops and overly dark edges. If your oven has bad hot spots, you can gently rotate the pans front-to-back once halfway through baking, but avoid opening the door repeatedly — big temperature drops can cause cakes to fall.
- Don’t overbake — follow the visual cues. Start by looking through the oven door: when the shine has disappeared from the very center, gently tap the center with a fingertip. If it springs back, do the toothpick test. You’re looking for a few moist crumbs, not a totally clean stick. If it feels liquid under the surface, close the oven door quickly and give it more time.
- Let the cakes cool in the pan. Because red velvet tends to dry out, leaving the layers in their pans until they’re completely cool helps lock in moisture. The combo of non-stick spray + parchment rounds makes them release cleanly later, even with basic generic spray — no fancy can required.
- Make-ahead layers work beautifully. Once the cakes are fully cool, remove them from the pans with the parchment, wrap each layer in a double layer of plastic wrap, and freeze flat (stacking no more than three high). Decorating is actually easier with cold or slightly frozen layers because they’re less fragile and shed fewer crumbs.
- Scale up frosting for big decorations. For a simple smooth-sided cake, a single batch of frosting is enough. If you want piped borders and big swirls on top, plan on 1½ batches of frosting. After you’ve frosted the cake, you can beat in an extra ½ cup or so of confectioners’ sugar to the remaining frosting to make it a bit firmer for piping.
- Crumb coat like a pro. A crumb coat is really just a sacrificial layer — it will be full of crumbs and scraped quite thin. Don’t pile it on; use a small amount of frosting, spread it thinly over the sides and top, then scrape most of it off. Chill to set, then add your final smoother layer for that crisp, clean look.
- Tools make the finish easier. Use a flat icing spatula or bench scraper for the sides and an offset spatula for the top. Frost the sides first using a generous scoop of frosting from the top, then finish by pulling the frosting in from the edges toward the center to get a neat top edge. A 1M tip is perfect for simple shell borders and pretty swirls.
- For crumb garnish, let the cake dry slightly. If you want those classic red velvet crumbs on the sides and top, crumble a bit of cake and let it air-dry briefly so it’s less sticky. Press the crumbs on with a cupped hand while the frosting is still fresh, then lightly press them in so they adhere.
Nutrition

I loved baking this cake. I’m a fan! It baked up perfectly flat on my first try! The crumb was perfect! And the flavor combined with the frosting came together in the ratio I truly love—cake with just the right amount of frosting! I tried the cake crumb decorations and appreciated the advice to let them dry out a little first! I will definitely put this cake on my “bake it again” list!! Delicious!!!
Hey Kim! So happy this was a hit for you. I really appreciate your thoughtful comment. It helps our community of bakers so much! Thanks also for the 5 stars! 🙂