
This post may contain affiliate links. Please read our disclosure policy.
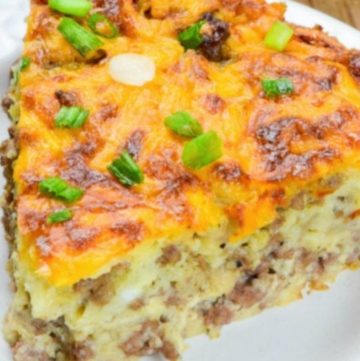
Impossible Cheeseburger Pie is one of those classic family dinners that never goes out of style. This easy Bisquick cheeseburger pie combines seasoned ground beef, onion, sharp cheddar cheese, and a simple Bisquick batter that magically bakes into its own crust. It’s hearty, comforting, budget-friendly, and perfect for busy weeknights when you need dinner on the table fast.
This vintage cheeseburger pie recipe dates back to the 1970s and has been a family favorite for generations. My grandma gave me the recipe when I first got married, and it’s been in regular dinner rotation ever since. The savory beef filling, fluffy Bisquick topping, and golden cheese create a simple meal that both kids and adults love.
Making Impossible Cheeseburger Pie couldn’t be easier. Brown the beef with onion and seasonings, spread it in a pie plate, then pour the Bisquick batter over the top. As it bakes, the batter forms its signature crust-like layers around the filling. Finish with cheddar cheese and bake until golden, bubbly, and irresistible.
If you love Bisquick impossible pies as much as I do, try my Bisquick Impossible Taco Pie for a fun Taco Tuesday twist, Bisquick Chicken Pot Pie for another comforting family dinner, or Bisquick Zucchini Pie for a delicious way to use summer zucchini.
If you love easy Bisquick recipes like this, be sure to browse my full collection of Bisquick Recipes for even more simple breakfast, dinner, and dessert favorites.

What Is an Impossible Pie?
An Impossible Pie is a classic Bisquick recipe that creates its own crust while it bakes. Instead of making a separate pie crust, you simply pour a thin Bisquick batter over the filling. As the pie bakes, the batter settles into layers, creating a soft crust-like base and a tender filling all in one dish.
Despite the name, there’s nothing magical happening in the oven. The batter doesn’t turn into a flaky pastry crust like a traditional pie. Instead, it forms a light, sturdy layer that holds everything together and gives the pie its signature texture.
Impossible Cheeseburger Pie became popular in the 1970s thanks to Bisquick and remains a family favorite today. It’s easy to make, budget-friendly, and a delicious way to turn simple ingredients like ground beef, cheese, and onions into a comforting weeknight dinner.
✨ Before You Begin
✨ Use a deep 9-inch pie plate. The filling and Bisquick batter need room to bake up without spilling over the edges.
✨ Don’t worry about the thin batter. The Bisquick mixture will seem very thin when you pour it over the beef. That’s exactly how it’s supposed to look.
✨ Drain excess grease. After browning the beef, remove any excess fat so the finished pie isn’t greasy.
✨ Grate your own cheese if possible. Freshly grated cheddar melts more smoothly than pre-shredded cheese and gives the pie the best texture.
✨ Let it rest before slicing. Allow the pie to cool for about 10 minutes after baking so the filling can set up properly.
Impossible Cheeseburger Pie Recipe Ingredients
Ground Beef: I use 80/20 ground beef because the extra fat adds flavor and helps keep the filling moist and juicy. Ground turkey or ground chicken can be substituted, though the flavor will be a bit lighter.
Onion: A yellow onion adds classic burger flavor, but a white onion works just as well.
Garlic: Fresh garlic gives the best flavor. I don’t recommend jarred garlic here since it can taste harsh and overpower the simple ingredients.
Worcestershire Sauce: This secret ingredient adds savory, beefy flavor and helps make the filling taste more like a great cheeseburger.
Morton Kosher Salt + Black Pepper: Simple seasonings are all you need to enhance the beef and balance the richness of the cheese.
Bisquick: The classic baking mix creates the signature “impossible pie” effect by forming its own crust-like layers as it bakes. Original Bisquick works best, though gluten-free versions can also be used.
Whole Milk: Adds richness and helps create the tender Bisquick batter.
Eggs: Large eggs provide structure and help the batter set as the pie bakes.
Cheddar Cheese: I prefer extra-sharp cheddar for the best flavor, but mild cheddar, sharp cheddar, Colby Jack, or Pepper Jack are all delicious options.

🥣 How to Make Impossible Cheeseburger Pie
Brown the beef. In a large skillet, cook the ground beef, onion, garlic, Worcestershire sauce, Morton kosher salt, and black pepper over medium heat until the beef is no longer pink and the onions are tender. Drain any excess grease, then transfer the mixture to a greased 9-inch pie plate.
Mix the batter. In a small bowl, whisk together the Bisquick, milk, and eggs until smooth. Don’t worry if the batter seems thin — that’s exactly what creates the signature impossible pie layers as it bakes.
Assemble the pie. Pour the Bisquick batter evenly over the beef mixture, then sprinkle the shredded cheddar cheese over the top.
Bake until golden. Bake in a preheated 400°F oven for 30–40 minutes, or until the center is set, the cheese is golden brown, and a knife inserted near the center comes out clean.
Rest and serve. Let the pie cool for about 10 minutes before slicing. This gives the filling time to set and makes serving much easier.
⭐ Pro Tips
⭐ Bake uncovered. This allows the pie to bake evenly and gives the cheesy top a beautiful golden finish.
⭐ Drain the beef well. Removing excess grease after browning the beef prevents the pie from becoming oily and helps the Bisquick batter set properly.
⭐ Customize the cheeseburger flavor. For a bacon cheeseburger pie, stir in 6 slices of cooked, crumbled bacon before adding the batter. Ketchup, mustard, and dill pickle relish can also be added, though I prefer serving them on the side so everyone can customize their slice.
⭐ Don’t overbake. The center should be set, the cheese golden, and a knife inserted near the center should come out clean. Overbaking can make the pie dry.
⭐ Rest before serving. Let the pie sit for about 10 minutes after baking. This allows the filling to firm up slightly and makes cleaner slices.
How to Make Impossible Cheeseburger Pie Without Bisquick
Don’t have Bisquick on hand? You can make a simple homemade substitute with pantry staples.
Whisk together:
- ½ cup all-purpose flour
- 1 teaspoon baking powder
- ½ teaspoon Morton kosher salt
Using a pastry blender or two butter knives, cut in:
- 2 tablespoons cold butter
The mixture should resemble coarse crumbs. Use it in place of the ½ cup Bisquick called for in the recipe, then continue with the recipe as directed.
Keep in mind that homemade Bisquick substitutes may produce a slightly different texture than the original baking mix, but the pie will still be delicious.

Storing + Freezing + Make-Ahead
Storing: Allow the pie to cool completely, then cover tightly or transfer leftovers to an airtight container. Store in the refrigerator for up to 4 days.
Freezing: Impossible Cheeseburger Pie freezes beautifully. You can freeze it either before or after baking.
To freeze unbaked, assemble the pie without the cheese topping, wrap tightly, and freeze for up to 3 months. Thaw overnight in the refrigerator, add the cheese, and bake as directed.
To freeze baked, cool completely, wrap tightly, and freeze for up to 3 months. Thaw overnight in the refrigerator and reheat in a 350°F oven until warmed through.
Make Ahead: Assemble the pie up to 24 hours in advance, cover, and refrigerate. When ready to bake, remove it from the refrigerator while the oven preheats, then bake as directed.
What to Serve With Impossible Cheeseburger Pie
Fresh + Crisp Sides
Copycat KFC coleslaw
Carrot Salad
Strawberry Spinach Salad
Vegetable Sides
Southern Green Beans
Broccoli Cauliflower Casserole
Comforting Sides
Creamed Corn
Macaroni Salad
Deviled Egg Potato Salad
Sweet Finishes
Peach Cobbler
Million Dollar Pie
How To Make Impossible Cheeseburger Pie Without Bisquick
Follow the recipe as directed but instead of adding the called for 1/2 cup Bisquick, prepare and substitute the following mixture:
Homemade Bisquick
- Whisk together the following:
- 1/2 cup all-purpose flour
- 1 teaspoon baking powder
- 1/2 teaspoon salt
- With two butterknives or a pastry blender, cut in:
- 2 tablespoons butter
- Continue with crust recipe as directed.
Different Sizes for Impossible Cheeseburger Pie
For a Crowd
Need to feed a larger group? Simply double the recipe and bake it in a greased 9×13-inch baking dish. The baking time may increase slightly, so begin checking for doneness around 40 minutes. The center should be set and a knife inserted near the middle should come out clean.
Individual Cheeseburger Pies
For fun individual servings, bake the pie in a greased muffin tin. Add about 1 tablespoon of Bisquick batter to each muffin cup, followed by ¼ cup of the beef mixture, then top with another tablespoon of batter.
Bake for about 25–30 minutes, or until golden and set. Allow the mini pies to cool for 5 minutes in the pan before removing, then cool for another 10 minutes before serving.
More Easy Bisquick Recipes
Bisquick Sausage Balls – The classic party appetizer loaded with sausage, cheddar cheese, and Bisquick.
Bisquick Breakfast Casserole – A hearty make-ahead breakfast packed with eggs, sausage, cheese, and Bisquick.
Bisquick Taco Bake – A family-friendly weeknight dinner with seasoned beef, cheese, and Tex-Mex flavor.
Bisquick Chicken and Dumplings – Comfort food at its finest with tender chicken and fluffy homemade dumplings.
Bisquick Quiche – An easy crustless-style quiche that’s perfect for breakfast, brunch, or a light dinner.
💗 Tried This Recipe?
I’d love to hear how your Impossible Cheeseburger Pie turned out!
Leave a comment and star rating below to let me know what you think. Did you keep it classic, add bacon, or load it up with your favorite cheeseburger toppings? I love seeing the creative ways you make these recipes your own.
Be sure to follow me on Instagram at @gonna_want_seconds and tag me in your photos so I can see your delicious creations.
And if you haven’t already, subscribe to my free newsletter for new recipes, comfort-food favorites, and easy family dinners delivered straight to your inbox.
Thanks so much for stopping by my kitchen. Happy cooking! Kathleen
Impossible Cheeseburger Pie
Ingredients
- 1 pound ground beef 80/20
- 1 large onion chopped
- 2 cloves garlic minced
- 1 tablespoon Worcestershire sauce
- 1 teaspoon salt
- 1/2 teaspoon black pepper
Bisquick Batter:
- 1/2 cup Bisquick
- 1 cup whole milk
- 2 large eggs
Topping:
- 1 cup extra-sharp cheddar cheese grated
Instructions
- Preheat the oven to 400°F (204ºC). Spray a 9-inch pie plate with nonstick cooking spray.
- In a large skillet, cook the ground beef (1 pound), onion (1), garlic (2 cloves), Worcestershire sauce (1 tablespoon), 1 teaspoon salt, and pepper (1/2 teaspoon) over medium heat, until beef is brown and there is no longer any pink, about 10 minutes. Remove excess fat. Pour cooked beef into the prepared pie plate.
- In a small mixing bowl, whisk together crust ingredients. Pour it over to the beef mixture. Sprinkle evenly with cheese (1 cup). Bake in the preheated oven until the top is golden, about 30-40 minutes. Remove from oven and allow to rest for 10 minutes before serving.
Fans Also Made:


Notes
- Bake: I always bake mine uncovered. It allows the air to circulate so the pie bakes up nice and even with a perfectly golden cheesy crust.
- Feed a crowd: If you want to stretch out the meal a bit, you can double the impossible concoction and fill up a 9” x 13” pan instead.
- You can also make cute little individual pies by baking this in muffin tins!
- Mix all the ingredients, then fill a lightly greased pan with a scant tablespoon of the Bisquick batter, ¼ c. of the beef filling, then another tablespoon of the batter.
- They’ll need to bake for about 30 minutes, cool for 5, then be taken out to cool for another 10 minutes to avoid any impatient mouth burning.
- You can also make cute little individual pies by baking this in muffin tins!
- Fillings + Toppings – Make this a bacon cheeseburger pie by adding about 6 slices of cooked and crumbled bacon to the beef before adding the Bisquick batter. Some impossible cheeseburger pie recipes add ketchup, mustard, or even dill pickle relish to the filling to emulate an actual cheeseburger.
- I like to save those things for garnish since no two guests are exactly alike when it comes to hamburger fixin’s.
- How To Check Doneness - The center will be set, the top golden, and a knife inserted into the center will come out clean.
Nutrition

Sounds quick and yummy. Has anyone added zuchinni to this recipe? I have lots from my garden.
Hi Judy, I haven’t added zucchini to this recipe but I make a Bisquick Zucchini PieBisquick Zucchini Pie you may enjoy.
I haven’t tried this yet but sounds good! With all the warnings about ingredients – genetically modified grains, seed oils, LA, etc. might you have a substitute for the Bisquick?
Hey, Pam. Here’s the DIY version of Bisquick. This recipe calls for 1/2 cup Bisquick. Here’s the measurement:
1/2 cup flour
0.75 teaspoon baking powder
1/8 teaspoon salt
0.5 tablespoon butter
Absolutely delicious! Was able to double it for a larger crowd. Put all the fixings you’d use for a cheeseburger on table and also served a green salad and had a bowl of chips for the kids.yummy
That’s a great idea! Thanks for sharing, Jeanie 🙂
This is absolutely fantastic. Quick and easy and so, so good. Thanks for a great recipe!
Thank you, Betty!! 🙂